If you are serious about building and maintaining a website, a key part of the process would be to choose a way to track the audience of your website. Who are they? Where do they come from? How much time do they devote to your content? When are people visiting your site and what exactly are they doing there? Do they interact with your content?
Are you interested to find the answers to those questions?
We are not implying that Google Analytics is the only way to receive the needed stats. But it’s the most common and there should be a reason for that. Now we’ll answer the question that brought you here.
Namely – How to add Google Analytics to WordPress.
Step 1: Get the Google Analytics Track ID code
We know that feeling. You are just trying to build a website. With WordPress! What does it mean code?! You are not familiar with any Programming Language. Also, we claimed that building a website with WordPress will not demand any development skills. Don’t feel betrayed. Just follow the steps. It will be alright, we promise!
In order to receive the code from Google Analytics, you should have an account on the Google Network. You can create it on every one of their websites.
Just don’t do it on YouTube. After a few hours, you could be still there. Learning how to make better conversation with your pet.
If you already have an account just go to the Google Analytics Signup Page.
Click the Sign Up Button.
 A registration form will appear. Fill in the information needed.
Once, you are ready, just click the Get Tracking ID button at the bottom of the page. You will be forwarded to a page that contains the Track ID code. The page should look something like this:
Step 2: Install the Chosen Google Analytics Integrating Plugin
As we promised no developing skills will be needed for that operation. The easiest way to integrate the Track ID code is by using a plugin. If you have never installed a plugin – here is how to add a plugin to WordPress.
It doesn’t matter what you are trying to achieve, in WordPress, you have a vast selection of plugins to choose from. We’ll show you how to use one of them. Of course, you can use the one you find most convenient.
Step 3: Add the Google Analytics Code in WordPress
Again, we presume that you are already familiar with WordPress plugins, what they do, and how to install them. We’ve chosen to show you how to do this operation by using a plugin named Analytics.

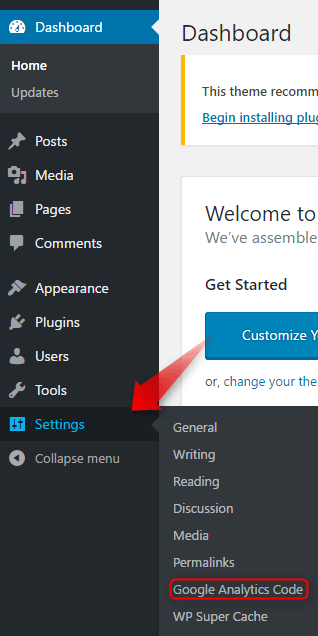
Install and activate the plugin. Afterward, you will find it in Settings->Google Analytics Code.

With this plugin you can either add the Tracking ID – it should look like this UA-12345678-1. This option is the first that the plugin will suggest. This ID you can find almost on every page of the Google Analytics Dashboard. Copy and paste it in the bar of the plugin. Click Save. You are ready!
Or, if you prefer, you can click on Manually paste Google Analytics Code, and copy the code, instead of the ID. Again, the code you should paste here is the one you received when you first entered the Analytics program.
This is what the code you are looking for should looks like. If you haven’t left the first page that Analytics presented to you, you will find the code there. Mark. Copy. Paste. Done!
Otherwise, you will find the code in the sidebar menu of Google Analytics by following the steps Admin->Tracking info->Tracking Code.
Once you have the code copied. Go back to the plugin and click Manually past Google Analytics code.

The following bar will appear.
Paste the code.
Click Save in the bottom right corner.
Congratulations! After just a few hours you will have access to invaluable information.


