What is WHOIS Information and How to Update it?

Home » Knowledge Base » Control Panel » Domain Manager » What is WHOIS Information and How to Update it?

Every domain that exists out there has one thing in common – Whois Information. In this article, we will explain how to update the Whois for your domain through the AwardSpace control panel and what it is.


What is Whois Information?

The WHOIS contains records of information for a domain. The records contain information such as when the domain is registered or expires. It also includes the contact information for the owner of the domain. You can find four types of contact information inside the WHOIS – Registrant, Admin, Billing, and Technical. The contact information contains the name of the person/organization who registered the domain, the address, email, and phone number. The owner of the domain is called Registrant and the organization from where the domain is registered is called Registrar.


Where can you Check the Whois?

The Whois for each domain can be checked from any Whois lookup website. An example of this would be ICANN’s Domain Data Lookup. When you enter the registered domain you will be presented with the Domain Information (creation and expiration dates, name servers, registry, and domain status) as well as the Contact Information for the domain.


How to Update the Whois?

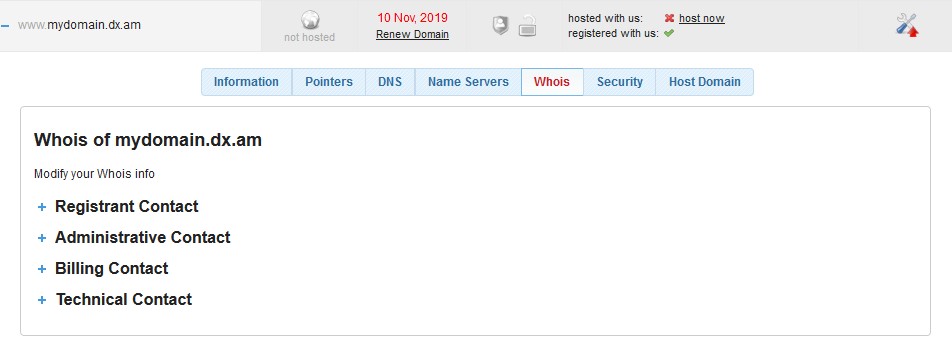
When you register a domain with AwardSpace, your account information is used for your whois information. This is why you should use valid information for your account. If you need to update your domain information you can do that by following the steps below:
whois-control-panel
  1. Log in to the Hosting Control Panel
  2. Access the Domain Manager
  3. Click on your domain
  4. Open the Whois tab
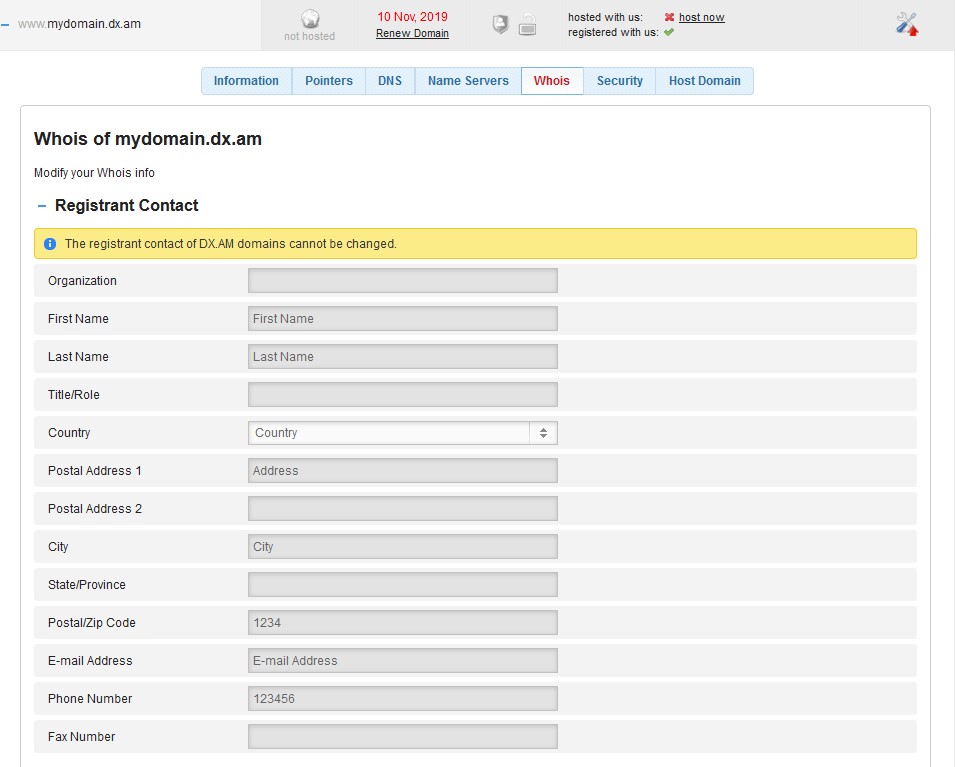
  5. Select the Registrant Contact and enter your information
whois-information-update

As mentioned previously, the WHOIS also has Admin, Billing, and Technical contact information. While we reserve the Technical contact information for us, you can still update the Billing and the Admin information.

Once the Whois information is updated you should receive an email to verify the change.


What is Taking so Long?

After you have made the changes from the hosting control panel, the public whois records will be updated accordingly. Usually, it takes anywhere from 24-48 hours for the Whois to reflect the updates.

Was this post helpful?

i

Relevant tags:

Connect

Latest posts:

How to Install a MediaWiki Skin

In MediaWiki, skins determine the visual appearance of your wiki website. Skins define how content is presented to users and include such settings for the overall website layout, typography, color scheme, and more. By default, when you install MediaWiki, the platform...

How to Create a Page in MediaWiki

Creating pages in MediaWiki is а core feature that allows you to add content to your MediaWiki website. Whether you are adding details for a project, contributing to a knowledge base, or anything else, learning how to create a page in MediaWiki is crucial for your...

How to Install MediaWiki Extensions

Now that you have installed MediaWiki and learned how to log in to the CMS, it is time to extend MediaWiki's functionality via extensions. MediaWiki extensions are sets of files that add various types of functionality to your MediaWiki website. You can use extensions...

How to Log In to MediaWiki

After you install MediaWiki, it is time to log in to the platform, so you can start working on your new MediaWiki website. To log in, you must open the MediaWiki login page and enter your credentials. Doing so will open the platform’s admin panel. In the following...

How to Install MediaWiki

You can quickly install MediaWiki on any of the AwardSpace web hosting plans. This includes our free web hosting, shared hosting, as well as advanced services such as semi-dedicated hosting and VPS hosting. You can install MediaWiki in a matter of minutes, whichever...


Create a website for free!


Free forever

Our Support Team is Here to Help


If you need any questions answered, don't hesitate and contact us. Click the button below and follow the instructions. You can expect an answer within an hour.


Contact AwardSpace


iNewest knowledge base articles

How to Install a MediaWiki Skin

In MediaWiki, skins determine the visual appearance of your wiki website. Skins define how content is presented to users and include such settings for the overall website layout, typography, color scheme, and more. By default, when you install MediaWiki, the platform...

How to Create a Page in MediaWiki

Creating pages in MediaWiki is а core feature that allows you to add content to your MediaWiki website. Whether you are adding details for a project, contributing to a knowledge base, or anything else, learning how to create a page in MediaWiki is crucial for your...

How to Install MediaWiki Extensions

Now that you have installed MediaWiki and learned how to log in to the CMS, it is time to extend MediaWiki's functionality via extensions. MediaWiki extensions are sets of files that add various types of functionality to your MediaWiki website. You can use extensions...

How to Log In to MediaWiki

After you install MediaWiki, it is time to log in to the platform, so you can start working on your new MediaWiki website. To log in, you must open the MediaWiki login page and enter your credentials. Doing so will open the platform’s admin panel. In the following...

How to Install MediaWiki

You can quickly install MediaWiki on any of the AwardSpace web hosting plans. This includes our free web hosting, shared hosting, as well as advanced services such as semi-dedicated hosting and VPS hosting. You can install MediaWiki in a matter of minutes, whichever...

How to Install an Elgg Theme

After you have installed Elgg core and logged in to the admin dashboard, you can search for themes that can help you customize your new website. Elgg themes are a set of files that help you customize the appearance of your website. Via themes, you can modify website...

Even more web tutorials

Check out our web hosting knowledge base and the WordPress tutorials to learn more, and be better prepared for your website creation and maintenance journey.