Spam Settings

In this online article, we’re going to review the Spam Settings section and its features.


How Do I Access the Spam Settings Manager?

To access and manage your e-mail account’s spam settings, please follow these steps:

  1. Sign in to your AwardSpace website hosting account.
  2. Open the Email Accounts page.
  3. Select the E-mail Accounts tab.
  4. Click on your email address.
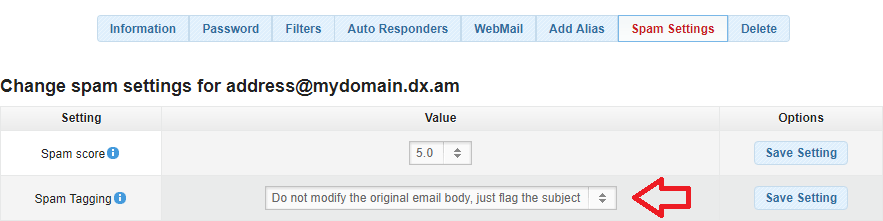
  5. Open the Spam Settings tab.

spam settings 1

What is the Spam Score?

The score is established based on a number of filtering tests performed on each incoming message by the SpamAssassin software. The higher the Spam Score is on a message, the higher the probability that the message is spam.


How Can I Enable Spam Tagging and Recognize Incoming Messages as Spam?

To enable spam tagging on an e-mail account, open the Spam Settings menu and select a Spam Score value from the drop-down list. Keep in mind that if you set a smaller Spam Score value, our anti-spam filtering system may consider regular non-spam messages as spam.

spam settings 2

The Spam Tagging option allows you to control and filter incoming messages with a score higher than the default value. You can assign any of the following actions to an incoming spam message:

  • Do not modify the original email body, just flag the subject.
  • Generate a report and set the original email body as an attachment.

spam settings 3

How to Whitelist an Email Address or Domain?

You can allow messages from specific email addresses and domain names to come into your AwardSpace.com mailbox by performing the following three actions:

    1. Click the Add Value button next to the Whitelist From setting.

spam settings 4

    1. In the E-mail or hostname field, enter the address of the e-mail account/domain name that you wish to allow.

spam settings 5

  1. Click the Add button.

Congratulations! Your spam filter has been set up and is ready to use.


How to Block (Ban) an Email Address or Domain?

If you do not wish to receive an email from a specific email address or domain, you may use the Blacklist From feature to block incoming messages. To add an email address or domain name to a block list:

    1. Click Add Value, next to the Blacklist From setting.

spam settings 6

    1. In the E-mail or hostname field, type the address of the e-mail account/domain that you do not wish to receive further messages from.

spam settings 7

  1. Click the Add button.

Congratulations! Your spam filter has been configured successfully and is ready to use.

Was this post helpful?

i

Relevant tags:

Connect

Latest posts:

How to Remove a Product in OpenCart

After installing OpenCart and logging in to the dashboard, you can start adding and removing products immediately. We have already covered how to add products in OpenCart, and in this article, we share simple steps to delete products from your store with only a few...

How to Add Products in OpenCart

The most important element in your OpenCart project is the products you will offer your site visitors. In the following paragraphs, we share how to add products to your OpenCart website.   How to Create Products in Opencart The process of adding new products in...

How to Log in to OpenCart

After you install OpenCart, you can log in to the platform and start working on your project right away. To log in, you should open the OpenCart login page and enter the credentials you chose when installing the CMS. This will open the platform’s admin panel. In the...

How to Install OpenCart

You can install OpenCart on every AwardSpace web hosting plan, including our free web hosting, shared hosting, and advanced AwardSpace services such as Semi-Dedicated Hosting and VPS hosting. Keep in mind that all of the AwardSpace hosting services are tailored to run...

How to Change My Last Name in Moodle

If you are asking yourself "How to change my last name in Moodle", then you are at the right place. This guide will walk you through the steps for changing your last name in Moodle while addressing common concerns like ratings and discussions.   How to Change My...


Create a website for free!


Free forever

Our Support Team is Here to Help


If you need any questions answered, don't hesitate and contact us. Click the button below and follow the instructions. You can expect an answer within an hour.


Contact AwardSpace


iNewest knowledge base articles

How to Remove a Product in OpenCart

After installing OpenCart and logging in to the dashboard, you can start adding and removing products immediately. We have already covered how to add products in OpenCart, and in this article, we share simple steps to delete products from your store with only a few...

How to Add Products in OpenCart

The most important element in your OpenCart project is the products you will offer your site visitors. In the following paragraphs, we share how to add products to your OpenCart website.   How to Create Products in Opencart The process of adding new products in...

How to Log in to OpenCart

After you install OpenCart, you can log in to the platform and start working on your project right away. To log in, you should open the OpenCart login page and enter the credentials you chose when installing the CMS. This will open the platform’s admin panel. In the...

How to Install OpenCart

You can install OpenCart on every AwardSpace web hosting plan, including our free web hosting, shared hosting, and advanced AwardSpace services such as Semi-Dedicated Hosting and VPS hosting. Keep in mind that all of the AwardSpace hosting services are tailored to run...

How to Change My Last Name in Moodle

If you are asking yourself "How to change my last name in Moodle", then you are at the right place. This guide will walk you through the steps for changing your last name in Moodle while addressing common concerns like ratings and discussions.   How to Change My...

How to Change Your Name in Moodle

Changing your name in Moodle is a very simple task and requires only a few minutes of your time.   How to Change My Name in Moodle The process is comprised of a few easy-to-follow steps:   Step 1: Log in to Moodle After installing the CMS, you should log in...

Even more web tutorials

Check out our web hosting knowledge base and the WordPress tutorials to learn more, and be better prepared for your website creation and maintenance journey.