Schedule Post in WordPress

Home » Knowledge Base » Design Tools » WordPress » Schedule Post in WordPress

Imagine you’ve crafted an important article a few days back, but it needs to be released at a very specific time—a time when you’re certain you won’t be available to manually publish it online. While it’s feasible to request a friend or loved one to handle the publication, this is a solution that, at best, offers a temporary fix. After a time or two, they might start to find it bothersome or coincidentally be just as preoccupied during the critical period.

So, what’s the solution? WordPress offers the perfect solution. Scheduling posts.

Scheduling posts is a powerful feature that helps you manage your content strategy effectively, ensuring your site remains active and engaging for your audience, even when you’re not available to publish content manually.

While you’re in the process of creating or editing your article on the WordPress Post editor, a.k.a. Gutenberg direct your attention to the right-hand side of the screen. Here, amidst a plethora of options that typically extend well beyond your immediate view, you’ll find several settings.

These settings, although they can be customized, appear in the following order:

  • Publish
  • Format
  • Categories
  • Tags
  • Featured Image

To schedule your posts within WordPress, the ‘Publish‘ section is where you’ll want to concentrate your efforts.

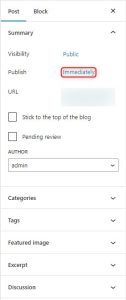
Right next to the Publish label, you can see the time of publishing. In the image above (and by default) it says “Immediately“. The text “immediately” is a button, and by clicking on it, you will trigger a calendar to show up.

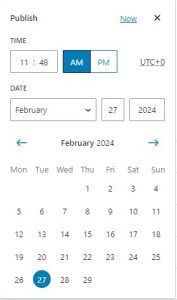
Select the desired date and close the calendar.

The button on top that previously had the label “Publish” should now be changed to “Schedule…”.

Subsequently, your post is scheduled to be automatically released at the chosen date and time.

If you need more in-depth directions, check our previously published article on How to Schedule Post in WordPress

If you feel like you are ready to go further in the CMS, feel free to browse our WordPress Tutorials section.

Was this post helpful?

i

Relevant tags:

Connect

Latest posts:

How to Remove a Product in OpenCart

After installing OpenCart and logging in to the dashboard, you can start adding and removing products immediately. We have already covered how to add products in OpenCart, and in this article, we share simple steps to delete products from your store with only a few...

How to Add Products in OpenCart

The most important element in your OpenCart project is the products you will offer your site visitors. In the following paragraphs, we share how to add products to your OpenCart website.   How to Create Products in Opencart The process of adding new products in...

How to Log in to OpenCart

After you install OpenCart, you can log in to the platform and start working on your project right away. To log in, you should open the OpenCart login page and enter the credentials you chose when installing the CMS. This will open the platform’s admin panel. In the...

How to Install OpenCart

You can install OpenCart on every AwardSpace web hosting plan, including our free web hosting, shared hosting, and advanced AwardSpace services such as Semi-Dedicated Hosting and VPS hosting. Keep in mind that all of the AwardSpace hosting services are tailored to run...

How to Change My Last Name in Moodle

If you are asking yourself "How to change my last name in Moodle", then you are at the right place. This guide will walk you through the steps for changing your last name in Moodle while addressing common concerns like ratings and discussions.   How to Change My...


Create a website for free!


Free forever

Our Support Team is Here to Help


If you need any questions answered, don't hesitate and contact us. Click the button below and follow the instructions. You can expect an answer within an hour.


Contact AwardSpace


iNewest knowledge base articles

How to Remove a Product in OpenCart

After installing OpenCart and logging in to the dashboard, you can start adding and removing products immediately. We have already covered how to add products in OpenCart, and in this article, we share simple steps to delete products from your store with only a few...

How to Add Products in OpenCart

The most important element in your OpenCart project is the products you will offer your site visitors. In the following paragraphs, we share how to add products to your OpenCart website.   How to Create Products in Opencart The process of adding new products in...

How to Log in to OpenCart

After you install OpenCart, you can log in to the platform and start working on your project right away. To log in, you should open the OpenCart login page and enter the credentials you chose when installing the CMS. This will open the platform’s admin panel. In the...

How to Install OpenCart

You can install OpenCart on every AwardSpace web hosting plan, including our free web hosting, shared hosting, and advanced AwardSpace services such as Semi-Dedicated Hosting and VPS hosting. Keep in mind that all of the AwardSpace hosting services are tailored to run...

How to Change My Last Name in Moodle

If you are asking yourself "How to change my last name in Moodle", then you are at the right place. This guide will walk you through the steps for changing your last name in Moodle while addressing common concerns like ratings and discussions.   How to Change My...

How to Change Your Name in Moodle

Changing your name in Moodle is a very simple task and requires only a few minutes of your time.   How to Change My Name in Moodle The process is comprised of a few easy-to-follow steps:   Step 1: Log in to Moodle After installing the CMS, you should log in...

Even more web tutorials

Check out our web hosting knowledge base and the WordPress tutorials to learn more, and be better prepared for your website creation and maintenance journey.