The best way to make a WordPress website truly yours and distinctive is to personalize it so that the color and shapes of the installed theme fit better with your logo and the brand you want to establish. On the other hand, you might want to personalize the chosen template just to enjoy your website more. The reasons to customize your website might be numerous, but the ways are more or less firmly established.
Here is how to personalize your WordPress theme.
Access the WordPress Customizer
The very first thing you ought to do to customize your WordPress is to access the WordPress Dashboard.
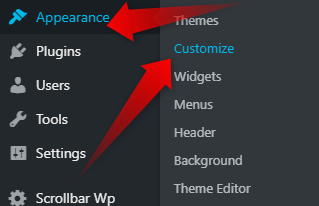
Once there, navigate yourself to the Appearance option. Hover over it. In the submenu that will emerge, click Customize.

This is how to access the WordPress Customizer.
How Can You Personalize your WordPress Theme?
Every theme has different options in the WordPress customizer. Yet, some of the options in the Customizer are available for all of the themes. Specifically “Site Identity”, “Widgets”, “Menus”, and, of course, “Additional CSS”. Therefore, depending on the theme you are using, you might have more or less ways to customize your website. Here are some of the most common.
Site Identity
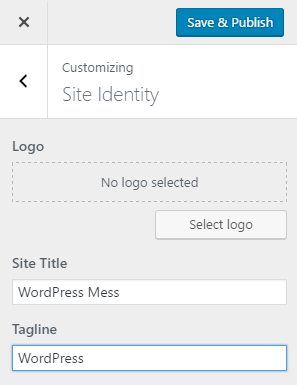
In the Site Identity section, you can change your site title, tagline, and site icon (favicon).
Among other options in the theme customization interface of WordPress, you can update the Site Title and Tagline. You can do that as many times as you want. While changing these elements is straightforward, it’s advised to tread carefully, especially for sites with a large following or if the new title significantly deviates from your domain name. However, there could be legitimate reasons for a change, such as correcting spelling errors.
To adjust the Title and Tagline, navigate to the “Site Identity” section within the customization menu. Here, in addition to the modification of the site’s title and tagline, you can also change (or add) the site logo and the favicon (the small image displayed on a browser’s tab).
As you make these changes, they will be instantly visible to you as the administrator. To ensure these updates are visible to your audience, remember to click the “Save & Publish” button, finalizing the changes for all visitors.
Colors and Background
In the colors and background section of the WordPress Customizer, you can adjust the colors of your theme, including the background, header, and link colors. Depending on the theme you are using, you could face more extensive color options which will allow for a detailed customization.
Fonts and Typography
Not all themes support this option. If the one you are using does allow it, you can change the fonts of your body texts and website headings.
It is recommended that you choose a readable font that matches the character of the website/brand you are establishing.
Header and Navigation
In the WordPress Customizer, you can also customize the header and navigation areas of your WordPress website. These areas are key for the user experience as they are the first thing a person sees once they arrive at your website. On the one hand. And on the other, a nicer header section will help them find their way around the website, which will naturally boost engagement.
In this section, you can sometimes change the styles and positions of the menus.
Widgets
Widgets in WordPress are versatile elements that enable you to add various types of content and features to your website’s sidebar, footer, and sometimes other areas, depending on the theme you’re using. The WordPress Customizer allows for intuitive management and customization of these widgets, offering a preview of changes in real time. You can add and edit the widgets through the dashboard as well, without the plus of a live preview, of course.
Homepage Settings
Here you can choose whether your homepage displays your latest posts or a static page. If selecting a static page, you’ll need to designate which pages serve as your homepage and posts page.
By default, WordPress is set up to display your most recent posts on the homepage. However, you can switch this to display a static page instead. Selecting this option will prompt two additional choices: one for choosing a particular page to serve as your homepage and another for a page where your blog posts will be aggregated. You’ll have the opportunity to pick from all the pages you’ve previously published. If you find that there are no pages available to select, you’ll need to create a new one by clicking on the “+Add New Page” button located beneath either selection list.
If you need in-depth directions, follow this guide to Choose a Homepage in WordPress.
Additional CSS
If you want to make more advanced customizations, adding custom CSS code is the way to go. Doing so will allow you to make changes that are not available in the WordPress Customizer.
Here is how to Add Custom CSS Code to Your WordPress Website.
Theme-Specific Options
As we’ve discussed, some of the changes are theme-specific. Meaning, you won’t find them on every WordPress Template you want to use and customize. The theme-specific options range from layout choices, post display options, social media links, and more. Explore these options to take full advantage of your theme’s capabilities.
Additional Recommendations
Here are some additional recommendations when editing your themes through the WordPress Customizer:
Responsive design
Make sure that whatever changes you make look as good on mobile, as they do on desktop. We all know that most people are using their phone as primary internet browsing devices.
Child Theme
A Child Theme in WordPress is a theme that inherits the functionality, features, and styling of another theme, known as the parent theme. They provide you with an easy and safe way to modify a WordPress theme, without directly altering the original theme’s files. This will on the one hand, keep the CSS changes you might make in the theme files instead of the WordPress Customizer. On the other hand, will provide you with another layer of security, should you decide to make extensive customizations, especially based on the PHP files or template changes.
Personalizing your WordPress theme allows you to create a more memorable and effective website. By exploring and utilizing the Customizer and your theme’s specific features, you can achieve a design that aligns perfectly with your vision.
If you need more in-depth directions, check our previously published article on How to Customize WordPress Theme
If you feel like you are ready to go further in the CMS, feel free to browse our WordPress Tutorials section.

