How to create language redirection

Home » Knowledge Base » Control Panel » .htaccess Generator » How to create language redirection

Successfully managing a website means catering to a diverse audience. At AwardSpace, our hosting plans are designed to meet your needs. We understand the importance of giving users a personalized experience based on their language preferences. This is why we are excited to introduce the “Redirect by Language” feature in our .htaccess Generator’s Redirections menu. This powerful tool lets you show different pages to your visitors depending on their preferred language. It ensures a truly localized and engaging experience.

The Redirections Feature

Our .htaccess Generator’s Redirections feature is a versatile tool designed to give you control over how traffic is directed on your website. From handling URL changes to rerouting visitors based on specific conditions, this feature ensures that you can tailor the user experience to meet the unique preferences of your audience.

Redirect by Language

The “Redirect by Language” option within the Redirections menu opens up a world of possibilities for creating a more inclusive and user-friendly website. This feature allows you to detect your visitors’ language preferences and automatically redirect them to a page that is tailored to their language. It provides a seamless and personalized browsing experience.

Use Cases

The “Redirect by Language” feature offers numerous applications for websites with a global or multilingual audience. Here are some key use cases where this feature proves invaluable:

  • Multilingual Content: Present visitors with content in their preferred language, enhancing user engagement and comprehension.
  • Localized Offers: Tailor promotions, discounts, or announcements based on the language preferences of your audience, maximizing the impact of your marketing efforts.
  • Enhanced Accessibility: Create a more inclusive online space by automatically directing users to content that matches their language, fostering a sense of connection and understanding.

Step-by-Step Instructions

Implementing language-based redirections with the “Redirect by Language” feature is straightforward with our .htaccess Generator. Follow these steps to provide a personalized experience for your visitors:

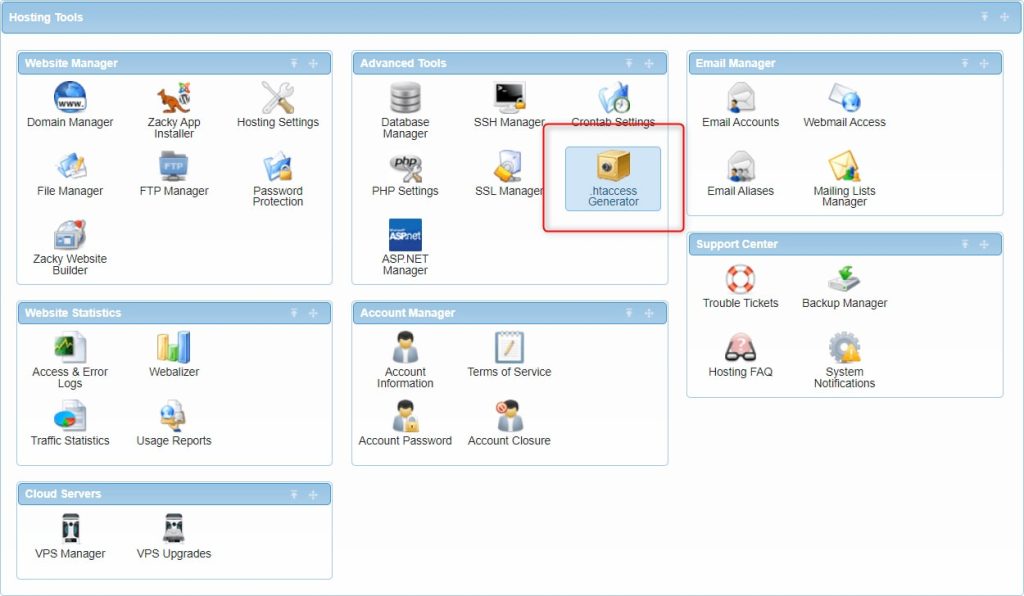
  1. Log in to your hosting control panel and find the “.htaccess Generator” within the “Advanced Tools” box in the “Hosting Tools” section.The .htaccess generator menu in the conrol panel.
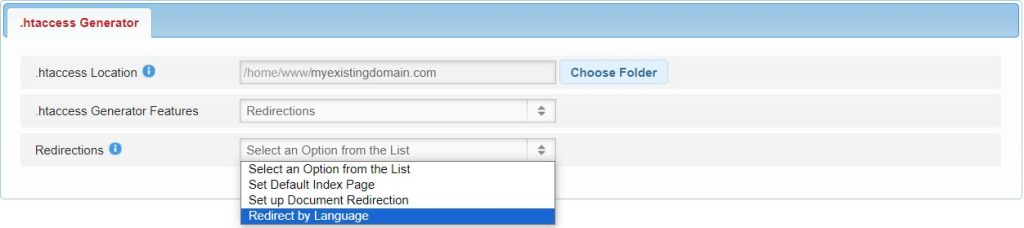
  2. Choose the “Redirect by Language” option.The option to redirect by language.
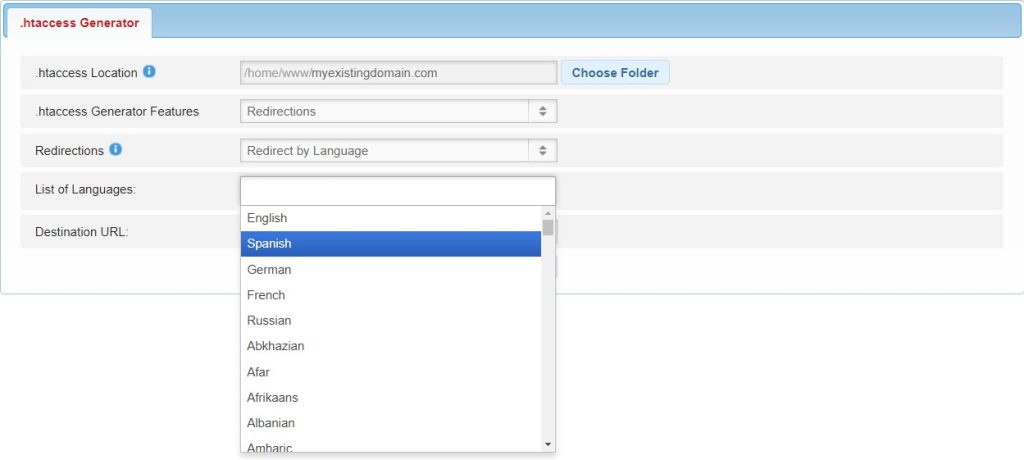
  3. Select the new language from the list of languages.The list of languages for the language redirection.
  4. Enter a relative path or the full URL of the translated file.The link to the translated page.

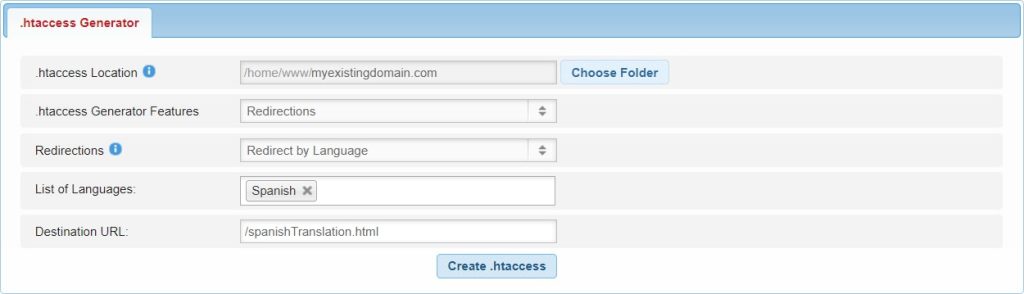
By following these steps, you can leverage the “Redirect by Language” feature to create a truly personalized and localized experience for your website visitors.

In Conclusion

The “Redirect by Language” feature of our .htaccess Generator empowers you to provide a tailored experience for your global audience. It will ensure that language preferences are respected and content is accessible. Whether you’re managing multilingual content, tailoring offers, or fostering inclusivity, this feature allows you to create a website that resonates with visitors from around the world. Take control of your website’s language-based redirections today with AwardSpace‘s .htaccess Generator and deliver a personalized experience to every user.

Was this post helpful?

i

Relevant tags:

Connect

Latest posts:

How to Log in to TYPO3

TYPO3 is a powerful CMS platform that allows you to build a fully functional and aesthetically pleasing website. The platform is known for its versatility and long list of features. In another article, we shared how you can install TYPO3 on any of the AwardSpace...

How to Install TYPO3

You can install TYPO3 on all the AwardSpace hosting services—free web hosting, shared hosting, and premium plans such as Semi-Dedicated Hosting and VPS hosting. All AwardSpace hosting services are tailored to run TYPO3 smoothly, regardless of your website’s size or...

How to Add Products to Zen Cart: A Step-By-Step Guide

After you install Zen Cart and log in to the admin panel, you can start adding products to your online store. This guide walks you through the process step by step.   How to Add Products to Zen Cart To add a product to Zen Cart, you need to follow a few simple...

How to Log in to Zen Cart

Once you install Zen Cart, you can log in to the CMS and start working on your project. The login process is simple and is comprised of only a few steps.   How to Log in to Zen Cart There are two ways to log in to Zen Cart: Method 1: Login by following the...

How to Install Zen Cart

You can install Zen Cart with any of the AwardSpace hosting plans—free web hosting, shared hosting, and advanced plans such as Semi-Dedicated Hosting and VPS hosting. Each AwardSpace hosting service is tailored to run Zen Cart flawlessly and smoothly, regardless of...


Create a website for free!


Free forever

Our Support Team is Here to Help


If you need any questions answered, don't hesitate and contact us. Click the button below and follow the instructions. You can expect an answer within an hour.


Contact AwardSpace


iNewest knowledge base articles

How to Log in to TYPO3

TYPO3 is a powerful CMS platform that allows you to build a fully functional and aesthetically pleasing website. The platform is known for its versatility and long list of features. In another article, we shared how you can install TYPO3 on any of the AwardSpace...

How to Install TYPO3

You can install TYPO3 on all the AwardSpace hosting services—free web hosting, shared hosting, and premium plans such as Semi-Dedicated Hosting and VPS hosting. All AwardSpace hosting services are tailored to run TYPO3 smoothly, regardless of your website’s size or...

How to Add Products to Zen Cart: A Step-By-Step Guide

After you install Zen Cart and log in to the admin panel, you can start adding products to your online store. This guide walks you through the process step by step.   How to Add Products to Zen Cart To add a product to Zen Cart, you need to follow a few simple...

How to Log in to Zen Cart

Once you install Zen Cart, you can log in to the CMS and start working on your project. The login process is simple and is comprised of only a few steps.   How to Log in to Zen Cart There are two ways to log in to Zen Cart: Method 1: Login by following the...

How to Install Zen Cart

You can install Zen Cart with any of the AwardSpace hosting plans—free web hosting, shared hosting, and advanced plans such as Semi-Dedicated Hosting and VPS hosting. Each AwardSpace hosting service is tailored to run Zen Cart flawlessly and smoothly, regardless of...

How to Log in to phpBB

Now that you have installed phpBB, it is time to learn how to log in to the system and start working with it. The process is simple and is comprised of only a few steps.   How to Log in to phpBB There are several ways you can use to log in phpBB. The process...

Even more web tutorials

Check out our web hosting knowledge base and the WordPress tutorials to learn more, and be better prepared for your website creation and maintenance journey.