How to use the .htaccess Generator

Home » Knowledge Base » Control Panel » .htaccess Generator » How to use the .htaccess Generator

The .htaccess file is a very powerful configuration file that allows you to make changes to your website without having the need to edit the web server config file. A couple of things that you can achieve with the .htaccess file are setting password protection, creating redirects, rewrites, and much more. In this article, we will go through the .htaccess Generator section available in our Hosting Control Panel.


How to access the .htaccess Generator

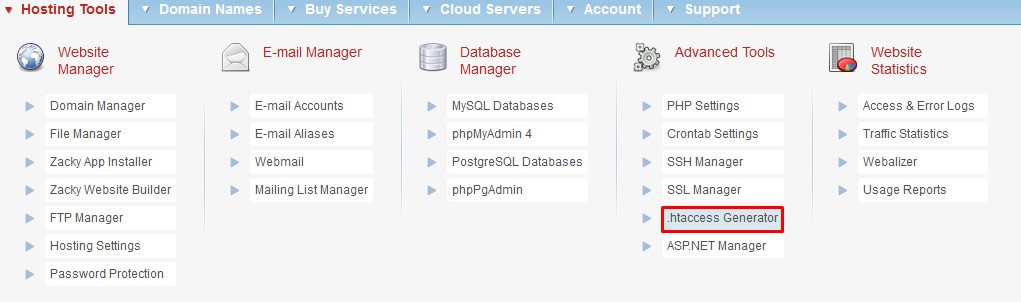
The .htaccess Generator can be found in the Hosting Control Panel of your Hosting Account. To access it simply follow the steps below:

  1. Log in to your Hosting Control Panel
  2. From the Dashboard choose the Hosting Tools menu
  3. Under Advanced Tools select the .htaccess Generator


What can you use the .htaccess Generator for?

The .htaccess Generator can assist you with creating a .htaccess file without much technical knowledge. There are a couple of features that you can use:

  • Access and Security
  • Error handling
  • File Operations
  • Redirections

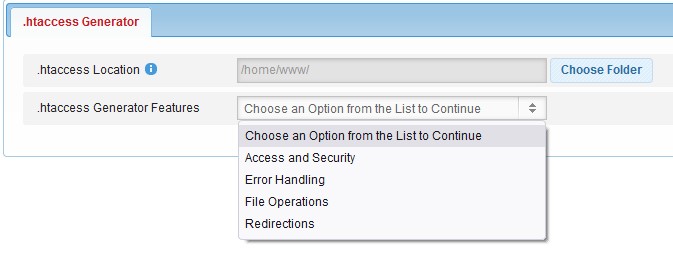
These options can be selected from the .htaccess Generator form under Features.
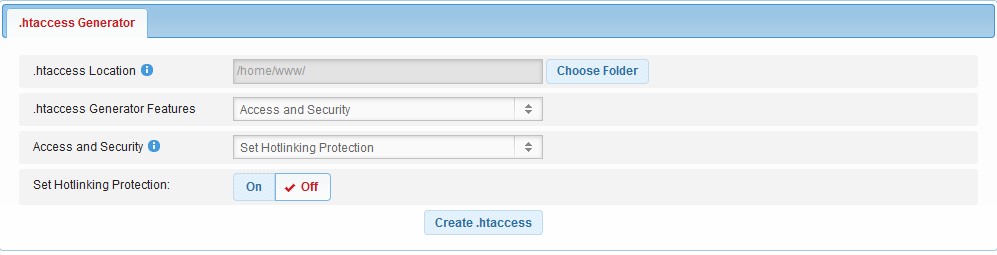
 

Access and Security

Under the Access and Security tab you can generate a code that will:

  • Block traffic by the referrer
  • Block abusive bots
  • Enable/Disable Hotlinking Protection
  • Block/Allow traffic by IP
  • Block/Allow traffic by hostname


Error Handling

As the features suggest you will be able to set up redirects for the error pages of your website. For example, you can create custom error pages for your website and use the .htaccess Generator to generate the code which will redirect your visitors. You can also redirect users that visit non-existing pages to one specific page.


File Operations

With File Operations, you can set additional MIME types such as audio files. Such an example would be the following code for the .htaccess file:

AddType audio/mpeg .mp3


Redirections

With the redirection feature, you can set the default index page for your website. You can also use this option to create redirects from one page to another. For example, you can redirect from domain.com/old-page to domain.com/new-page. Another useful option is that you can set up a redirect depending on the country from which your visitors are.


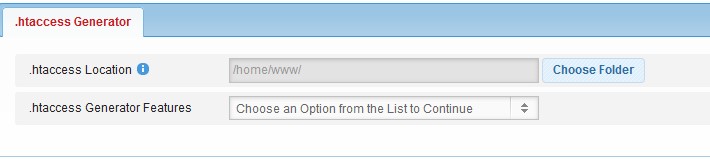
How to generate the .htaccess file?

To generate the .htaccess file follow the steps bellow:

  1. Select the Location for your .htaccess file
  2. Select the feature from the list
  3. Select the option which you would like to add in the .htaccess file
  4. If necessary add the needed information for the feature
  5. Click on the Create .htaccess button

Once you have done that you will find the .htaccess file inside the specified directory with the necessary code.

Was this post helpful?

i

Relevant tags:

Connect

Latest posts:

How to Check My Hosting Limits

To check your hosting limits, follow these steps: First, log in to the hosting control panel. Then, via the dashboard, head to Hosting Settings:   After that, click the Hosting Limits tab:   Then, you will access the information about your account's hosting...

How to Access the Security Settings of My Domains

Accessing the security settings of your hosted domains is easy with AwardSpace. You can access the settings in just a few minutes by following the steps below. First, log in to the AwardSpace hosting panel. Then, head to the Domain Manager page by clicking the...

How to Access The Name Servers Settings of My Domain

Accessing the name server settings with AwardSpace is quite simple. Just follow the next steps. First, log in to the AwardSpace hosting panel. Then, head to Domain Manager:   After that, locate the domain whose Name Server settings you wish to access and click...

How to Access the DNS Settings of My Domains

Accessing the DNS settings of your domains is easy with AwardSpace. The process is comprised of a few simple steps and requires only a minute or two of your time. First, log in to the AwardSpace hosting panel. Then, head to the Domain Manager:   After that,...


Create a website for free!


Free forever

Our Support Team is Here to Help


If you need any questions answered, don't hesitate and contact us. Click the button below and follow the instructions. You can expect an answer within an hour.


Contact AwardSpace


iNewest knowledge base articles

How to Check My Hosting Limits

To check your hosting limits, follow these steps: First, log in to the hosting control panel. Then, via the dashboard, head to Hosting Settings:   After that, click the Hosting Limits tab:   Then, you will access the information about your account's hosting...

How to Access the Security Settings of My Domains

Accessing the security settings of your hosted domains is easy with AwardSpace. You can access the settings in just a few minutes by following the steps below. First, log in to the AwardSpace hosting panel. Then, head to the Domain Manager page by clicking the...

How to Access The Name Servers Settings of My Domain

Accessing the name server settings with AwardSpace is quite simple. Just follow the next steps. First, log in to the AwardSpace hosting panel. Then, head to Domain Manager:   After that, locate the domain whose Name Server settings you wish to access and click...

How to Access the DNS Settings of My Domains

Accessing the DNS settings of your domains is easy with AwardSpace. The process is comprised of a few simple steps and requires only a minute or two of your time. First, log in to the AwardSpace hosting panel. Then, head to the Domain Manager:   After that,...

How to Access The Settings for My Subdomains

Accessing the settings for your subdomain with AwardSpace is quite simple. First, log in to the AwardSpace hosting panel. Then, head to Domain Manager:   A new page should open. Once you see it, scroll down until you see your list of hosted subdomains:  ...

Even more web tutorials

Check out our web hosting knowledge base and the WordPress tutorials to learn more, and be better prepared for your website creation and maintenance journey.