How to Signup for a Free Hosting Service?

Home » Knowledge Base » Hosting Basics » How to Signup for a Free Hosting Service?

As pioneers in offering truly free website hosting services, AwardSpace abides by the ease of access and ease of use. Thus, everybody will be able to create their first website and be part of the World Wide Web.

In order to achieve that, we figured, a tutorial on how to signup for your first free hosting account might come in handy.

Here is a two steps tutorial on how to signup for a free hosting service today.


Method 1: Via The Free Web Hosting Registration Page

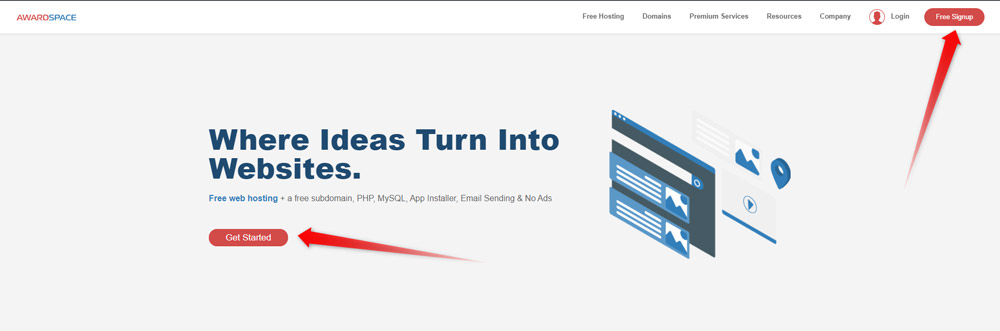
If you were to go to AwardSpace’s Homepage, or even from the current tutorial, you’ll have to navigate to the Free Web Hosting Registration Page.


Step 1: Go to the Free Web Hosting Registration page

Navigating to that page is easy. You can either click the link at the end of the previous sentence, the Get Started Button on the Home Page, or the Free Signup button located in the main menu, visible on every page of our website.


Step 2: Create Your Free Hosting Registration

Once you are at the free hosting registration page, there is nothing left for you to do but to create your registration.


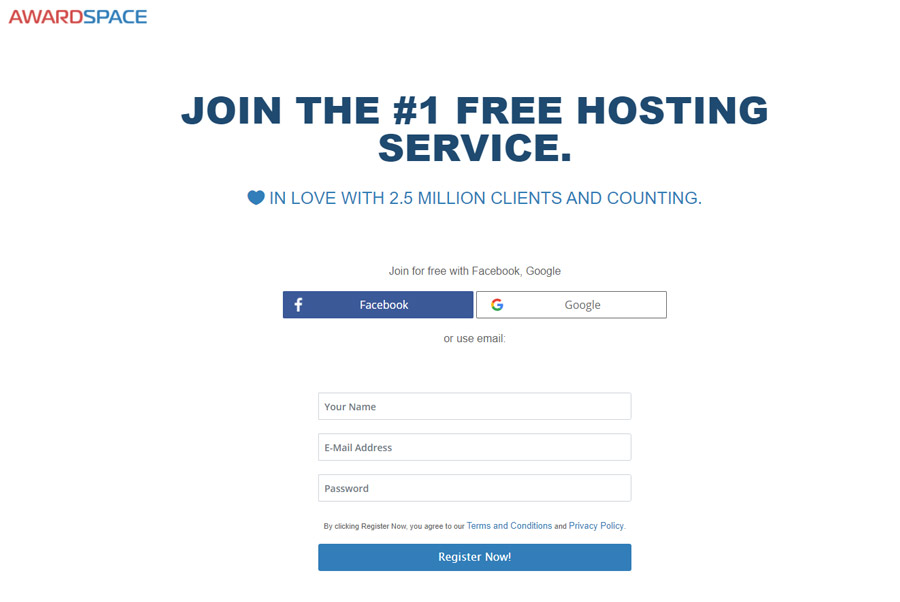
To do so, you can either create your account with one click,  using your Facebook or Google account. By clicking on each of these buttons a prompt will show up. You need to allow the connection between AwardSpace and the service you’ve chosen. After that, give a few minutes for the server to process your request. Your account will be ready in a few seconds, and you will be redirected to your hosting control panel.

On the other hand, you can create your registration by using the classic method of filling the three fields below. Namely, add your Name, E-mail Address, and the Password you want to use. That’s it.

Once again, you’ll be redirected to your newly created free web hosting account.


Method 2: Via the Free Web Hosting page

You also have the option to register via our free web hosting page.

To do so, the first thing you need to do is to navigate to the page in question.

Once here, the procedure is more or less the same.

Choose your preferred method of signing up and go with it. You’ll soon be redirected to your new web hosting account.


Next Steps:

Now that you’ve signed up for your free hosting account:

Already finished these steps?

Create an Email Account

Was this post helpful?

i

Relevant tags:

Connect

Latest posts:

How to Add Products to Zen Cart: A Step-By-Step Guide

After you install Zen Cart and log in to the admin panel, you can start adding products to your online store. This guide walks you through the process step by step.   How to Add Products to Zen Cart To add a product to Zen Cart, you need to follow a few simple...

How to Log in to Zen Cart

Once you install Zen Cart, you can log in to the CMS and start working on your project. The login process is simple and is comprised of only a few steps.   How to Log in to Zen Cart There are two ways to log in to Zen Cart: Method 1: Login by following the...

How to Install Zen Cart

You can install Zen Cart with any of the AwardSpace hosting plans—free web hosting, shared hosting, and advanced plans such as Semi-Dedicated Hosting and VPS hosting. Each AwardSpace hosting service is tailored to run Zen Cart flawlessly and smoothly, regardless of...

How to Log in to phpBB

Now that you have installed phpBB, it is time to learn how to log in to the system and start working with it. The process is simple and is comprised of only a few steps.   How to Log in to phpBB There are several ways you can use to log in phpBB. The process...

How to Install phpBB

You can install phpBB on any AwardSpace hosting plan - on the free web hosting, shared hosting, and also on the advanced AwardSpace plans such as Semi-Dedicated Hosting and VPS hosting. Each AwardSpace hosting service is tailored to run phpBB flawlessly and smoothly,...


Create a website for free!


Free forever

Our Support Team is Here to Help


If you need any questions answered, don't hesitate and contact us. Click the button below and follow the instructions. You can expect an answer within an hour.


Contact AwardSpace


iNewest knowledge base articles

How to Add Products to Zen Cart: A Step-By-Step Guide

After you install Zen Cart and log in to the admin panel, you can start adding products to your online store. This guide walks you through the process step by step.   How to Add Products to Zen Cart To add a product to Zen Cart, you need to follow a few simple...

How to Log in to Zen Cart

Once you install Zen Cart, you can log in to the CMS and start working on your project. The login process is simple and is comprised of only a few steps.   How to Log in to Zen Cart There are two ways to log in to Zen Cart: Method 1: Login by following the...

How to Install Zen Cart

You can install Zen Cart with any of the AwardSpace hosting plans—free web hosting, shared hosting, and advanced plans such as Semi-Dedicated Hosting and VPS hosting. Each AwardSpace hosting service is tailored to run Zen Cart flawlessly and smoothly, regardless of...

How to Log in to phpBB

Now that you have installed phpBB, it is time to learn how to log in to the system and start working with it. The process is simple and is comprised of only a few steps.   How to Log in to phpBB There are several ways you can use to log in phpBB. The process...

How to Install phpBB

You can install phpBB on any AwardSpace hosting plan - on the free web hosting, shared hosting, and also on the advanced AwardSpace plans such as Semi-Dedicated Hosting and VPS hosting. Each AwardSpace hosting service is tailored to run phpBB flawlessly and smoothly,...

How to Remove a Product in OpenCart

After installing OpenCart and logging in to the dashboard, you can start adding and removing products immediately. We have already covered how to add products in OpenCart, and in this article, we share simple steps to delete products from your store with only a few...

Even more web tutorials

Check out our web hosting knowledge base and the WordPress tutorials to learn more, and be better prepared for your website creation and maintenance journey.