How to create a database?

Home » Knowledge Base » Databases » How to create a database?

Databases are an important part of modern websites. They store all your website data (content, users, configuration). This is why we offer databases for all hosting plans, including the free plan. In this article, we will go through the process of database creation.


Creating a database on a shared plan

When using our shared hosting plans you will be able to create databases only from the Database Manager located in the Hosting Control Panel. The reason for this is due to the fact that you do not have root access to the server and you would not be able to send a command to the server that would create the database for you. This means that when manually installing an application that requires a database you would also have to manually create the database from the Database Manager.


How to create a database?

To do that you would first have to navigate to the Database Manager. The Database Manager can be found inside your Hosting Control Panel under the Hosting Tools menu. Once inside the Database Manager you will be presented with two options:

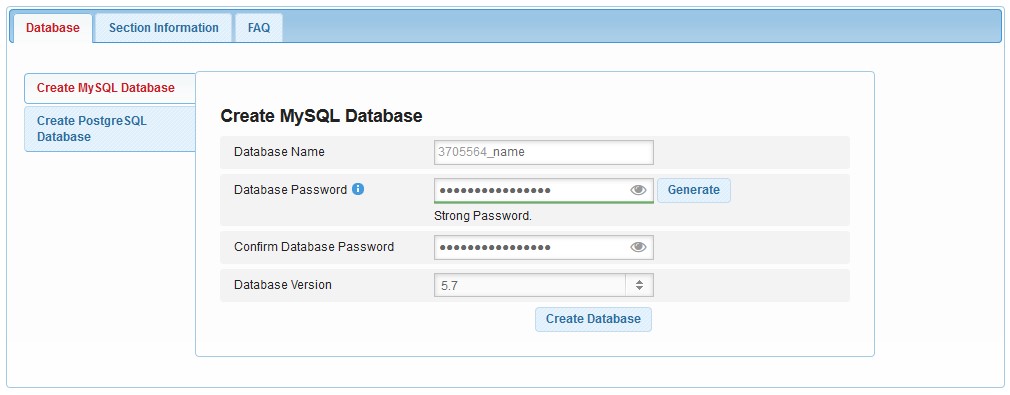
  • Create MySQL Database
  • Create PostgresSQL Database

Choose the database type that your website requires. After that, you will have to enter the name and the password for your database as shown in the picture below, and click Create Database.


Things you must know when creating a database

There are a couple of things you need to know before and after you create a database:

  1. The name of your database would always have your client ID as a prefix. For example, if your client ID is 123456 your database name will be 123456_database
  2. When you create a database a user is automatically created and assigned to it. The name of the username for your database would be the same as your database name. Following the above example, the username for the database 123456_database would be 123456_database
  3. You cannot create additional users for your database. Each database comes with one and only user which can manage it
  4. Our shared hosting database servers are running on separate servers. This means that when installing your application you will not be able to use localhost as a hostname for your database. Please make sure to check your Database Manager for the proper hostname
  5. Databases cannot be accessed remotely. You can only make changes to your database via a script uploaded to your hosting account or via the phpMyAdmin which can be accessed in the Database Manager

If you are having trouble with using our Database Manager you can look at our article here where we have described the section in detail.

Was this post helpful?

i

Relevant tags:

Connect

Latest posts:

How to Check My Auto Renewals

To check your AwardSpace hosting plan auto-renewals, first log in to the admin dashboard. Then, head to Wallet, within the Orders & Invoices section:   After that, click the Auto Renewals tab, where you can check any relevant information about your hosting...

How to Check My Payment Requests

To check your payment requests, first log in to the AwardSpace hosting panel. Then, head to Wallet within the Orders & Invoices category:   Then, click the Payment Requests tab. There, you can browse all the information you need about your...

How to Check My Invoices

To check your invoices in AwardSpace, first log in to the hosting panel. From there, head to Invoices within the Orders & Invoices category:   From this place, you can browse order references, payment orders, payment types, order dates, and various...

How to Check My Wallet Flow

To check your wallet flow, first log in to the AwardSpace hosting panel. Then, click on Wallet within Payments & Invoices:   After that, click the Wallet Flow tab. This is where you can see details about your wallet flaw:

How to Check My Incomplete Orders

To check your incomplete orders, first log in to the AwardSpace hosting panel. Then, head to Incomplete Orders within Orders & Invoices:   Then, you can check the list within the Incomplete Orders tab:  


Create a website for free!


Free forever

Our Support Team is Here to Help


If you need any questions answered, don't hesitate and contact us. Click the button below and follow the instructions. You can expect an answer within an hour.


Contact AwardSpace


iNewest knowledge base articles

How to Check My Auto Renewals

To check your AwardSpace hosting plan auto-renewals, first log in to the admin dashboard. Then, head to Wallet, within the Orders & Invoices section:   After that, click the Auto Renewals tab, where you can check any relevant information about your hosting...

How to Check My Payment Requests

To check your payment requests, first log in to the AwardSpace hosting panel. Then, head to Wallet within the Orders & Invoices category:   Then, click the Payment Requests tab. There, you can browse all the information you need about your...

How to Check My Invoices

To check your invoices in AwardSpace, first log in to the hosting panel. From there, head to Invoices within the Orders & Invoices category:   From this place, you can browse order references, payment orders, payment types, order dates, and various...

How to Check My Wallet Flow

To check your wallet flow, first log in to the AwardSpace hosting panel. Then, click on Wallet within Payments & Invoices:   After that, click the Wallet Flow tab. This is where you can see details about your wallet flaw:

How to Check My Incomplete Orders

To check your incomplete orders, first log in to the AwardSpace hosting panel. Then, head to Incomplete Orders within Orders & Invoices:   Then, you can check the list within the Incomplete Orders tab:  

How to Check My Canceled Orders

To check your canceled orders with AwardSpace, first, log in to the hosting panel. Then, head to Caneled Orders within the Orders & Invoices category:   Then, within the Canceled Orders tab, you can browse your canceled orders with AwardSpace:

Even more web tutorials

Check out our web hosting knowledge base and the WordPress tutorials to learn more, and be better prepared for your website creation and maintenance journey.