How to Configure Cloudflare?

Home » Knowledge Base » Hosting Basics » How to Configure Cloudflare?

In this tutorial, we will walk you through the process of setting up a Cloudflare account and adding a domain name to it.

The configuration process is very straightforward and easy to follow. In order to set up a domain to work with Cloudflare, please follow these simple steps:


Step 1: Set Up a Cloudflare Account

    1. Launch your favorite web browser and visit Cloudflare’s Sign Up page.
    2. Fill in the Email and Password fields and press Create Account.

cloudflare 1

Note: If you would like to receive e-mail notifications and updates from Cloudflare, tick the check box that says I would like to receive occasional email updates and special offers for Cloudflare products, services, and events.

    1. After submitting the form, you will receive a verification letter through which you can verify your e-mail address and activate your Cloudflare account.

cloudflare 2


Step 2: Add a Domain to Your Cloudflare Account

Once your Cloudflare account has been activated, you will be prompted to add a domain to your Control Panel.

    1. Once in the dashboard, you will notice a message saying You currently don’t have any websites. Click the + Add a Site button to proceed.

cloudflare 3

    1. A new window will appear asking you to enter the URL (web address) of your existing site. Type your domain name and press Add Site.

cloudflare 4

    1. Cloudflare will look up your existing DNS records. While waiting for their system to query your DNS server, click Next to select a suitable plan for your website.

cloudflare 5

    1. On the next page, you will be asked to pick a plan. Choose the plan that best suits your needs and click the Confirm Plan link.

cloudflare 6

    1. Once you have decided on a Cloudflare account, you need to click the Confirm link

cloudflare 7


Step 3: Obtain the Necessary DNS Records

After a successful plan activation, there are a few more tasks that you will need to perform in order to complete the setup.

    1. First, you will need to wait for Cloudflare to finish the DNS scan on your domain name. Depending on your DNS configuration, the entire process may take up to 60 seconds.

cloudflare 8

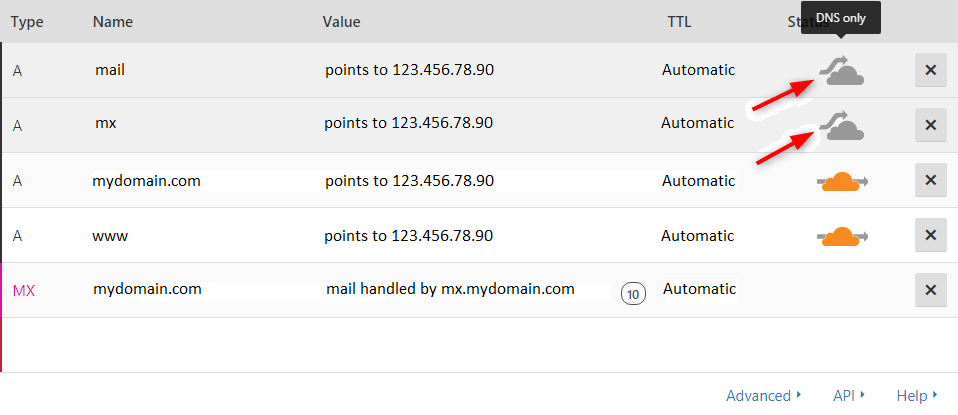
    1. The results of the DNS record scan will appear shortly after that. Cloudflare will detect which of them should be DNS only or HTTP proxy.

cloudflare 9

    1. Cloudflare will provide you with their associated Name Server addresses. The Name Servers will look similar to these:

cloudflare 10

  1. Once you have the addresses, log into the Control Panel supplied by your domain provider and update your current NS records to those of Cloudflare.

If you’ve not updated your DNS settings before and are unsure how to proceed, please contact your registrar and ask them to change the Name Servers on your behalf.


Step 4: Finalize the Setup

Once you have ensured that your Name Servers are properly set and pointing in the right direction, Cloudflare will perform one final scan on your DNS records. If all goes well, the status of your website will be changed to Active.

cloudflare 11

That’s it! You’ve just learned how to configure a domain name to work with Cloudflare. Cloudflare adds an extra layer of protection to your website.

Was this post helpful?

i

Relevant tags:

Connect

Latest posts:

How to Add Products to Zen Cart: A Step-By-Step Guide

After you install Zen Cart and log in to the admin panel, you can start adding products to your online store. This guide walks you through the process step by step.   How to Add Products to Zen Cart To add a product to Zen Cart, you need to follow a few simple...

How to Log in to Zen Cart

Once you install Zen Cart, you can log in to the CMS and start working on your project. The login process is simple and is comprised of only a few steps.   How to Log in to Zen Cart There are two ways to log in to Zen Cart: Method 1: Login by following the...

How to Install Zen Cart

You can install Zen Cart with any of the AwardSpace hosting plans—free web hosting, shared hosting, and advanced plans such as Semi-Dedicated Hosting and VPS hosting. Each AwardSpace hosting service is tailored to run Zen Cart flawlessly and smoothly, regardless of...

How to Log in to phpBB

Now that you have installed phpBB, it is time to learn how to log in to the system and start working with it. The process is simple and is comprised of only a few steps.   How to Log in to phpBB There are several ways you can use to log in phpBB. The process...

How to Install phpBB

You can install phpBB on any AwardSpace hosting plan - on the free web hosting, shared hosting, and also on the advanced AwardSpace plans such as Semi-Dedicated Hosting and VPS hosting. Each AwardSpace hosting service is tailored to run phpBB flawlessly and smoothly,...


Create a website for free!


Free forever

Our Support Team is Here to Help


If you need any questions answered, don't hesitate and contact us. Click the button below and follow the instructions. You can expect an answer within an hour.


Contact AwardSpace


iNewest knowledge base articles

How to Add Products to Zen Cart: A Step-By-Step Guide

After you install Zen Cart and log in to the admin panel, you can start adding products to your online store. This guide walks you through the process step by step.   How to Add Products to Zen Cart To add a product to Zen Cart, you need to follow a few simple...

How to Log in to Zen Cart

Once you install Zen Cart, you can log in to the CMS and start working on your project. The login process is simple and is comprised of only a few steps.   How to Log in to Zen Cart There are two ways to log in to Zen Cart: Method 1: Login by following the...

How to Install Zen Cart

You can install Zen Cart with any of the AwardSpace hosting plans—free web hosting, shared hosting, and advanced plans such as Semi-Dedicated Hosting and VPS hosting. Each AwardSpace hosting service is tailored to run Zen Cart flawlessly and smoothly, regardless of...

How to Log in to phpBB

Now that you have installed phpBB, it is time to learn how to log in to the system and start working with it. The process is simple and is comprised of only a few steps.   How to Log in to phpBB There are several ways you can use to log in phpBB. The process...

How to Install phpBB

You can install phpBB on any AwardSpace hosting plan - on the free web hosting, shared hosting, and also on the advanced AwardSpace plans such as Semi-Dedicated Hosting and VPS hosting. Each AwardSpace hosting service is tailored to run phpBB flawlessly and smoothly,...

How to Remove a Product in OpenCart

After installing OpenCart and logging in to the dashboard, you can start adding and removing products immediately. We have already covered how to add products in OpenCart, and in this article, we share simple steps to delete products from your store with only a few...

Even more web tutorials

Check out our web hosting knowledge base and the WordPress tutorials to learn more, and be better prepared for your website creation and maintenance journey.