How to Clear Web Browser Cache on Windows

Home » Knowledge Base » Hosting Basics » How to Clear Web Browser Cache on Windows

Web browser cache, or simply cache is a term that refers to stored website data files that improve the overall web browsing experience. Although useful, sometimes cache files might cause technical issues. Such are slow loading speeds, and error messages such as HTTP Error 400 Bad Request. This is why, the cache should be regularly deleted, so issues are avoided. Depending on your preferred Internet browser, here’s how to delete cached files:

Google Chrome

Open the browser and click the three-dotted menu located in the upper right corner. Then, a menu will appear. From this menu go to More Tools->Clear Browsing Data:

HTTPS Error 400 Bad Request Google Chrome


This will prompt Google Chrome to open the clear browsing data options. From the suggested options select Cookies and other site data and Cached images and files and click on the light blue Clear data button:
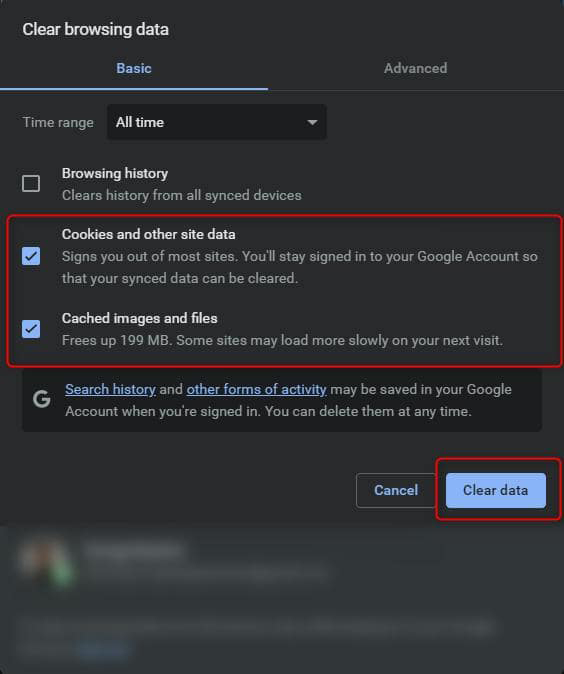
HTTPS Error 400 Bad Request Google Chrome Clear Browsing Data


Mozilla Firefox

Open Mozilla Firefox and click on the hamburger menu icon at the top right of the screen. This will open a new menu. From there click on Settings:
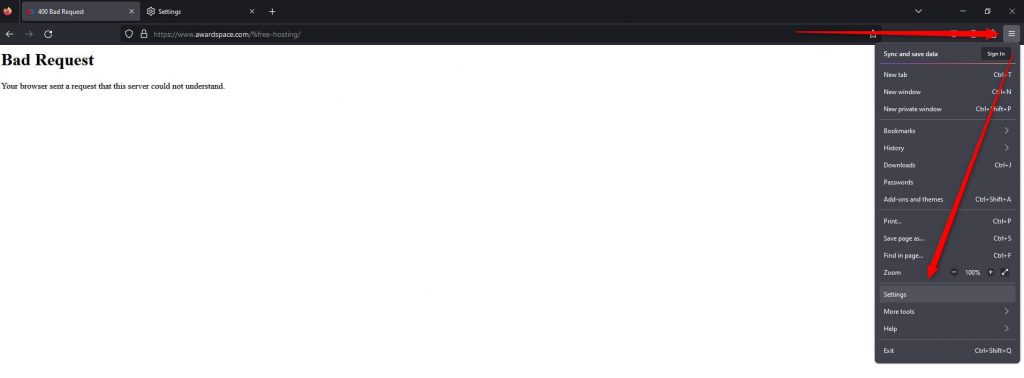
HTTPS Error 400 Bad Request Mozilla Firefox Browser


A new tab with settings will appear. It should look like this:
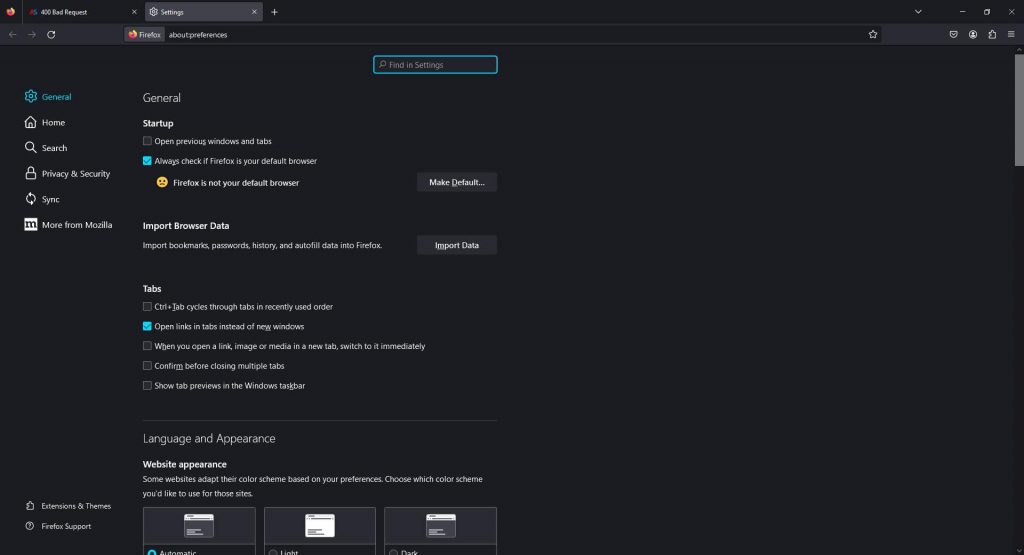
HTTPS Error 400 Bad Request Mozilla Firefox Browser Settings


From this tab head to Privacy & Security options located at the left side of the tab:
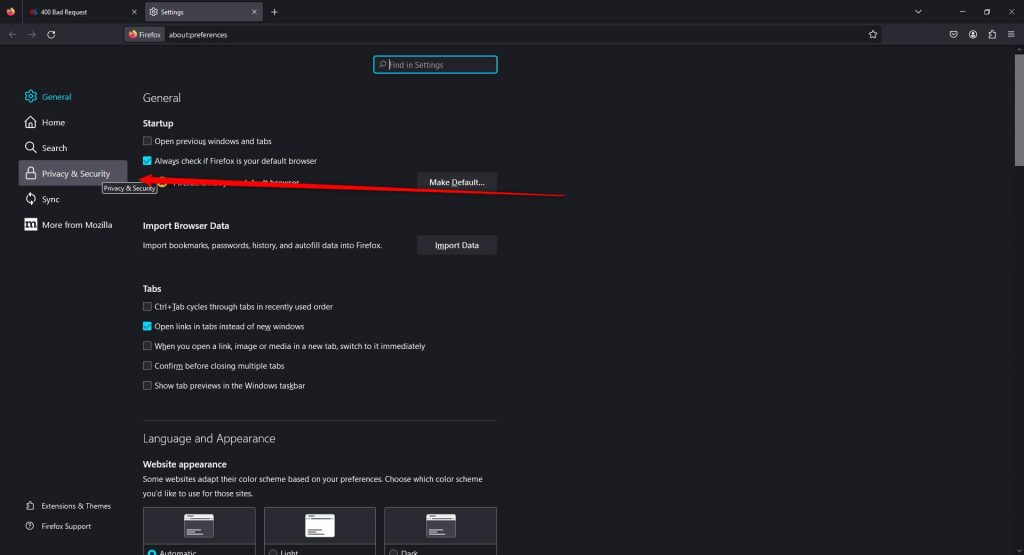
HTTPS Error 400 Bad Request Mozilla Firefox Privacy and Security Options


Click on Privacy & Security, so a new menu with settings appears. Once the tab is opened, scroll down until you find the History options section:
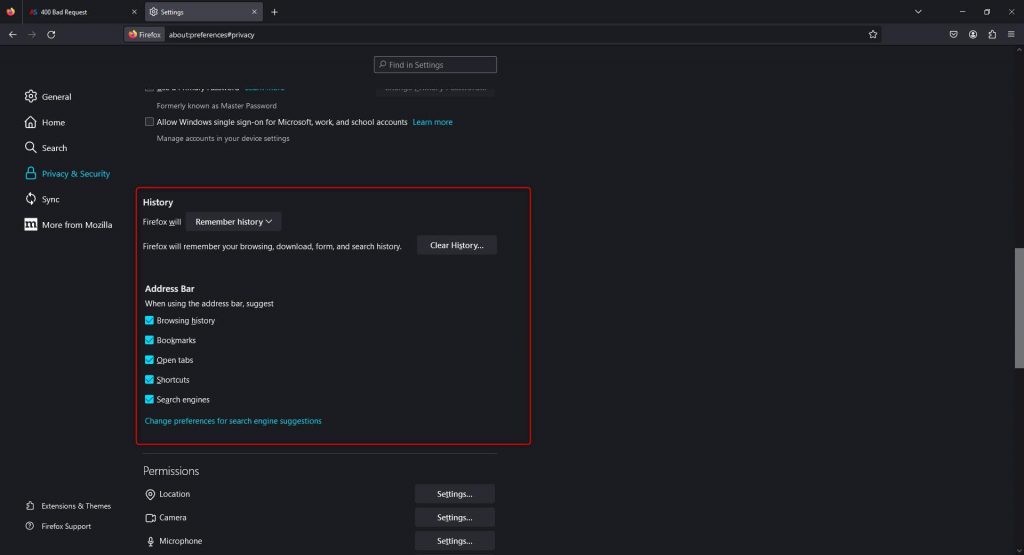
HTTPS Error 400 Bad Request Mozilla Firefox Brwosing Data Options

Then, click on the gray Clear History… button:
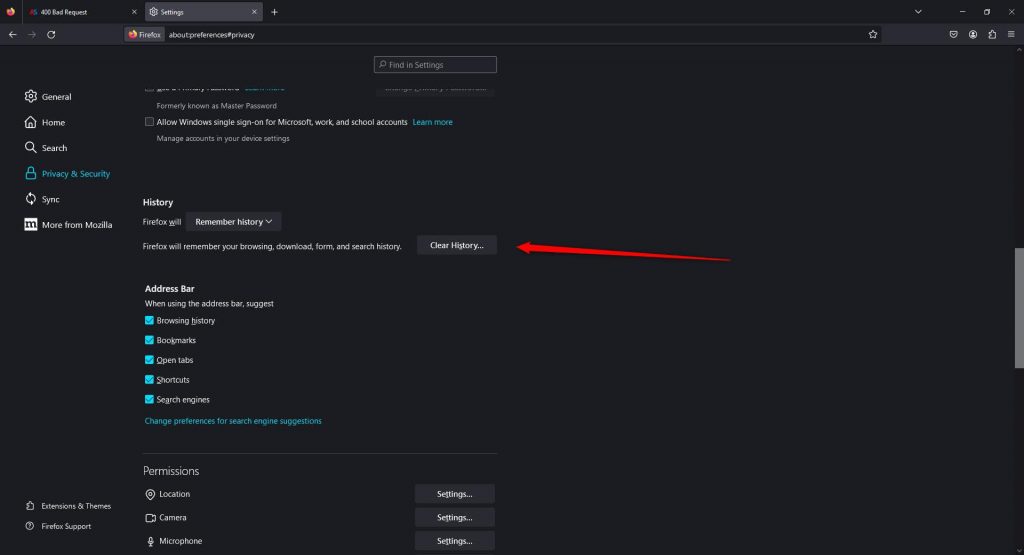
HTTPS Error 400 Bad Request Mozilla Firefox Clear Browsing History


Clicking on the button will prompt the browser to display various clear options:
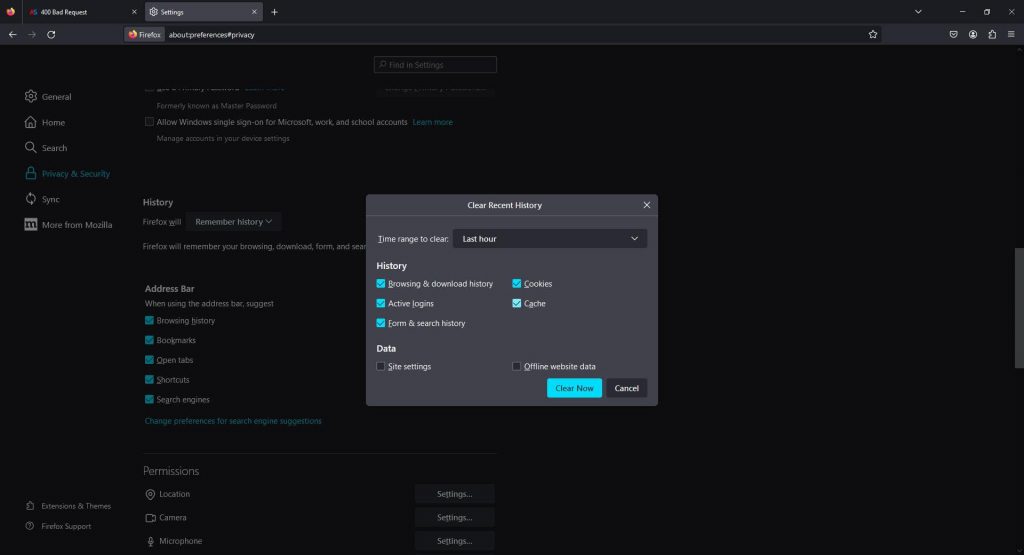
HTTPS Error 400 Bad Request Mozilla Firefox Clear Browsing History Options

From this menu select a time range, make sure that you add a tick Cache, and then click on the Clear Now button:
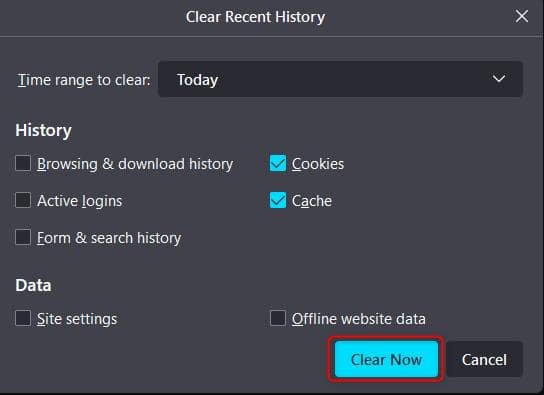
HTTPS Error 400 Bad Request Mozila Firefox Clear Browisng Data Button


Opera

Open the Opera Internet browser and click on the sandwich menu located at the upper right corner of the window:

HTTPS Error 400 Bad Request Opera Browser Options


Click the button, so a menu with the option appears: HTTPS Error 400 Bad Request Opeara Browser Settings
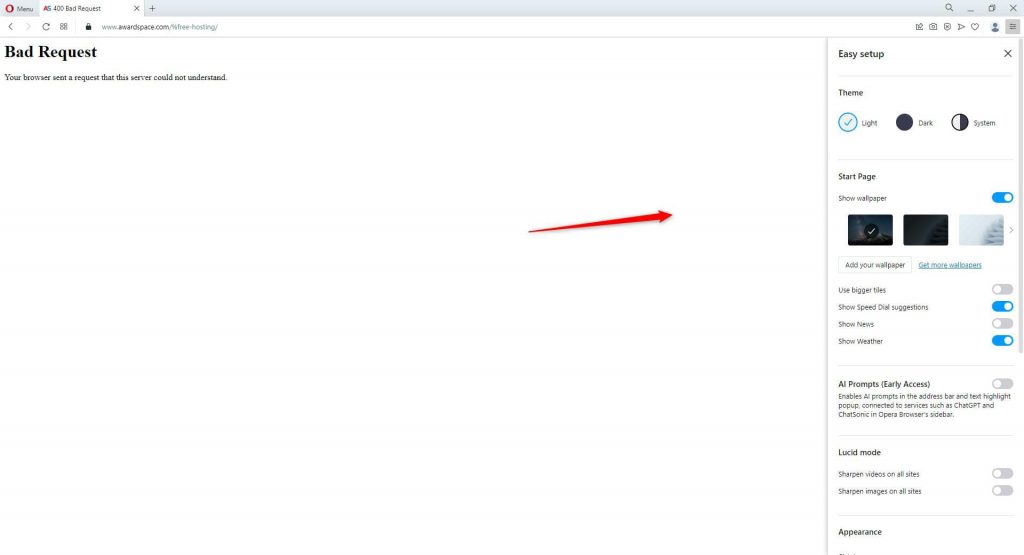
 

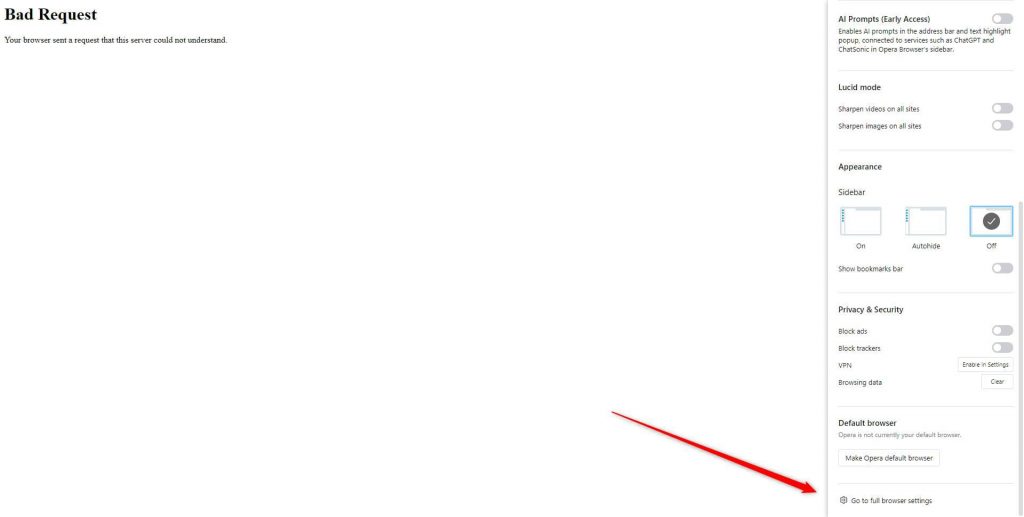
Once you see a menu section such as this, scroll down until you see a Go to full browser settings button. When you locate it, click it: HTTPS Error 400 Bad Request Opeara Browser Access All Settings
 

Once you click it, Opera will open a menu such as this one: HTTPS Error 400 Bad Request Opeara Browser Options Tab
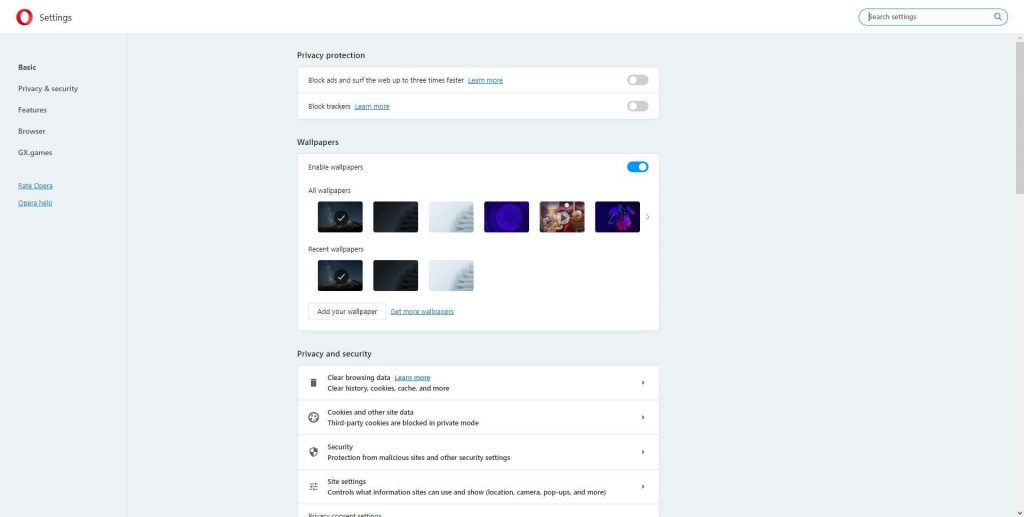
 

In this menu locate the Privacy and Security section: HTTPS Error 400 Bad Request Opeara Browser Browsing History Options
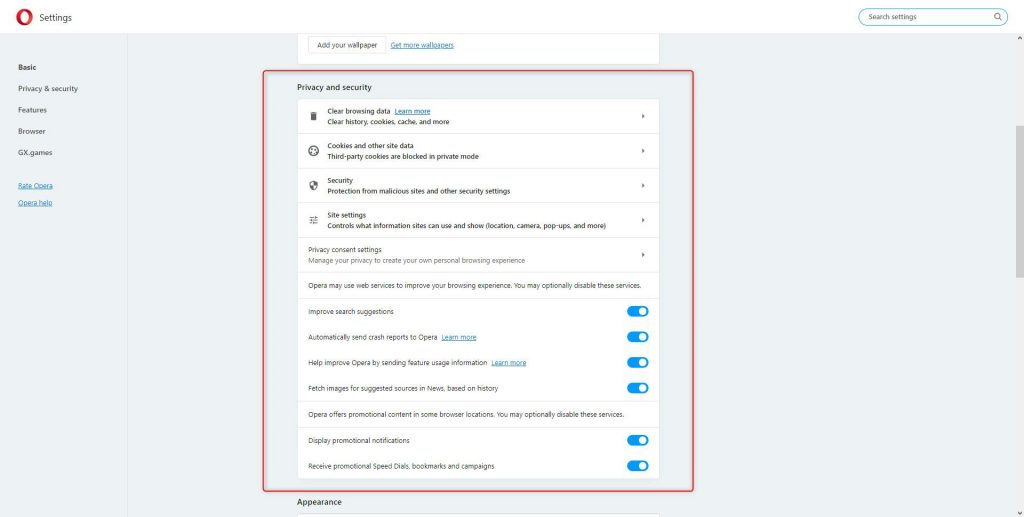
 

Once you see it, locate the Clear browsing data button, and click it:
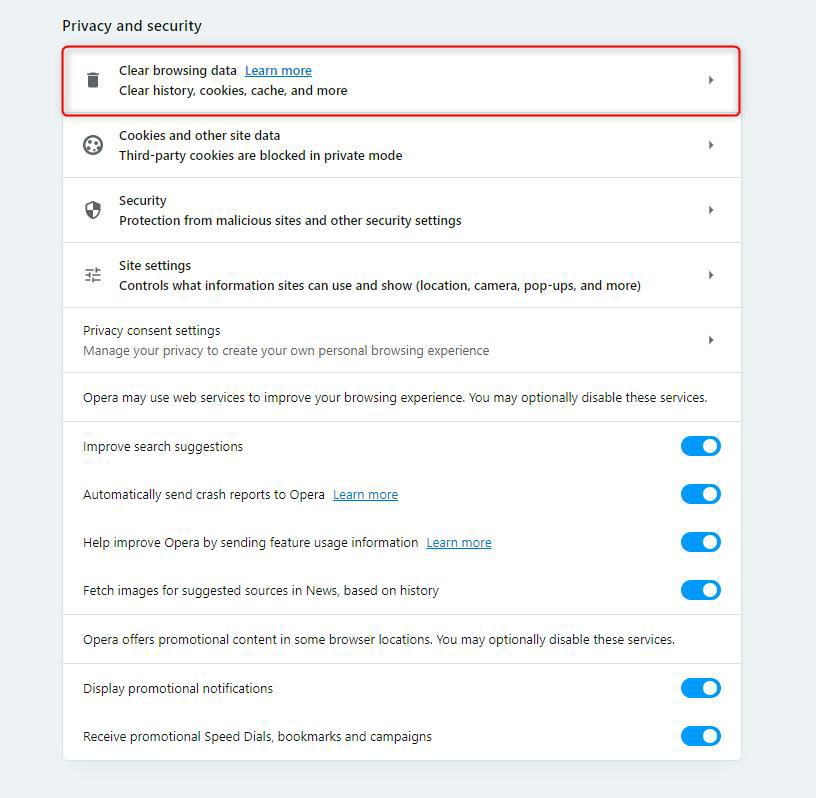
HTTPS Error 400 Bad Request Opeara Browser Clear Browsing Data Options


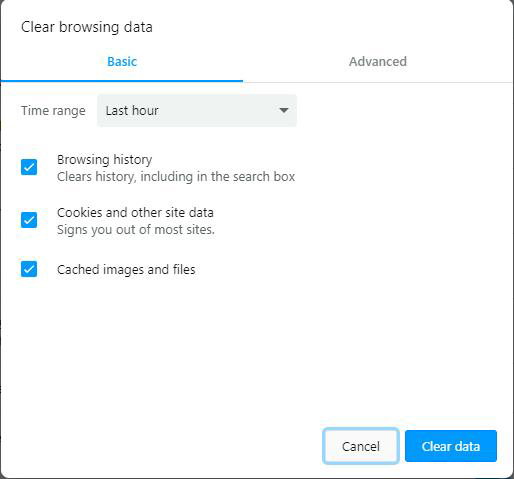
Clicking on the button will prompt Opera to display the various clearing options. Add a tick to Cookies and other site data, and on Cached images and files and click the Clear data button: HTTPS Error 400 Bad Request Opeara Browser Clear Browsing Data Settings
Microsoft Edge

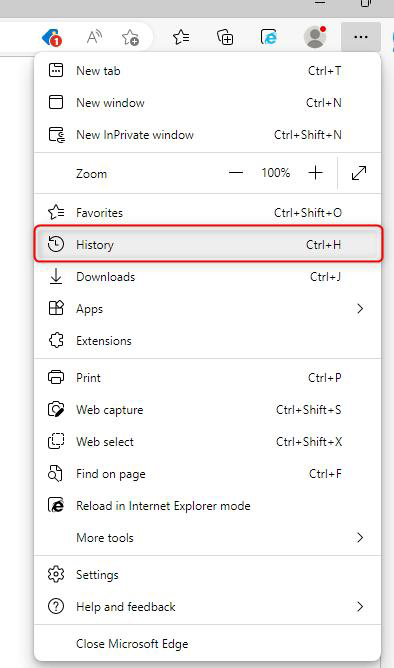
Open Microsoft Edge and click on the three dots at the right of the window: HTTPS Error 400 Bad Request Internet Explorer Settings


This will prompt the browser to display a menu with various settings: HTTPS Error 400 Bad Request Internet Explorer Menu Options
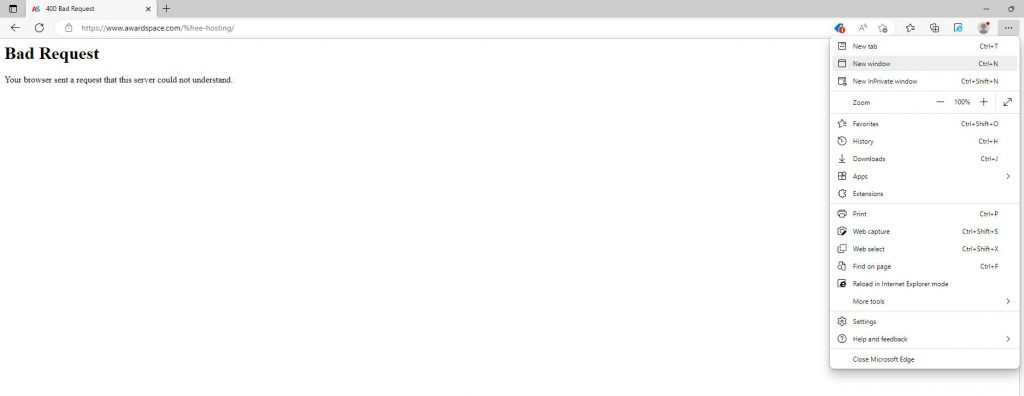
 

From this menu click on History:

HTTPS Error 400 Bad Request Internet Explorer Browsing History Options


A new menu with options will appear. Once you see it, click on the three dots at the corner right of the menu:
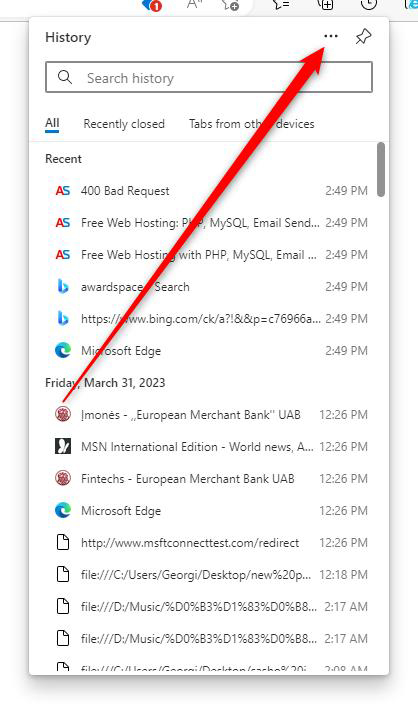
HTTPS Error 400 Bad Request Internet Explorer Access Browsing History Settings

Once you click the three dots, a new menu will appear. Once it does, click on Clear browsing data from the suggested options:
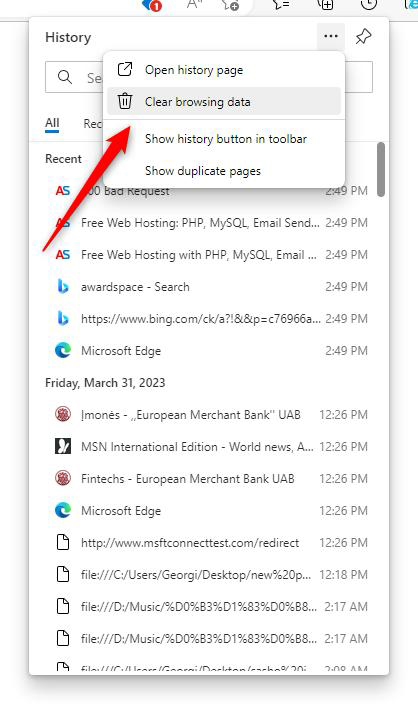
HTTPS Error 400 Bad Request Internet Explorer Clear Browsing Data Button


This will prompt Microsoft Edge to display the clear browser data options:
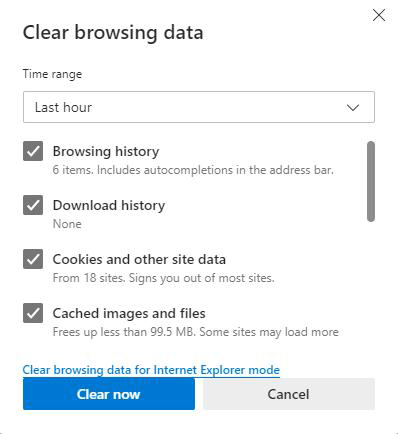
HTTPS Error 400 Bad Request Internet Explorer Browsing History Elements


Once you see this box, select Cached images and files, then click on the Clear Now button:
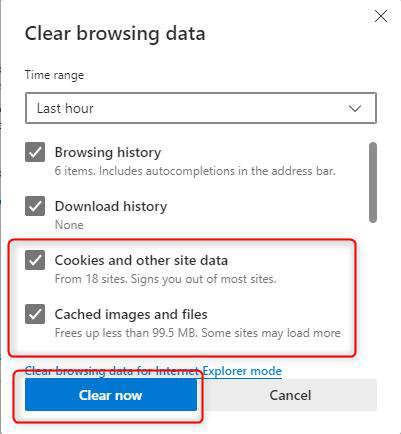
 

HTTPS Error 400 Bad Request Internet Explorer Clearn Browsing History Button


Now that you have managed to clear the Internet browser cache.

Was this post helpful?

i

Relevant tags:

Connect

Latest posts:

How to Install MediaWiki

You can quickly install MediaWiki on any of the AwardSpace web hosting plans. This includes our free web hosting, shared hosting, as well as advanced services such as semi-dedicated hosting and VPS hosting. You can install MediaWiki in a matter of minutes, whichever...

How to Install an Elgg Theme

After you have installed Elgg core and logged in to the admin dashboard, you can search for themes that can help you customize your new website. Elgg themes are a set of files that help you customize the appearance of your website. Via themes, you can modify website...

How to Log in to Elgg

After you install Elgg, it is time to log in to the CMS, so you can start working on your Elgg website. To log in, you should load the Elgg login page and type in your credentials to access the platform’s admin dashboard. In the following paragraphs, we share how to...

How to Install Elgg

You can quickly install Elgg with any of the AwardSpace web hosting plans. You can use our free web hosting, shared web hosting, or advanced hosting plans such as semi-dedicated hosting and VPS hosting.   How to Install Elgg To install Elgg, you should first sign...

How to Change the PHP Timezone

Setting the correct timezone in PHP is crucial for ensuring that date and time functions in your scripts operate accurately. AwardSpace offers a range of hosting plans that provide easy management of PHP settings, including timezone configuration. This article will...


Create a website for free!


Free forever

Our Support Team is Here to Help


If you need any questions answered, don't hesitate and contact us. Click the button below and follow the instructions. You can expect an answer within an hour.


Contact AwardSpace


iNewest knowledge base articles

How to Install MediaWiki

You can quickly install MediaWiki on any of the AwardSpace web hosting plans. This includes our free web hosting, shared hosting, as well as advanced services such as semi-dedicated hosting and VPS hosting. You can install MediaWiki in a matter of minutes, whichever...

How to Install an Elgg Theme

After you have installed Elgg core and logged in to the admin dashboard, you can search for themes that can help you customize your new website. Elgg themes are a set of files that help you customize the appearance of your website. Via themes, you can modify website...

How to Log in to Elgg

After you install Elgg, it is time to log in to the CMS, so you can start working on your Elgg website. To log in, you should load the Elgg login page and type in your credentials to access the platform’s admin dashboard. In the following paragraphs, we share how to...

How to Install Elgg

You can quickly install Elgg with any of the AwardSpace web hosting plans. You can use our free web hosting, shared web hosting, or advanced hosting plans such as semi-dedicated hosting and VPS hosting.   How to Install Elgg To install Elgg, you should first sign...

How to Change the PHP Timezone

Setting the correct timezone in PHP is crucial for ensuring that date and time functions in your scripts operate accurately. AwardSpace offers a range of hosting plans that provide easy management of PHP settings, including timezone configuration. This article will...

How to Disable PHP Error Messages

When running a PHP-based website in a production environment, it's crucial to disable PHP error messages to prevent sensitive information from being exposed to users. AwardSpace offers a variety of hosting plans tailored to different needs, all of which support...

Even more web tutorials

Check out our web hosting knowledge base and the WordPress tutorials to learn more, and be better prepared for your website creation and maintenance journey.