The management of MySQL databases has come a long way thanks to tools like phpMyAdmin. Using phpMyAdmin you are able to not only manage your existing database but also import data from a database backup file with just a few clicks. Sometimes, however, you may run into an issue where a backup fails to import successfully and phpMyAdmin presents you with error 1044 “Access denied for user”. In this article, we will go over why this issue occurs and how to resolve it.
What Causes the phpMyAdmin Error 1044 “Access Denied for User”?
At its core, phpMyAdmin error 1044 signals that there may be something wrong with the permissions assigned to your database user. As the “Access denied for user” description suggests, your database user lacks the necessary privileges to execute one or more of the commands contained within your database backup.
The 1044 access denied error is generally limited to shared hosting accounts since they often do not have full root access to the database server. As such, you may run into this issue if you are using our free website hosting, premium shared hosting, or our Semi-Dedicated web server plans. The only hosting package where you would not be faced with such an issue is our VPS Cloud Hosting plan.
Which Commands Are Restricted in Shared Hosting?
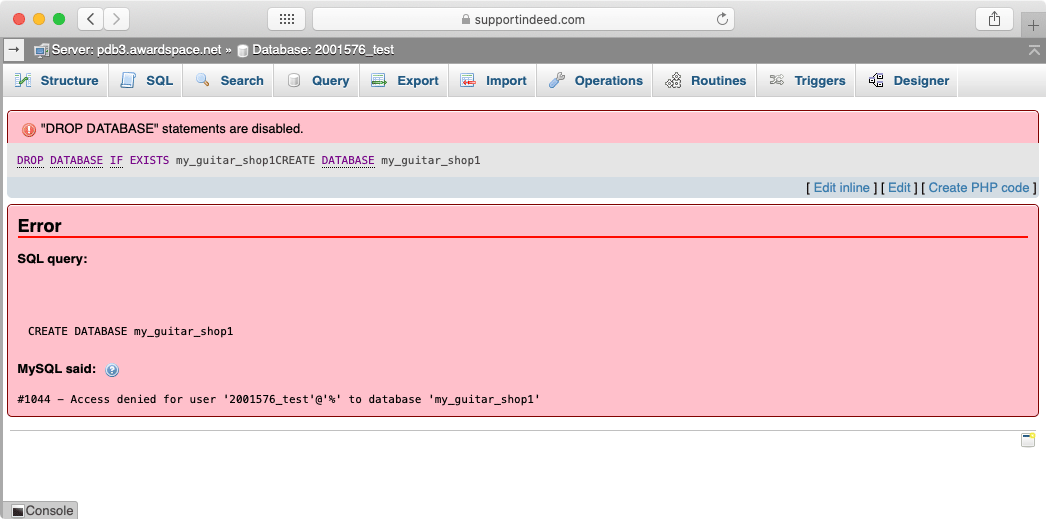
In most shared hosting environments you will not be able to issue commands that directly manipulate entire databases. For example, you will not be able to create or delete a database using SQL commands. The two screenshots below illustrate what happens when you try to create and drop (delete) a database while working in a shared hosting environment:

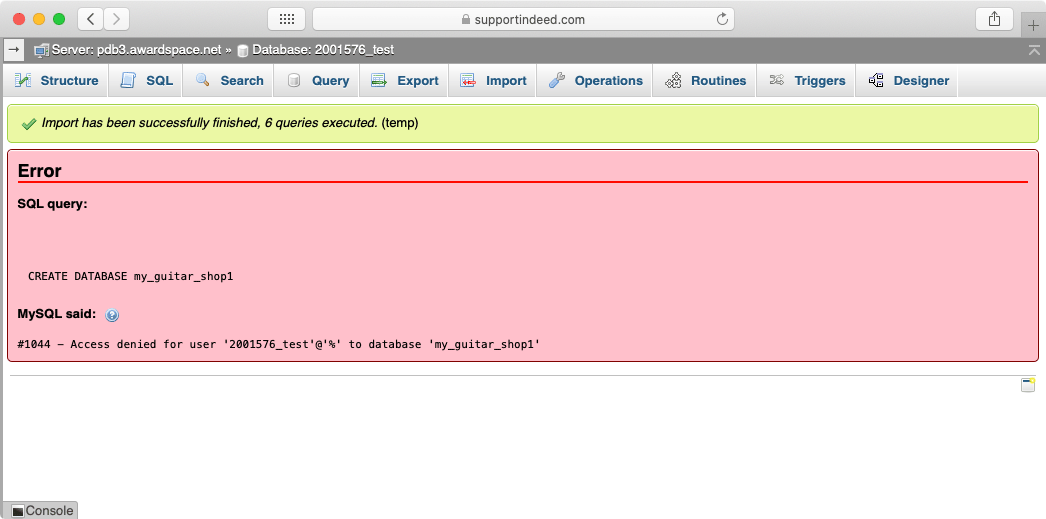
Depending on the type of SQL commands that are contained in your backup file and the server configuration, the importing process may partially succeed. In other words, you can see an “Import has been successfully finished” message while also being presented with an “Access denied for user” error. If this happens to you, it is best to further troubleshoot the issue as you would almost certainly be missing some amount of data. You can view an example of such an error below:

In addition to database creation and deletion, in most cases, there are other types of commands that may be restricted if you are using a shared hosting plan. For instance, you may not be able to create new database users and grant them privileges. To learn more about these restrictions, you can read our article on what do to when a database user has insufficient privileges.
How Can the “Access Denied for User” Error be Fixed?
The first step in fixing the phpMyAdmin error 1044 ”Access denied for user” is identifying the problematic SQL commands. Once identified, these commands need to either be removed or they need to be run in a manner that would not cause such issues.
The two most common SQL commands that can lead to a 1044 access denied error have to do with the creation and deletion of an entire database. Such commands are often included when you make a backup of your MySQL database.
Your MySQL backup file can be packaged in different ways. In some cases, it can be provided to you as an archive using the .ZIP, .RAR, TAR, .7z or a similar extension. If you do have an archive on your hands, you would need to extract it and obtain its contents. The contents themselves should contain one or more files that have the .TXT or .SQL extension or perhaps no extension at all. You should be able to open these files using a plain text editor. If you are using Windows, we recommend opening the files using Notepad or Notepad++, Mac users can use TextEdit, and Linux users can use nano or vim.
In this article, we will use the sample code below:
/******************************************
Create the musicshop database
*****************************************/

DROP DATABASE IF EXISTS musicshop;
CREATE DATABASE musicshop;
USE musicshop;

-- create the tables
CREATE TABLE categories (
categoryID INT(11) NOT NULL AUTO_INCREMENT,
categoryName VARCHAR(255) NOT NULL,
PRIMARY KEY (categoryID)
);

CREATE TABLE products (
productID INT(11) NOT NULL AUTO_INCREMENT,
categoryID INT(11) NOT NULL,
productCode VARCHAR(10) NOT NULL UNIQUE,
productName VARCHAR(255) NOT NULL,
listPrice DECIMAL(10,2) NOT NULL,
PRIMARY KEY (productID)
);

CREATE TABLE orders (
orderID INT(11) NOT NULL AUTO_INCREMENT,
customerID INT NOT NULL,
orderDate DATETIME NOT NULL,
PRIMARY KEY (orderID)
);

-- insert data into the database
INSERT INTO categories VALUES
(1, 'Guitars'),(2, 'Basses'),(3, 'Drums');
If we try to run this code in phpMyAdmin, we would get the 1044 error. This is because we are attempting to both create and delete a database via SQL commands on a shared server. The specific code that is causing these issues is the following:
DROP DATABASE IF EXISTS musicshop;
CREATE DATABASE musicshop;
USE musicshop;
Since we cannot run these commands via phpMyAdmin, we would need to perform them by hand using the Database Manager section of the Hosting Control Panel:
- the first command
DROP DATABASE IF EXISTS musicshop;instructs us to delete a database calledmusicshopif it already exists. - the second command
CREATE DATABASE musicshop;instructs us to create a new database calledmusicshop. - lastly, the third command
USE musicshop;simply asks us to make sure thatmusicshopis the active database. We can do that by opening it in phpMyAdmin.
Once the problematic commands are performed manually, we need to remove them from the backup file. Using the text editor of your choice, remove the commands outlined earlier in our tutorial and then save your changes. In our example, the end result would be a file with the following contents:
/******************************************
Create the musicshop database
*****************************************/

-- create the tables
CREATE TABLE categories (
categoryID INT(11) NOT NULL AUTO_INCREMENT,
categoryName VARCHAR(255) NOT NULL,
PRIMARY KEY (categoryID)
);

CREATE TABLE products (
productID INT(11) NOT NULL AUTO_INCREMENT,
categoryID INT(11) NOT NULL,
productCode VARCHAR(10) NOT NULL UNIQUE,
productName VARCHAR(255) NOT NULL,
listPrice DECIMAL(10,2) NOT NULL,
PRIMARY KEY (productID)
);

CREATE TABLE orders (
orderID INT(11) NOT NULL AUTO_INCREMENT,
customerID INT NOT NULL,
orderDate DATETIME NOT NULL,
PRIMARY KEY (orderID)
);

-- insert data into the database
INSERT INTO categories VALUES
(1, 'Guitars'),(2, 'Basses'),(3, 'Drums');
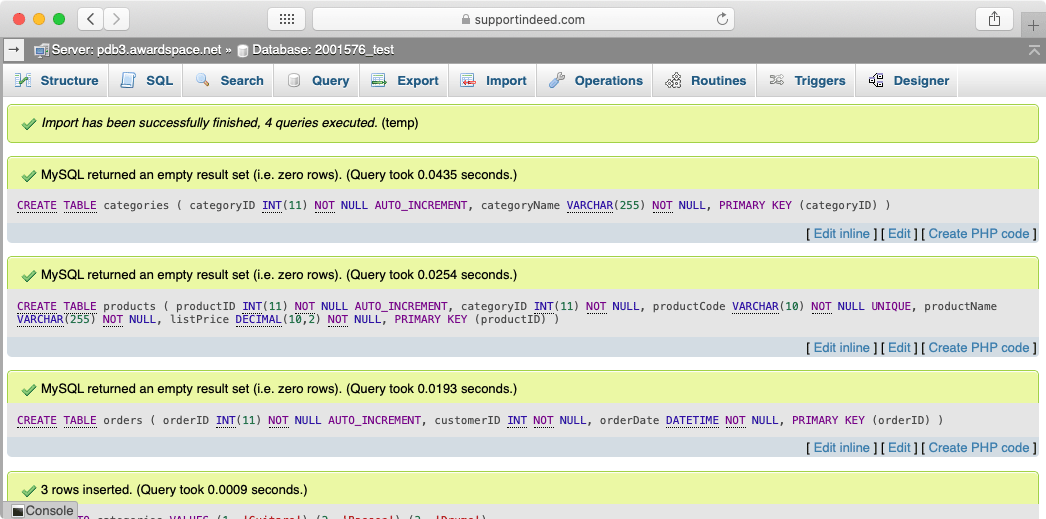
This file should now be fully compatible with shared hosting environments and you should be able to import it without any issues using phpMyAdmin:

The 1044 Access Denied Error Persists. What Else Can Be Done?
In rare cases, you may still be faced with the ”Access denied for user” error once you perform the above actions. If this happens to you, we recommend thoroughly checking your entire SQL code for any other CREATE DATABASE or DROP DATABASE statements.
Depending on how the database backup was made, it may be instructing phpMyAdmin to create not one, but multiple databases in one go. In these situations, you would need to use the CREATE DATABASE commands as dividers and split your backup file into several files where each file is responsible for restoring a single database.
Then, you would need to follow our guide as outlined above for each of these backup files in order to manually carry out the database creation and deletion commands.
Conclusion
While the phpMyAdmin error 1044 “Access denied for user” may sound serious and difficult to resolve, in most cases, it actually takes a just handful of small edits to fix the problem. All you need is a few minutes of work, patience, and a plain text editor. And if all else fails, you can always contact the 24/7 Technical Support Team via a Trouble Ticket for additional assistance.
