How to Enable Outgoing Connections

Home » Knowledge Base » Control Panel » Website Manager » How to Enable Outgoing Connections

Outgoing connections are a necessary feature for modern websites. They are used to establish a connection to external servers. In this article, we will review how to enable the outgoing connection for your hosting account.


Enabling outgoing connections

The outgoing connections are a premium feature and thus are available only for our Premium Hosting Plans. If you are using the Free Hosting Plan and you would like to enable them you will first have to upgrade your plan.

To enable the outgoing connections for your account simply follow the steps below:

  1. Login to your Hosting Control Panel
  2. From the Hosting Tools menu open the Hosting Settings page
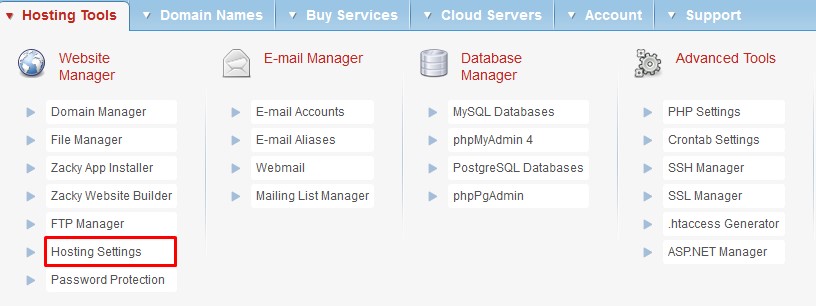
  3. Scroll down to Firewall Options and enable the HTTP Outgoing connections
outgoing-connections

Currently, you can only enable HTTP(s) Outgoing connections from the Hosting control panel. If you would like to establish an SMTP connection please refer to our article here.


Outgoing connections are enabled but my website still cannot connect to the external server. Why?

The most common reason for your website to not establish a connection to an external server, after you have enabled the outgoing connections would be if the PHP extension curl is disabled.

To save you the extra step we have the curl extension enabled by default on all paid hosting plans. This can be seen inside the php.ini file from the PHP Settings page. The settings inside php.ini are global for your hosting account. Because of this, having a php.ini file inside your website directory would overwrite the settings inside the global php.ini file.
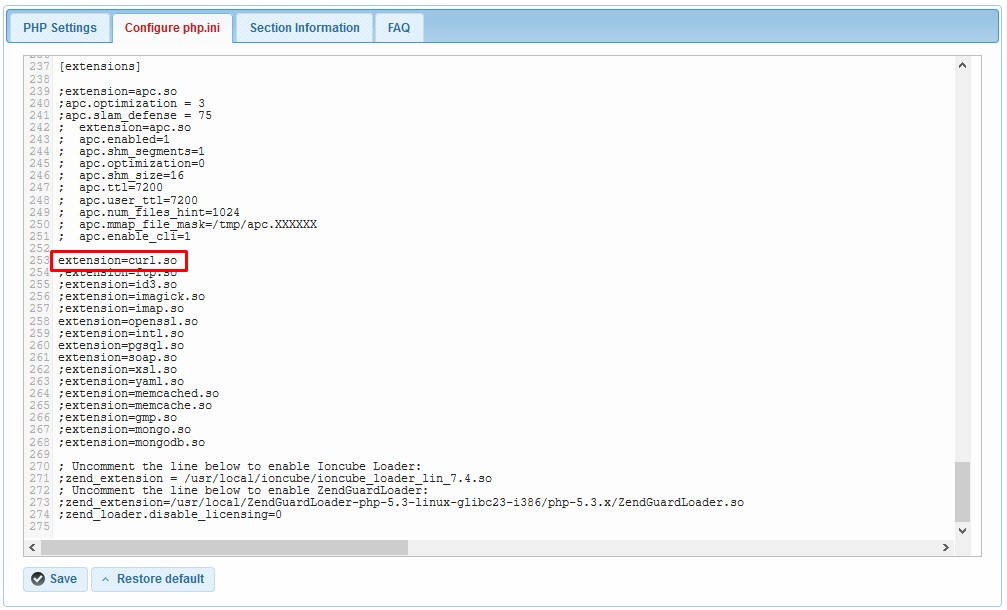
php-ini-file

To make sure that all changes inside your global php.ini are in effect is to make sure that you do not have any php.ini files inside your website directory. A similar example would be the default Opencart installations which have php.ini files in their directory that would prevent your website from connecting to external servers.

To solve this all you need to do is access the website directory and remove the php.ini file(s).


Still not able to connect to external servers?

Although all of this should be enough for your site to establish a connection to an external server, there are still some cases where you might experience issues. For example a blocked network or corrupted file. Our technical support team would be happy to assist you with troubleshooting the issue.

If you have followed our articles for activating the outgoing connections and your website still does not connect, we would recommend you to contact our technical support via Trouble Ticket or email support@supportindeed.com.

Was this post helpful?

i

Relevant tags:

Connect

Latest posts:

Create an FTP Account

In this article, we will show you how to create an FTP account using the AwardSpace hosting panel. The process is simple and comprises only a few steps. Please note that you must be registered for any of our web hosting plans to utilize this feature. Here's how to...

How to Access the File Manager

All AwardSpace hosting plans include a handy file management tool called File Manager. It is instantly available after you subscribe to any of our plans, including our free hosting, or register a domain name with AwardSpace. By using the File Manager, you can manage...

How to Access Your Website Usage Report

All AwardSpace hosting plans include a handy analytics tool that allows you to monitor your hosting features and their usage. Once you subscribe to any of our plans or register a domain name with AwardSpace, including our free hosting, you have the option readily...

How to Add Dynamic Fields in Vtiger

Vtiger is a versatile CMS that you can use for free with all AwardSpace hosting plans. The CMS offers numerous options to manage your online business, workflows, and team roles. Among other useful tweaks, Vtiger also provides you with dynamic fields and layouts that...


Create a website for free!


Free forever

Our Support Team is Here to Help


If you need any questions answered, don't hesitate and contact us. Click the button below and follow the instructions. You can expect an answer within an hour.


Contact AwardSpace


iNewest knowledge base articles

Create an FTP Account

In this article, we will show you how to create an FTP account using the AwardSpace hosting panel. The process is simple and comprises only a few steps. Please note that you must be registered for any of our web hosting plans to utilize this feature. Here's how to...

How to Access the File Manager

All AwardSpace hosting plans include a handy file management tool called File Manager. It is instantly available after you subscribe to any of our plans, including our free hosting, or register a domain name with AwardSpace. By using the File Manager, you can manage...

How to Access Your Website Usage Report

All AwardSpace hosting plans include a handy analytics tool that allows you to monitor your hosting features and their usage. Once you subscribe to any of our plans or register a domain name with AwardSpace, including our free hosting, you have the option readily...

How to Add Dynamic Fields in Vtiger

Vtiger is a versatile CMS that you can use for free with all AwardSpace hosting plans. The CMS offers numerous options to manage your online business, workflows, and team roles. Among other useful tweaks, Vtiger also provides you with dynamic fields and layouts that...

How to Add Tags in Vtiger

Tags in Vtiger grant you the possibility to quickly and efficiently organize and retrieve records. Tags work like labels, allowing you to distribute leads, contacts, opportunities, tickets, and other entries into different categories based on a set of criteria. What...

Even more web tutorials

Check out our web hosting knowledge base and the WordPress tutorials to learn more, and be better prepared for your website creation and maintenance journey.