Nowadays, the use of a database is very common when building a website. The main role of the database is to store the information that is present on each page. This allows you to modify your design without affecting the text that is shown throughout your site. As such, it is recommended that all new websites take full advantage of the benefits, afforded by the use of a database. In this article, you will learn how to find your database connection settings, so you can hook up your site to a database. Additionally, you will learn how to manipulate the data contained within the database itself.
What Is the Database Manager?
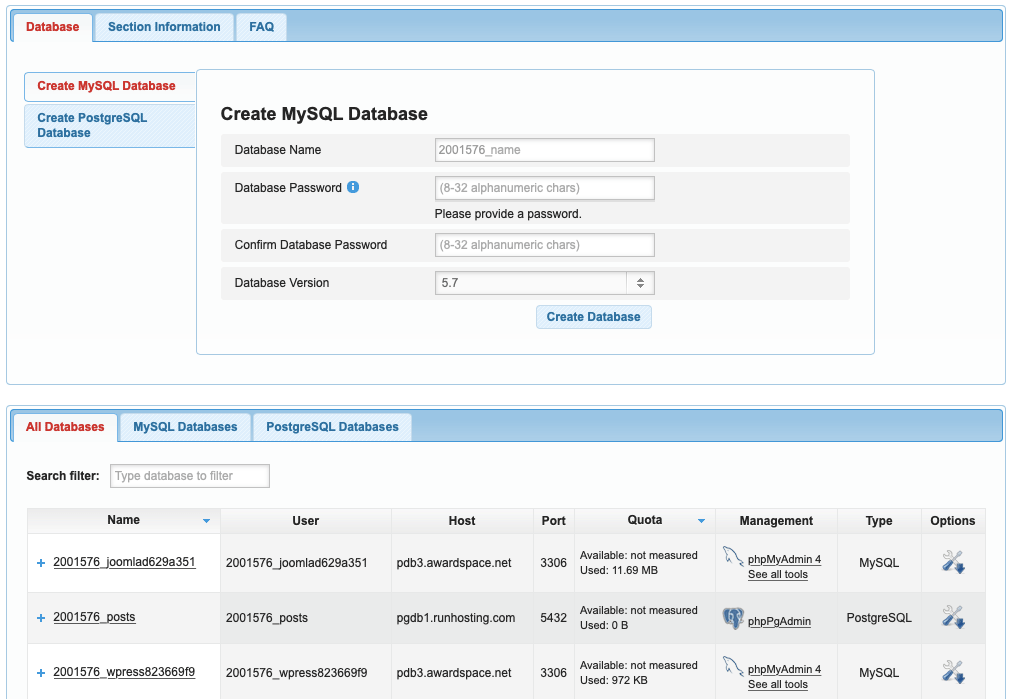
In the Hosting Control Panel, you will find a section dedicated to the management of your databases, aptly named the Database Manager.

Through the Database Manager, you are able to create, edit, and delete databases. There are two supported database types – MySQL and PostgreSQL. Both database types can be used to store your site’s content and you can interact with each database type in a similar manner. You can learn more about the features and capabilities of this section of our Control Panel by reading our in-depth tutorial on the Database Manager.
We believe that having a database is a fundamental part of running a modern website and that is why even our free hosting plan comes with one MySQL database which you can use. If you require multiple databases or you wish to use a PostgreSQL database, you may consider opting for one of our premium hosting packages.
Where Can I Find My Database Connection Settings?
Locating your database connection settings is a straightforward process:
- Open the Database Manager section of the Control Panel.
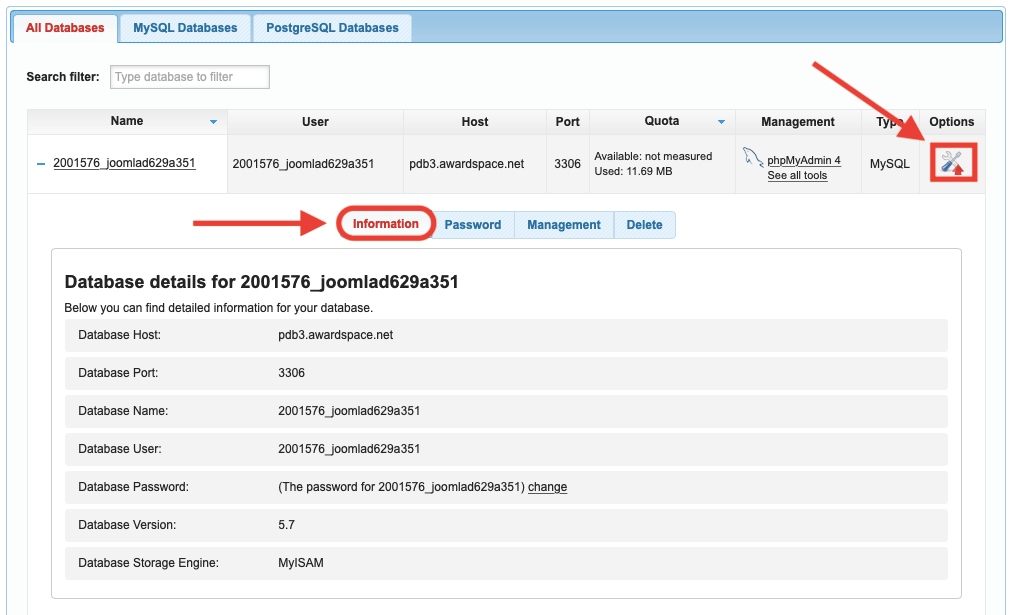
- Click on the Options button next to your database. If you haven’t created a database yet, you can do so by using the database creation form in the upper half of the Database Manager interface.
- You will notice that several tabs appear beneath the database name. Click on the Information tab.

You will then be presented with your database connection settings. This information includes the:
- Database Host
- Database Port
- Database Name
- Database User
- Database Password
- Database Version
- Database Storage Engine
Note: Unlike other hosting providers, here at AwardSpace we use dedicated database servers in order to better distribute the server load and offer faster loading times for your website. As such, you need to find your database host using the information provided in the Information tab. Using localhost will not allow you to establish a successful connection to our database server.
Where Can I Get a Sample PHP Script That Connects to My Database?
You are welcome to use the following PHP script as the starting point for your website. This script opens a connection to your MySQL database, lists the names of all tables that are currently stored, and then closes the connection:
<?php

$db_host='DB_HOST'; //Should contain the "Database Host" value
$db_name='DB_USER'; //Should contain the "Database Name" value
$db_user='DB_NAME'; //Should contain the "Database User" value
$db_pass='DB_PASS'; //Should contain the "Database Password" value

$mysqli_connection = new MySQLi($db_host, $db_user, $db_pass, $db_name);

if ($mysqli_connection->connect_error) {
echo "Could not connect to $db_user, error: " . $mysqli_connection->connect_error;
} else {
echo "Connected to $db_user! <hr> The database contains the following tables: <br />";
}

$showtablequery = "SHOW TABLES FROM $db_user";
$showtablequery_result = mysqli_query($mysqli_connection, $showtablequery);

while($showtablerow = mysqli_fetch_array($showtablequery_result))
{
echo $showtablerow[0]."<br />";
}

$mysqli_connection->close();
echo "<hr> mysqli_connection closed!";

?>
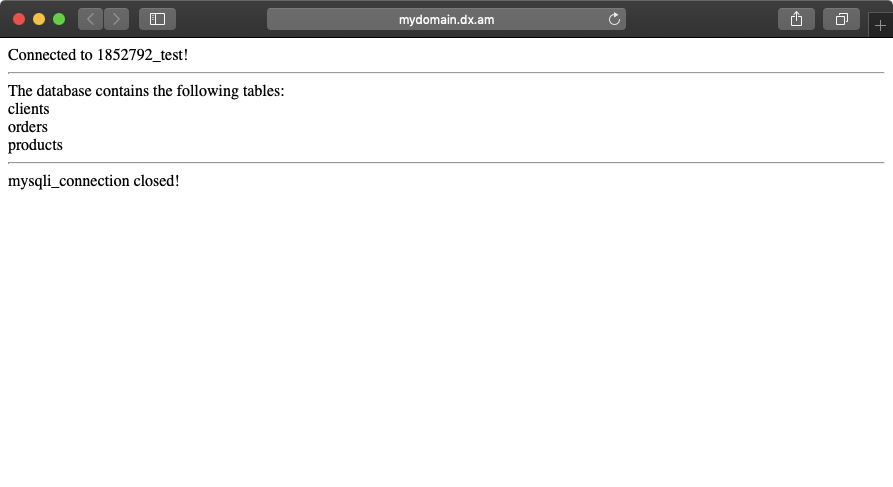
For the best results, create a new .PHP file in your hosting space and copy the sample code above. Just make sure to update the values for the $db_host, $db_name, $db_user, and $db_pass variables. They are defined at the very beginning of the script. Once your credentials are entered and saved, you should be able to run your script by opening it in a web browser. The end result should be a page that lists all tables present in your MySQL database:

If the script does not list any tables when you run it, it is probably because you have just created your MySQL database and it doesn’t contain any data just yet. Continue reading in order to learn how to interact with your database and add data to it.
How Can I Manage the Data Stored in My Database?
Depending on the type of database you have, you can use either phpMyAdmin or phpPgAdmin in order to manage your database’s contents. MySQL databases are managed through phpMyAdmin, while PostgreSQL databases use phpPgAdmin. To launch either of those tools (depending on your database type), simply follow the steps below:
- Open the Database Manager section of the Control Panel.
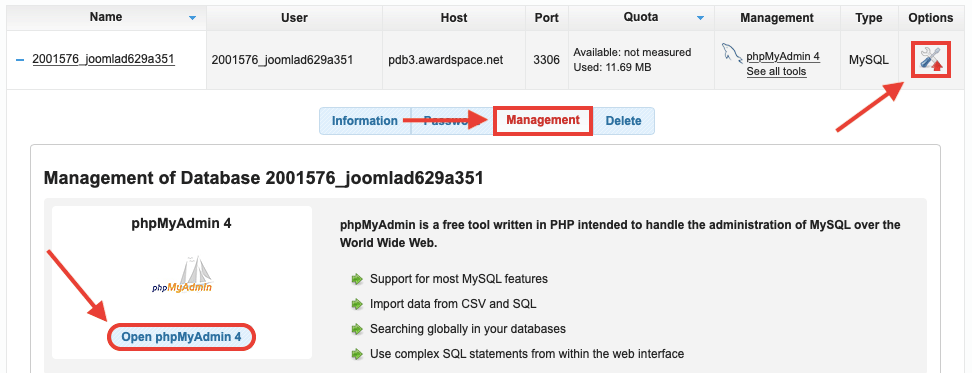
- Click on the Options button next to your database.
- You will notice that several tabs appear beneath the database name. Click on the Management tab.
- Click on the option named Open phpMyAdmin 4 or Open phpPgAdmin, depending on the type of database you are looking to manage.

Upon clicking the button to open phpMyAdmin or phpPgAdmin, a new window or tab should open in your web browser and you should be taken directly to the contents of your database.
Important: If you are asked to log into phpMyAdmin/phpPgAdmin, make sure that you use your database username and password to do so and not your hosting account Client ID and password. Your credentials are listed in the Information tab for your reference.
If you are new to phpMyAdmin and phpPgAdmin, you can learn more about these tools by reading our articles on how to use phpMyAdmin and how to use phpPgAdmin.
Can I Use Software Like MySQL Workbench in Order to Manage My Database?
Due to security reasons, the databases created on your hosting account can only be used either through the phpMyAdmin/phpPgAdmin utilities or through scripts that are hosted on your account. Connections from other sources are rejected. As such, you would not be able to use a third-party database manager like the MySQL Workbench with your database that is live on our servers.
If being able to fully interact and connect to your database is important to you, you may consider purchasing one of our VPS hosting packages which all grant you root access to a virtual Linux server. You can then proceed to set up your server in a way that would allow connections from external sources.
Can I Use the Database Provided by AwardSpace in Order to Power My Smartphone App?
If you are developing a smartphone application, you may be thinking about using a database hosted on your account for the purpose of storing your users’ data. Such a scenario is completely possible when using a Virtual Private Server (VPS).
If you are using one of our shared hosting plans, on the other hand, you can still accomplish your goal, but with some caveats. The one major limitation, which you will need to work around, is the fact that your app will not be able to talk to the database directly. Instead, you will need to create PHP scripts on your hosting account which will interact with the database. Your app would need to send queries to those scripts in order to retrieve information from the database and also write data into the database.
Conclusion
Using a database to store your website content is a great way to build a dynamic site that is able to display varying information. And thanks to the Database Manager section of the Control Panel, you can easily create new databases, view your database connection settings, modify existing databases, and delete those which you no longer need.
