MySQL databases, like any other software product, are constantly being developed and new features are being added all the time. Popular CMSs like WordPress and Joomla are quick to adopt these new database features in order to improve security, reliability, and performance. In this article, we will take a look at one of the most important aspects of a MySQL database – its storage engine. We will discuss what a storage engine is and how to change the storage engine for your MySQL database tables.
What Is a Database Storage Engine?
At its most basic level, a database storage engine is a program that directly manipulates the information stored within the database. The storage engine accepts commands through its programming interface (API). These commands instruct the engine to create, read, update or delete one or more database entries.
What Is the Default Storage Engine?
Currently, if you start creating new tables in your database without specifying a storage engine, the MyISAM storage engine will be used by default. The good news is that if you later realize that you need a different engine for your table, you will be able to change it without any data loss.
How Can I Discover Which Storage Engine Is Used on a Particular Table?
If you are not sure which storage engine is being used in your table, you can easily find out through phpMyAdmin or by sending an SQL query. We will cover both approaches.
To discover which storage engine you are using through phpMyAdmin’s interface, follow these steps:
- Navigate to the phpMyAdmin utility in your web browser.
- If necessary, log in using your database credentials (not your hosting account credentials).
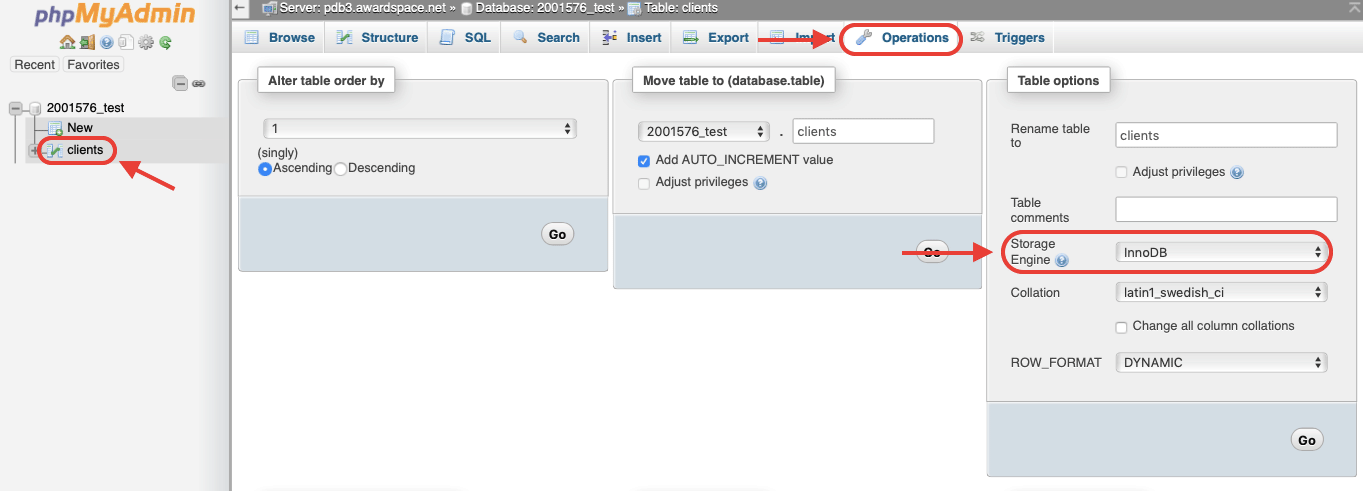
- Click on the table name which you would like to inspect from the list of the left.
- Switch to the Operations tab.
- You will find your Storage Engine listed in the Table options section.

If you are in a hurry or just prefer to send SQL commands manually, you can jump to the SQL tab of phpMyAdmin (or create a script that connects to your database) and run the following query (make sure that you replace table-name with the actual name of the table you are querying):
SHOW TABLE STATUS WHERE `Name` = 'table-name';
The results will be presented in a table format. The storage engine will be listed in the Engine column, as shown below:

How Do I Create a MySQL Table That Uses the InnoDB Storage Engine?
If you know that your site will be requiring the InnoDB storage engine, you can easily create your new tables using InnoDB from the onset. The InnoDB engine is available on all of our paid hosting plans and even on our free hosting service. In fact, there are two different ways you can set your storage engine, depending on how you create your table – via the phpMyAdmin interface or using an SQL command.
You can create a table with InnoDB as its storage engine via phpMyAdmin’s interface by following the steps below:
- Navigate to the phpMyAdmin utility in your web browser.
- If necessary, log in using your database credentials (not your hosting account credentials).
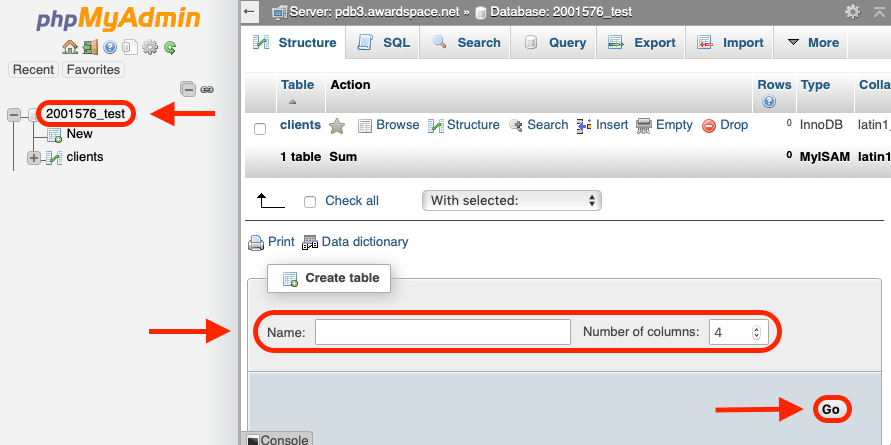
- Click on the database name from the list of the left in order to indicate where you would like to include the new table.
- In the Create table section, pick a name for your new table and choose the number of columns.
- Press the Go button in order to start creating your new table.

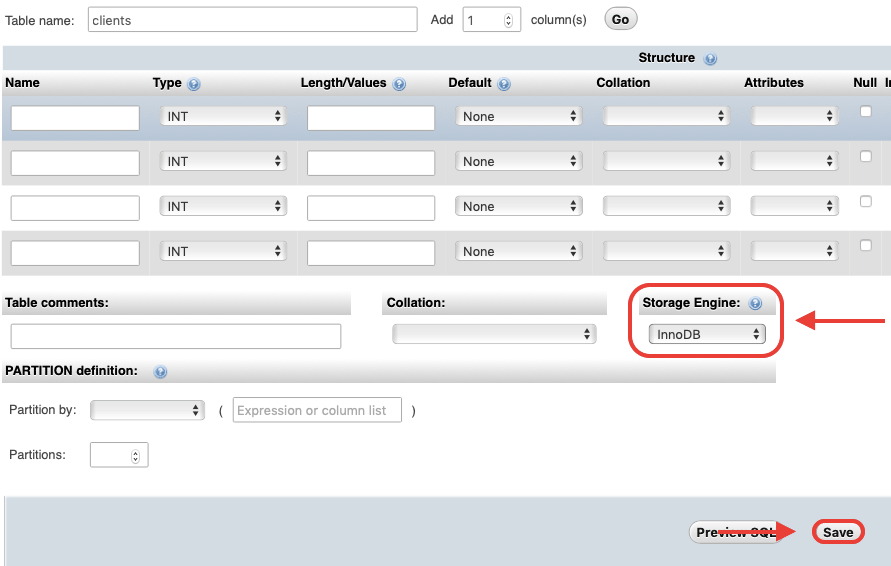
- You will be taken to the table creation interface. Locate the Storage Engine section and make sure that InnoDB is selected from the dropdown.
- Finish creating your table by customizing each column. When done, press the Save button.

If you prefer to use your own SQL statements when creating a new table, simply make sure to append ENGINE=InnoDB to your statement as is shown in the example below:
CREATE TABLE new-table (a INT NOT NULL, b CHAR(10)) ENGINE=InnoDB;
How Do I Convert an Existing MySQL Table From the MyISAM Storage Engine to InnoDB?
You may be surprised to learn that it is indeed possible to change the storage engine for an existing MySQL table. And best of all – your data will remain safe. Converting your table from MyISAM to InnoDB is a straightforward process that can be achieved via both phpMyAdmin and an SQL query.
To convert your storage engine via phpMyAdmin, follow the steps below:
- Navigate to the phpMyAdmin utility in your web browser.
- If necessary, log in using your database credentials (not your hosting account credentials).
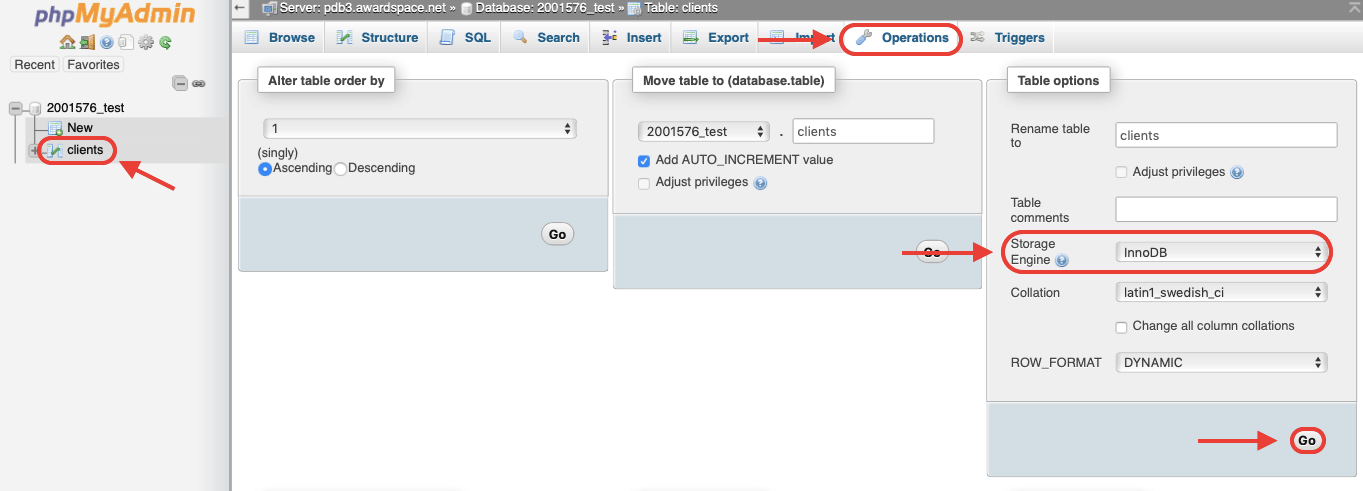
- Click on the table name which you would like to modify from the list on the left.
- Switch to the Operations tab.
- Locate the Table options section and use the dropdown menu to Storage Engine to change your storage engine from MyISAM to InnoDB.
- Once you have made your selection, press the Go button at the bottom of the Table options section in order to save your changes.

As an alternative, you can also execute an ALTER TABLE SQL statement in order to start using a different storage engine (make sure to replace table-name with the actual name of the table you are modifying):
ALTER TABLE `table-name` ENGINE = InnoDB;
The only caveat that should be mentioned is that some storage engines have features that are not found in other storage engines. So if you convert from a storage engine with more features to one with fewer, you may lose some of these extra customizations. Continue reading in order to find the most notable differences between the MyISAM and InnoDB storage engines.
What Are the Main Differences Between the InnoDB and MyISAM Storage Engines?
While in most cases your website software will dictate the type of storage engine you should use, some packages support both types of storage engine and it will be ultimately up to you which storage engine you will use. Below is a brief comparison between the two most popular storage engines InnoDB and MyISAM.
Overall, InnoDB is the more advanced storage engine. It uses a relational base design that enables features like transactions, foreign keys, and row locking. Consequently, you will experience better performance if your project executes a lot of inserts, updates, and deletes. InnoDB is also geared towards large databases.
Conversely, MyISAM excels in terms of performance if your project mainly reads from the database without modifying any data. MyISAM is also the preferred storage engine for smaller projects.
Conclusion
The ability to quickly switch between the different storage engines gives you the flexibility to adapt your database to your project’s needs as it grows over time. And since your data is automatically preserved with each storage engine change, you can experiment with different storage engines with no risk and minimal effort.
