Create a Page in WordPress

Home » Knowledge Base » Design Tools » WordPress » Create a Page in WordPress

WordPress pages are, similar to the posts, a key building element of a WordPress website. While the posts are ordered chronologically and, therefore, used for blog or news feeds, the pages in WordPress are static and (usually) not tied to a date. The content on the pages is not expected to change frequently.  Pages that, more or less, every website should have might include: ‘About Us’, ‘Contact’, ‘Services’, and ‘Privacy Policy’ pages.

Creating a page in WordPress is a straightforward process. To do so, follow these steps:


Step 1: Log in to Your WordPress Dashboard

Naturally, the first step would be to enter your Admin Panel. You can use the username and password that you have entered while installing WordPress. The URL of the WordPress login page is usually `yourdomainname.com/wp-admin`.

Related: How to Log In to WordPress


Step 2: Access the Page Editor

Once you’re in the dashboard, go to the Pages section by clicking on Pages in the left-hand menu. Then, click on Add New to open the page editor.


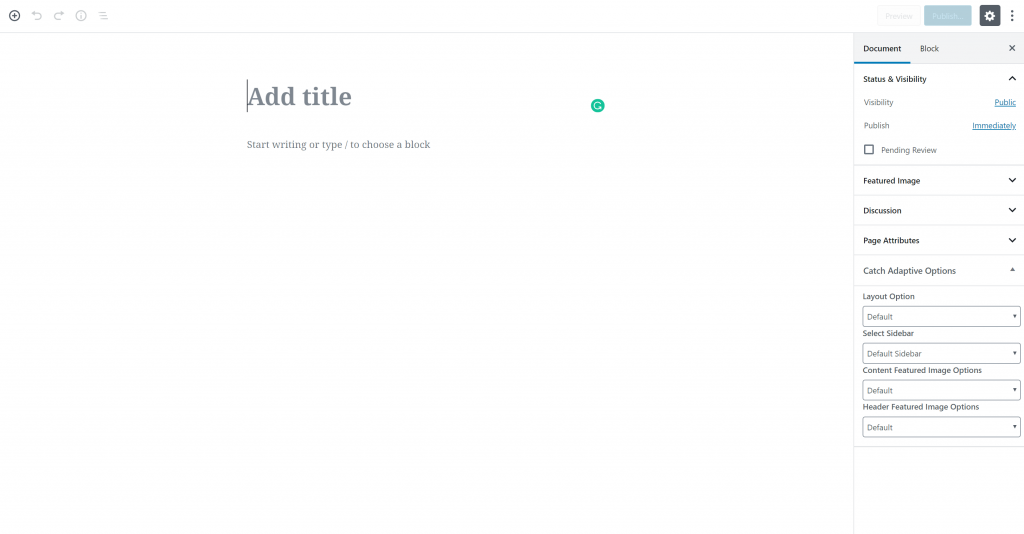
Step 3: Add Title and Content

At the top of the page editor, you’ll find a field to enter the title of your page. Below that is the WordPress block editor (also known as Gutenberg), where you can add and format the content of your page. You can add text, images, videos, and other media to your page using blocks.


Step 4: Use Blocks to Add Content

The block editor uses blocks to add and organize content. Click on the + button to see the available blocks, such as paragraphs, headings, images, lists, and more. Select the block you want to use and add your content.

If you need more in-depth directions on how to use the new WordPress editor, please refer to our Gutenberg Tutorials.


Step 5: Set the Page Attributes (Optional)

In the right-hand panel of the editor, you’ll find the Page Attributes section, where you can set parent pages (to create a hierarchy of pages, if needed) and choose a template (if your theme provides multiple page templates).


Step 6: Preview and Publish

Use the Preview button to see how your page will look on the front end of your site. Once you’re satisfied with the page, click on Publish to make your page live on your website.

Both the posts and the pages have Featured images, meta descriptions, and the option to leave on or remove the comment section. Naturally, there are some important differences between the posts and the pages in WordPress. And that is, of course, the reason these two types of content exists in the CMS. Now you already know how to build a new page as well as create a WordPress post.

If you need more in-depth directions, check our previously published article on How to Add a Page to a WordPress Website

If you feel like you are ready to go further in the CMS, feel free to browse our WordPress Tutorials section.

Was this post helpful?

i

Relevant tags:

Connect

Latest posts:

How to Fix 308 Permanent Redirect

308 Permanent Redirect is an HTTPS status code indicating that the requested resource has been permanently moved to another location. Similar to 301 Moved Permanently, 308 informs the user of the movement of a given online resource, and unlike the 301 redirect, 308...

How to Fix 301 Error Moved Permanently

The 301 Moved Permanently is an HTTP status code that indicates a permanent relocation of an online resource from a given URL to a new one. More technically, the moved resource has been moved to the new URL specified in the Location header. The HTTP 301 status code is...

How to Fix 307 Temporary Redirect

307 Temporary Redirect is a response HTTP status code that indicates the requested resource has been moved to a different URL for a limited period of time. Unlike a 301 permanent redirect, the 307 Temporary Redirect message indicates that the change is temporary and...

How to Access Crontab Settings

To access the crontab settings, first, you need to log in to your AwardSpace hosting panel. After you have logged in, head to Crontab Settings, located within the Advanced Tools category:   After you click the Crontab Settings icon, a new page should load. Once...

How to Check My Auto Renewals

To check your AwardSpace hosting plan auto-renewals, first log in to the admin dashboard. Then, head to Wallet, within the Orders & Invoices section:   After that, click the Auto Renewals tab, where you can check any relevant information about your hosting...


Create a website for free!


Free forever

Our Support Team is Here to Help


If you need any questions answered, don't hesitate and contact us. Click the button below and follow the instructions. You can expect an answer within an hour.


Contact AwardSpace


iNewest knowledge base articles

How to Fix 308 Permanent Redirect

308 Permanent Redirect is an HTTPS status code indicating that the requested resource has been permanently moved to another location. Similar to 301 Moved Permanently, 308 informs the user of the movement of a given online resource, and unlike the 301 redirect, 308...

How to Fix 301 Error Moved Permanently

The 301 Moved Permanently is an HTTP status code that indicates a permanent relocation of an online resource from a given URL to a new one. More technically, the moved resource has been moved to the new URL specified in the Location header. The HTTP 301 status code is...

How to Fix 307 Temporary Redirect

307 Temporary Redirect is a response HTTP status code that indicates the requested resource has been moved to a different URL for a limited period of time. Unlike a 301 permanent redirect, the 307 Temporary Redirect message indicates that the change is temporary and...

How to Access Crontab Settings

To access the crontab settings, first, you need to log in to your AwardSpace hosting panel. After you have logged in, head to Crontab Settings, located within the Advanced Tools category:   After you click the Crontab Settings icon, a new page should load. Once...

How to Check My Auto Renewals

To check your AwardSpace hosting plan auto-renewals, first log in to the admin dashboard. Then, head to Wallet, within the Orders & Invoices section:   After that, click the Auto Renewals tab, where you can check any relevant information about your hosting...

How to Check My Payment Requests

To check your payment requests, first log in to the AwardSpace hosting panel. Then, head to Wallet within the Orders & Invoices category:   Then, click the Payment Requests tab. There, you can browse all the information you need about your...

Even more web tutorials

Check out our web hosting knowledge base and the WordPress tutorials to learn more, and be better prepared for your website creation and maintenance journey.