Giving your visitors an easy way to reach you is a fundamental feature that every modern site should have. As such, having a working contact form is a must nowadays. In this article, we will show you how to set up a PHP contact form on your website and we will even provide you with a free PHP email script that you can download and use.
Is There a Difference Between PHPMailer and the PHP Mail() Function?
If you have previously researched how to connect your contact form to your email in PHP, you may have come across the terms PHP mail() function and PHPMailer. While they sound remarkably similar, these terms are in fact two distinct pieces of technology.
The PHP mail() function is a part of the standard PHP installation and is available out of the box. While it is very barebones in terms of features, it can still be used to create PHP mailer scripts. As such, the PHP mail() function works best when you need to send very basic email messages. For more information on the PHP mail() function, you can check our article on how to send emails using PHP mail().
The PHPMailer, on the other hand, is a free third-party package for creating sophisticated PHP email scripts. PHPMailer needs to be downloaded separately and integrated into your website. It supports advanced features, not found in the standard PHP mail() function, such as the sending of attachments and the creation of richly formatted email messages thanks to built-in support for HTML markup and CSS styling.
The present article will show you how to create a PHP mailer script using the built-in PHP mail() function. If you are interested in using PHPMailer, you can check our article on how to create a contact form using PHPMailer.
What Are the Requirements to Have a Working PHP Mail Script for My Contact Form?
We strongly believe that a working contact form is a feature that every website owner should have access to, regardless of the hosting plan they use. As a result, we allow contact form PHP files to be created and used on both our free hosting plan as well as our paid hosting packages.
In addition to having an active hosting plan, you also need to own a fully-qualified domain. You can either purchase a premium domain name or use the Domain Manager section of the Control Panel to register a free .DX.AM domain. Once you have a fully-qualified domain present in your hosting account, head over to the Email Accounts section of the Control Panel and register an email account. This account will be used for the actual sending of email messages. Not sure how to create an email account? You can review our guide on how to create an email account.
How Do I Set up a PHP Contact Form on My Website?
As long as you have an active hosting plan and there is an email account present in your hosting space, you can proceed to implement the contact form. The contact form itself is comprised of two files – a PHP email script that handles the actual email sending and an HTML form that your site visitors use to send you a message. To set up the PHP email script and HTML form, follow the steps below:
- Go to the File Manager section of the Control Panel.
- Double-click on your domain name’s folder in order to open it.
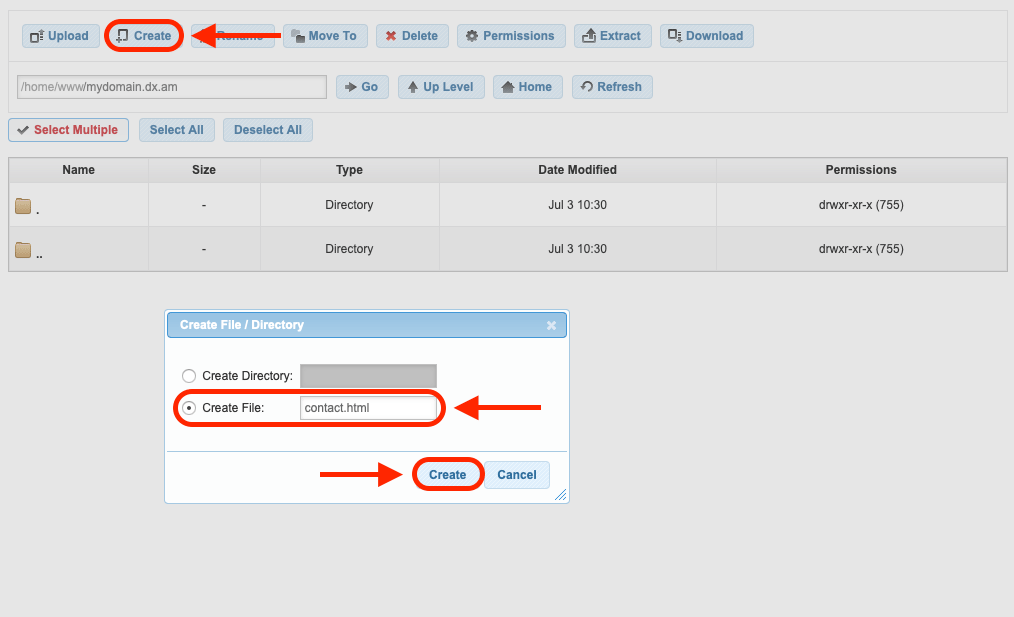
- Click on the Create button, switch to the option to Create File and make a new HTML document. Name it contact.html as is shown in the screenshot below.

- Once the contact.html file is created, double-click it in order to open it.
- Copy the code shown below and paste it into your contact.html file.
<html>
     <head>
         <title>
             Contact Form
         </title>
     </head>
     <body>
         <center>
             <font size="5">
             <b>Contact Form</b>
             <br/>
             <br/>
             </font>
             <form method="POST" action="mail-script.php">
                 Subject:
                 <input type="text" name="subject" size="20">
                 <br/>
                 <br/>
                 Name:
                 <input type="text" name="name" size="20">
                 <br/>
                 <br/>
                 E-mail:
                 <input type="email" name="email" size="20">
                 <br/>
                 <br/>
                 Message:
                 <br/>
                 <textarea rows="9" name="message" cols="30">
                 </textarea>
                 <br/>
                 <br/>
                 <input type="submit" value="Send" name="submit">
             </form>
         </center>
     </body>
 </html>
- Save your changes and close the contact.html document.
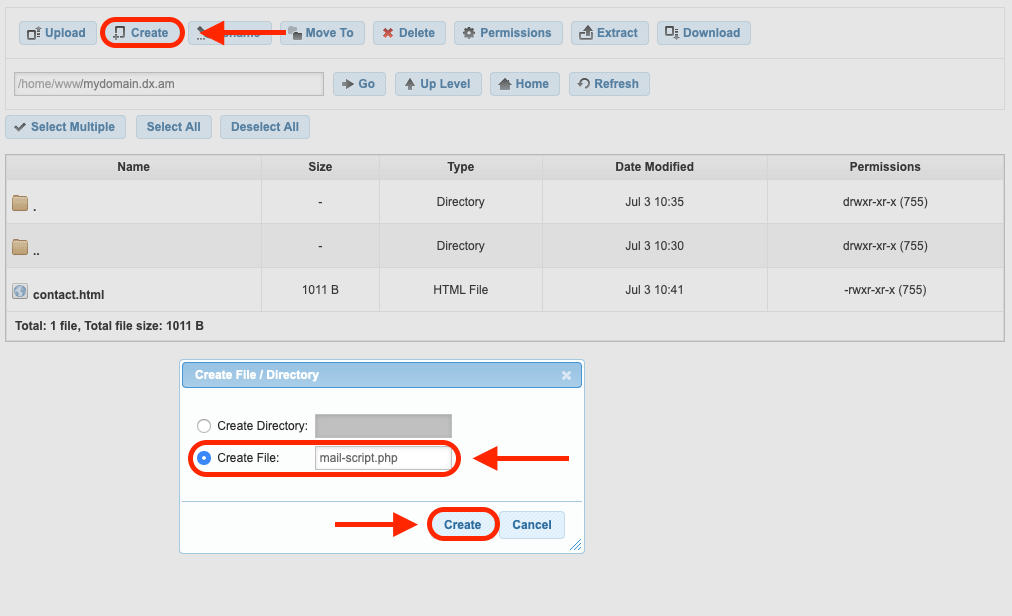
- Using the Create button, make a new file. This time call it mail-script.php. Make sure that this new file is placed in the same directory as the contact.html document. You may refer to the screenshot below:

- Double-click the newly created mail-script.php file in order to open it.
- Now copy the code below and paste it inside of the mail-script.php file:
<?php

    $myAwardSpaceEmail = "your-AwardSpace-email-goes-here";
    $myPersonalEmail = "your-personal-email-goes-here";

    if(isset($_POST['submit'])) {
        $subject = $_POST['subject'];
        $name = $_POST['name'];
        $email = $_POST['email'];
        $message = $_POST['message'];
        $headers = "From: Contact Form <" . $myAwardSpaceEmail . ">" . "\r\n";
        $headers .= "Reply-To: " . $name . " <" . $email .">" . "\r\n";

        echo 'Your message was sent successfully!';
        mail($myPersonalEmail, $subject, $message, $headers);
    } else {
        echo 'An error has occurred!';
    }
?>
- Near the start of the script you will see the following two lines of code:
$myAwardSpaceEmail = "your-AwardSpace-email-goes-here";
$myPersonalEmail = "your-personal-email-goes-here";
You need to edit these two lines in order for the script to work. On the first line, replace the text your-AwardSpace-email-goes-here with the email address that you created using the Email Accounts section of the Control Panel. Similarly, on the second line, you need to replace the text your-personal-email-goes-here with the email address where you would like to receive your contact form submissions. If you want, you can use your AwardSpace-created email address as the recipient of the messages, however, this is not mandatory.
- Save your changes and close the mail-script.php file.
All done! At this point, you should have a fully operational contact form that sends you an email message whenever someone uses it. All that is left is to test the contact form and make sure that it works as expected.
How Do I Test My PHP-Powered Contact Form?
Testing your contact form is a straightforward process:
- Navigate to your contact.html document using your web browser. You can do this by going to
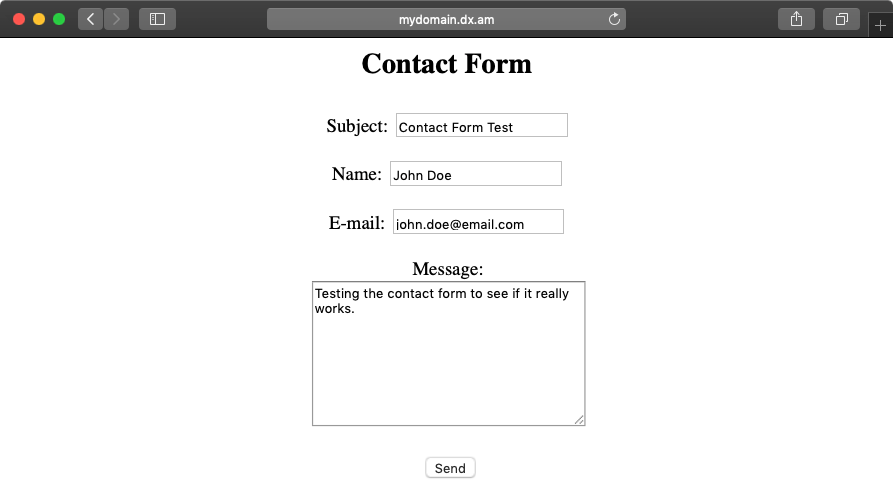
http://your-domain.com/contact.html(make sure that you replaceyour-domain.comwith your actual domain name. - Fill in the contact form as is shown below and click on the Send button.

- If everything goes well, the message Your message was sent successfully! should appear in your browser.
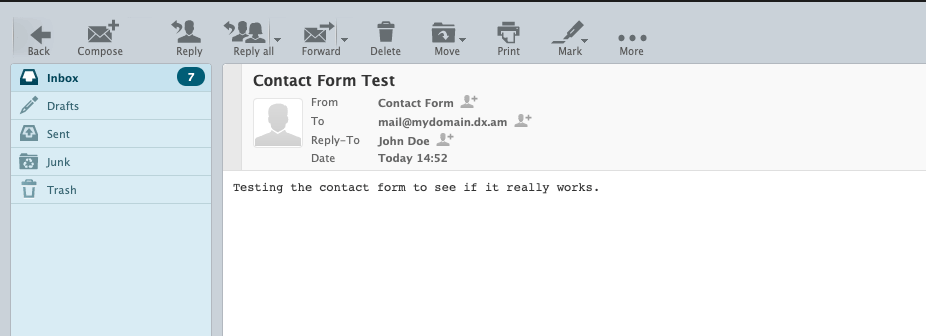
- All that is left to do now to check whether you have received the contact form submission as an email notification in your personal mail account’s inbox:

Download the Files of the PHP Contact Form Example.
If you are in a hurry and don’t have time to create the HTML document and PHP mail script manually, you can download a zip archive that contains the PHP email contact form example files. Just make sure to add your personal and AwardSpace emails in the PHP script, so that the contact form can successfully send emails.
If you followed the steps above and manually created the contact.html and mail-script.php files, there is no need to download the zip archive.
Can I Use the PHP Mail() Function and SMTP to Send Messages Through an External Mail Server?
The free PHP-form-to-email script which we have created is only able to send email messages using your AwardSpace-hosted email address. You may be wondering if it is possible to use an external mail server and send your messages through SMTP. This is indeed possible, however configuring the PHP mail() function to utilize an external mail server is a rather complex process and it falls outside of the scope of this guide.
Fortunately, PHPMailer, the more feature-complete alternative to the PHP mail() function, which we discussed at the start of the guide, enables you to easily connect to external mail servers via SMTP. We cover this functionality in our guide on how to create a working contact form that is powered by PHPMailer. Note: the ability for your hosting account to communicate with external mail servers is advanced functionality only available if you are using one of our premium hosting plans.
Conclusion
There’s no better way to build a group of loyal visitors who regularly come to your site than to allow them to directly interact with you and to send you messages. And if your site is built around your business, having a contact form is even more important as it allows potential clients to get in touch with you in a hassle-free manner. No matter what type of site you have, chances are that it will greatly benefit from having an easy-to-use contact form. And while our contact form example is rather basic, it is a great starting point that you can develop further in the future.
