Backup Manager

Home » Knowledge Base » Control Panel » FTP Manager » Backup Manager

Creating a website can be time-consuming. It would be unpleasant to find out that something is now broken and we have to start from scratch. To avoid this it is a good practice to create a backup for your website. We at AwardSpace understand how important the backups are for our users and thus all our premium customers receive an automatic backup every week. In this article, we will go through the Database Manager and how to use it to restore your website files and databases.


How to access the Backup Manager?

The Database Manager is available to all users that are using our paid hosting plans. You can access it by following the steps below:

  1. Go to your Hosting Control Panel
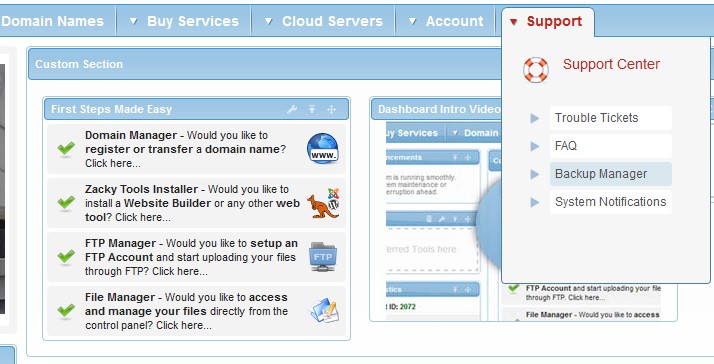
  2. From the Support menu choose Backup Manager

Once you have done that a page will load with the options to browse the backups for your websites and databases.


How to restore your website files?

Restoring files from the backup manager is easy. All you need to do is follow these steps:

  1. Access the Backup Manager
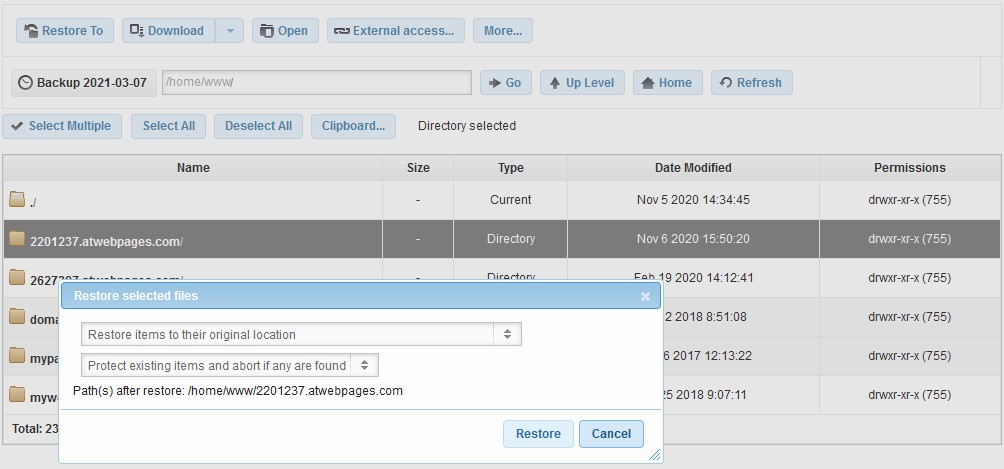
  2. Make sure you have selected the Backup Files tab
  3. Choose the date from which you would like restore your backup (we save the backups from the past 3 weeks)
  4. You can choose a directory which you would like to backup or you can directly browse all backed up directories in the /home/www/ directory
  5. You will be presented with a File Manager that contains all backups for your directories and files from the date specified.
  6. To restore a directory/file simply mark it and click the Restore To button
  7. Once you have done that choose the actions which you would like the restore process to take and click Restore
  8. Done, your files are now restored


Restore options

Once inside the Backup File Manager and you have decided what to restore, you will be presented with the following options:

  • Restore Items to their original location
  • Restore a single item to a specific path 
  • Restore selected items inside a specified directory
  • Restore selected items to their original location in a new directory

In addition to these four options you have the following three options as well:

  • Protect existing items and abort if any are found
  • Ignore existing items and write over them
  • Delete all existing items


How to restore your database?

The steps to restoring your database are similar to the ones for restoring your website files:

  1. Access the Backup Manager
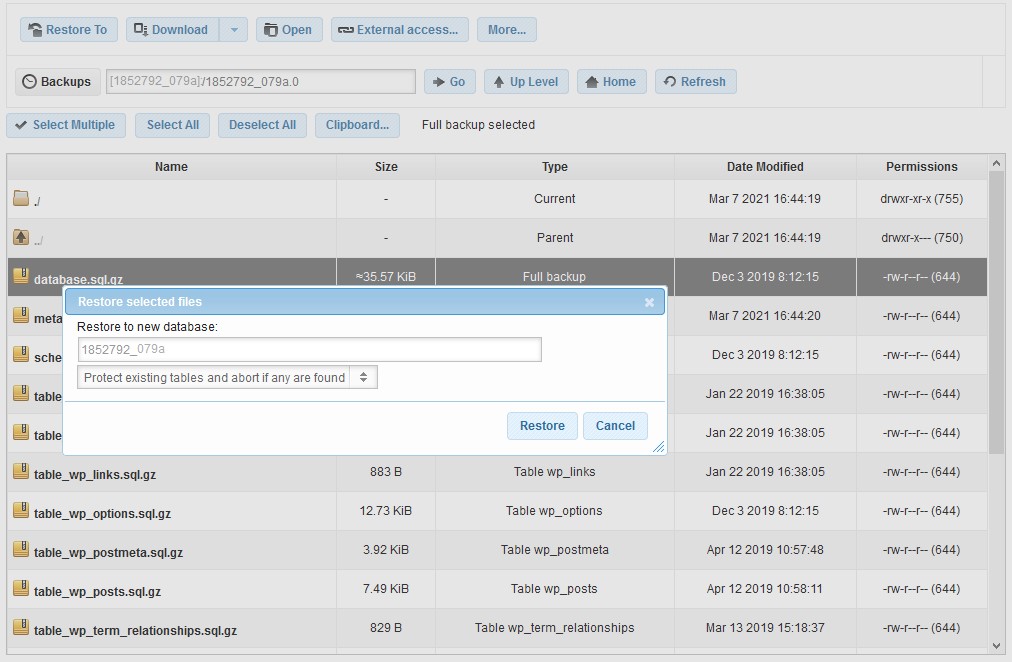
  2. Select the Backup database tab
  3. Select the database which you would like to restore
  4. Choose the date for your backup 
  5. You will be presented with a File Manager that contains the backup of your database
  6. Select the archive named database to restore the entire database or select a specific table which you would like to restore
  7. Click the Restore To button and choose the database where you would like to import the backup
  8. Click Restore

Restore options

You are presented with the following three options for restoring your database:

  • Restore a single item to a specific path
  • Ignore existing tables and write over them
  • Delete existing tables

You can also choose to restore your backup in a new database.


Things to know

Our automatic backups are limited to one backup per week for the past 3 weeks. In addition to that, the automatic backup is disabled if have more than 3 GB of disk usage. This is why we strongly recommend you to create your own backups as well both for your files and database.

Was this post helpful?

i

Relevant tags:

Connect

Latest posts:

How to Remove a Product in OpenCart

After installing OpenCart and logging in to the dashboard, you can start adding and removing products immediately. We have already covered how to add products in OpenCart, and in this article, we share simple steps to delete products from your store with only a few...

How to Add Products in OpenCart

The most important element in your OpenCart project is the products you will offer your site visitors. In the following paragraphs, we share how to add products to your OpenCart website.   How to Create Products in Opencart The process of adding new products in...

How to Log in to OpenCart

After you install OpenCart, you can log in to the platform and start working on your project right away. To log in, you should open the OpenCart login page and enter the credentials you chose when installing the CMS. This will open the platform’s admin panel. In the...

How to Install OpenCart

You can install OpenCart on every AwardSpace web hosting plan, including our free web hosting, shared hosting, and advanced AwardSpace services such as Semi-Dedicated Hosting and VPS hosting. Keep in mind that all of the AwardSpace hosting services are tailored to run...

How to Change My Last Name in Moodle

If you are asking yourself "How to change my last name in Moodle", then you are at the right place. This guide will walk you through the steps for changing your last name in Moodle while addressing common concerns like ratings and discussions.   How to Change My...


Create a website for free!


Free forever

Our Support Team is Here to Help


If you need any questions answered, don't hesitate and contact us. Click the button below and follow the instructions. You can expect an answer within an hour.


Contact AwardSpace


iNewest knowledge base articles

How to Remove a Product in OpenCart

After installing OpenCart and logging in to the dashboard, you can start adding and removing products immediately. We have already covered how to add products in OpenCart, and in this article, we share simple steps to delete products from your store with only a few...

How to Add Products in OpenCart

The most important element in your OpenCart project is the products you will offer your site visitors. In the following paragraphs, we share how to add products to your OpenCart website.   How to Create Products in Opencart The process of adding new products in...

How to Log in to OpenCart

After you install OpenCart, you can log in to the platform and start working on your project right away. To log in, you should open the OpenCart login page and enter the credentials you chose when installing the CMS. This will open the platform’s admin panel. In the...

How to Install OpenCart

You can install OpenCart on every AwardSpace web hosting plan, including our free web hosting, shared hosting, and advanced AwardSpace services such as Semi-Dedicated Hosting and VPS hosting. Keep in mind that all of the AwardSpace hosting services are tailored to run...

How to Change My Last Name in Moodle

If you are asking yourself "How to change my last name in Moodle", then you are at the right place. This guide will walk you through the steps for changing your last name in Moodle while addressing common concerns like ratings and discussions.   How to Change My...

How to Change Your Name in Moodle

Changing your name in Moodle is a very simple task and requires only a few minutes of your time.   How to Change My Name in Moodle The process is comprised of a few easy-to-follow steps:   Step 1: Log in to Moodle After installing the CMS, you should log in...

Even more web tutorials

Check out our web hosting knowledge base and the WordPress tutorials to learn more, and be better prepared for your website creation and maintenance journey.