
Adding custom CSS code to your WordPress site is a great way to personalize and tweak your site’s design beyond the options provided by your theme. You can add custom CSS code to your WordPress theme, via the customization options or directly in the styles.css file, editable through the theme editor.
What is CSS
CSS, which stands for Cascading Style Sheets, is a coding language designed primarily for styling websites. It allows you to modify the appearance, color, and positioning of various elements across your site.
The term “cascading” in its name highlights a key feature: if multiple styles are applied to the same element, the style located lower in the stylesheet will prevail, reflecting the most recent modification made to that element.
Learning CSS can significantly enhance your web development skills, even if you’re using WordPress, which is known for its user-friendly content management system. A great starting point for mastering this programming language is the CSS course offered by W3Schools.
How to add Custom CSS to WordPress
It is really easy to add additional CSS to your WordPress website. There are two main methods to do so. Each of them, of course, has its positive and negative sides, as they are adding the code in different places on your website. As mentioned above, we’ll cover how to add custom CSS code through the theme customizing page. The main reason for that is the fact, that it is easier to add code there, as it won’t be removed once your theme gets updated. As we’ve already discussed, it is recommended that you choose a theme that is getting regular updates.
Also, using this method, even if you change the theme, the changes will remain. It is another question of how much of them will apply to the new theme, as it will probably use different CSS classes for the same site elements. Still, the important fact is that the code you’ve written, shouldn’t get lost with updates, etc.
If you want to write your code directly in the styles.css file of the theme, it is recommended that you create a Child theme.
Adding Custom CSS with the WordPress Customizer
With the integrated personalizing feature offered by WordPress, you can do a lot more than adding custom CSS. Yet, we will focus on doing that. As we’ve covered it before, you can read more about the capabilities of WordPress Customizer. Here is how to add custom CSS through the WordPress Theme Customizer.
Step 1: Access the WordPress Customizer
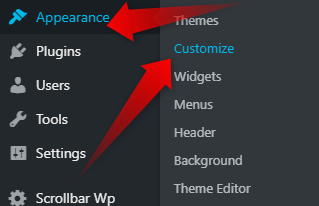
To access the WordPress customizer, log in to your WordPress website. Once you are in the Dashboard, navigate yourself toward the “Appearance” menu in the sidebar. Hover over it and in the submenu that will show up, select “Customize.” Doing so will open the WordPress Customizer.
Step 2: Find the Additional CSS Section
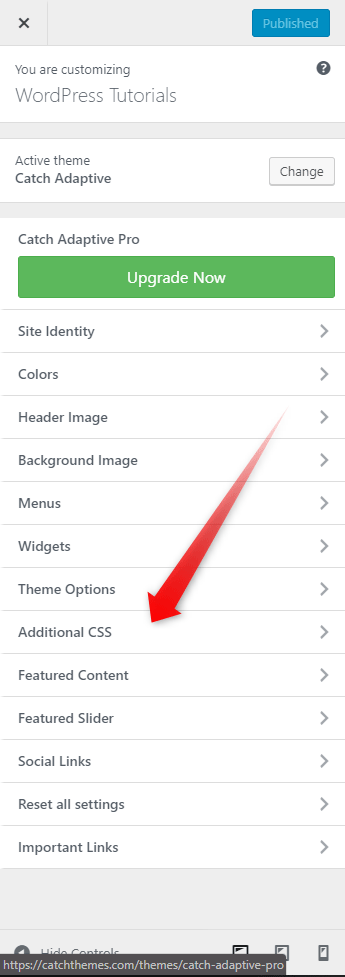
All of the WordPress themes have some of the options in the Customizer. Specifically “Site Identity”, “Widgets”, “Menus”, and, of course, “Additional CSS”. Therefore, depending on the theme you are using, the option you will need to add Custom CSS code might be easier to find.
In the Customizer, scroll through the sidebar options until you locate the “Additional CSS” section. This will open a new page where you can add your custom CSS code.
Step 3: Enter Your Custom CSS
Once the “Additional CSS” box loads up, you can start typing or pasting your CSS code. If you know how to write CSS, most probably you know how to find the class you need to alter. Unlike the theme editor option, using the Additional CSS one, through the WordPress customizer, will let you see the effect of your changes live. So, you will know if something is wrong before publishing the changes.
Step 4: Publish Your Changes
Once you are happy with the changes you’ve made, click the “Publish” button on the top right corner of the sidebar menu. Doing so will apply the custom CSS across your entire website. The changes will be visible for all the users.
Further Recommendations:
Here are some recommendations for your first changes in the CSS.
Keep the Changes to a Minimal Level
It is best, especially if you are still learning, to keep the changes to a minimal level. They should be considered and targeted. That will ensure ease of management and troubleshooting.
Use Comments
Code comments are used so that the developers can easily orient themselves to the purpose of a specific code chunk. Adding comments in CSS will let you easily understand what changes you’ve made and why. Although, while writing the first lines it might not look necessary with time the code will accumulate, and therefore, the complexity of the changes. That might make it difficult for you to find a specific change that you’ve made (or whether you made it at all).
Use Backups
Before any significant change on a website, the best practice is to create a backup. Don’t underestimate the value of a backup. Sometimes it is better to be safe than sorry.
If you need more in-depth directions, check our previously published article on How to Add Additional CSS to WordPress and Further Customize Your Website
If you feel like you are ready to go further in the CMS, feel free to browse our WordPress Tutorials section.
