
Navigating Google Analytics 4 properly can grant you tons of useful information, statistics, and insights that you can use to expand your website’s online presence and improve conversions.
To be able to benefit from all the data, you should know how to navigate Google Analytics 4 to acquire the information that is important for your website and business.
Luckily, GA4 is user-friendly and allows you to navigate pretty easily.
In the following sections, how to navigate Google Analytics 4 and how to acquire information quickly and easily.
How to Navigate Google Analytics 4
Before we read how to navigate Google Analytics 4, it is important first to set it up. Read our comprehensive article on how to do so:
Also, if you are new to web analytics, read what this is and why is it important for your website:
- What Are Web Analytics and Why Do They Matter?
- What are the Most Important Website Metrics to Track in Google Analytics 4
As it comes to navigating yourself in GA4, there are 5 main sections that you can access:
All the website data that Google Analytics 4 provides you, along with various options, is distributed among these sections. In the following paragraphs, you will read about what each section contains and how this data is important for your website.
N.B! For this demonstration, we will be using the free Google Merch Shop GA4 account.
Google Analytics Home
Before delving into navigating Google Analytics 4, you should log in to your account. Once there, you will stumble upon the GA4 home page. The page has 3 main sections:
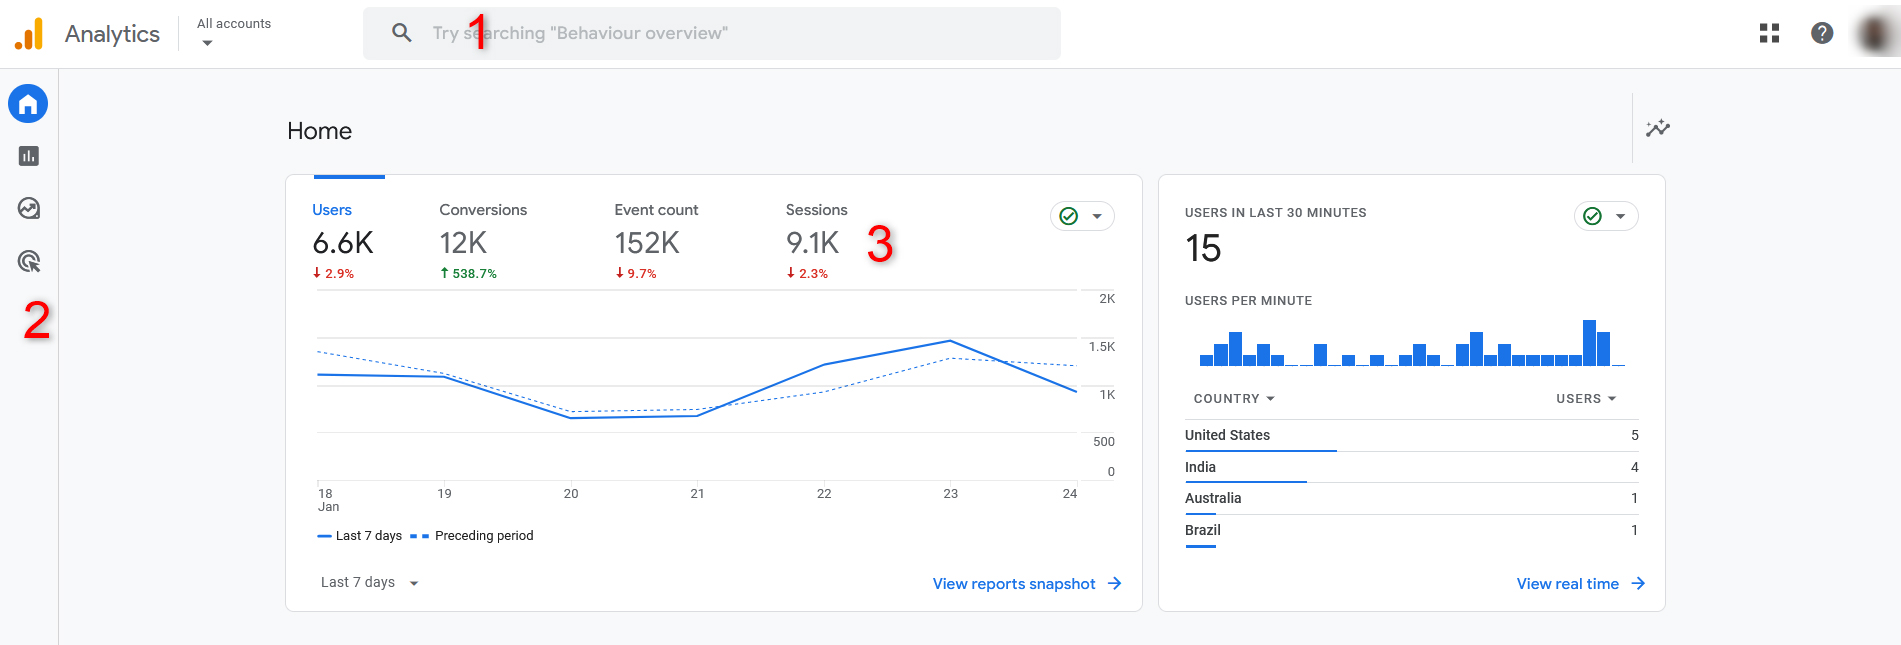
- Global search function: type in anything, so GA4 can deliver relevant results.
- Main navigation: From here you can jump from section to section and access various types of GA4 metrics.
- Main screen: showcases various data, depending on which section you are browsing.
Search and the main navigation are always visible, whereas the main screen changes data, depending on what you wish GA4 to display to you.
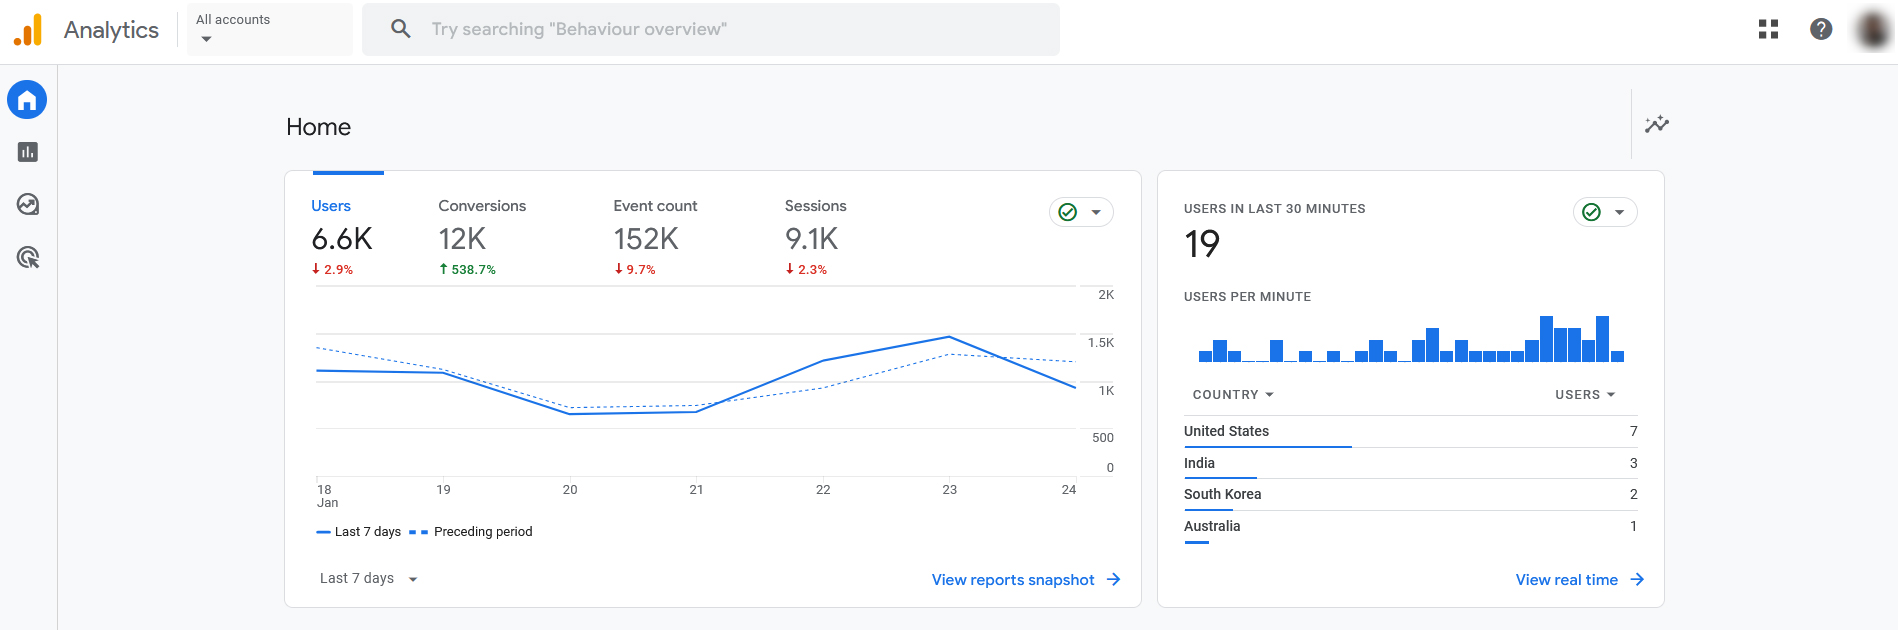
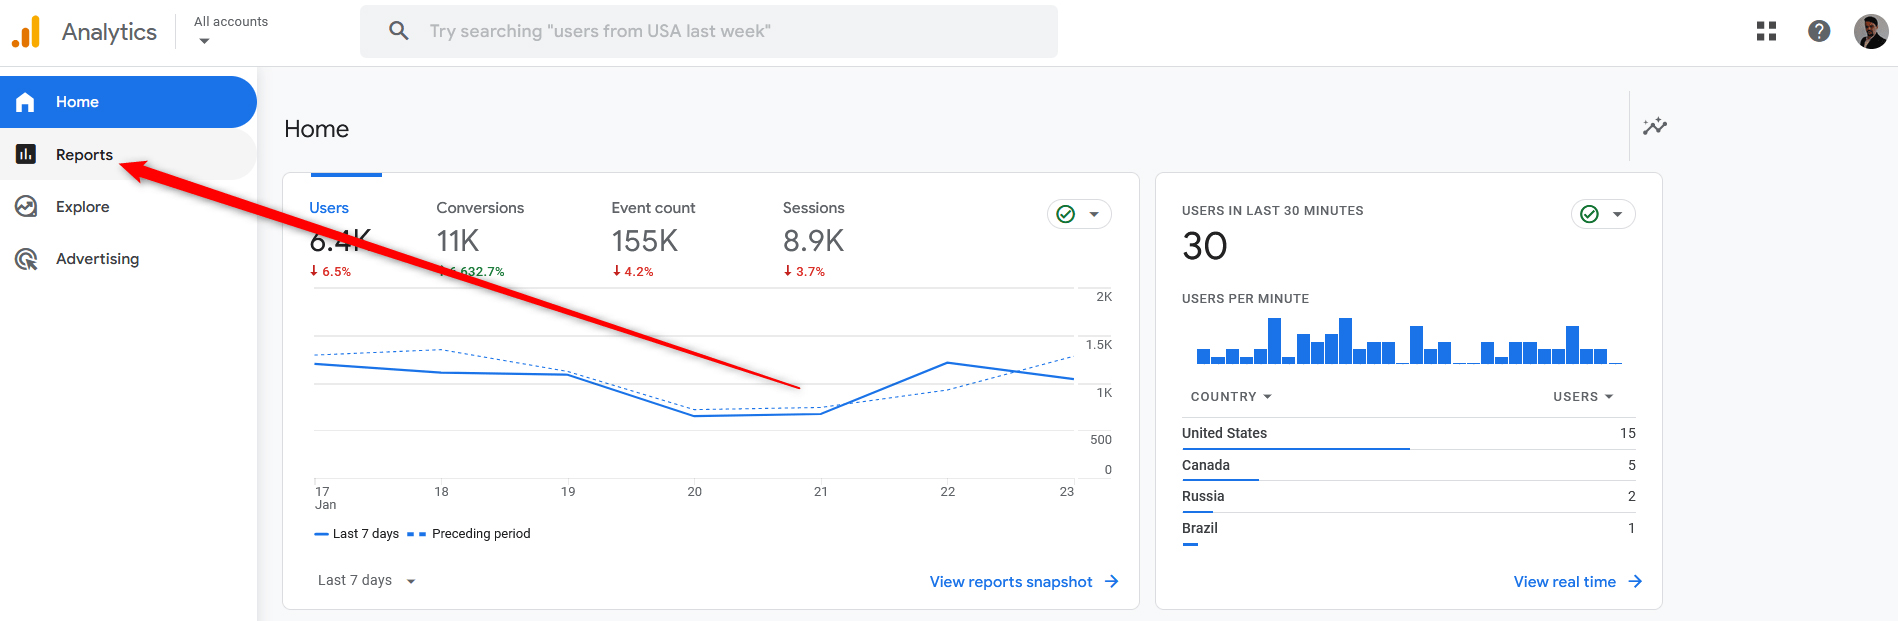
GA4 home gives you an overview of site metrics for a certain period. For example, within the Google Merch Store account, we can see how many users, conversions, events, and sessions tracked for the last 7 days there have been, as well as how many users there have been on the website in the last 30 minutes:
You can change the period by simply clicking the lower left corner or each of the reports shown on this page and selecting either a suggested period or a custom one:
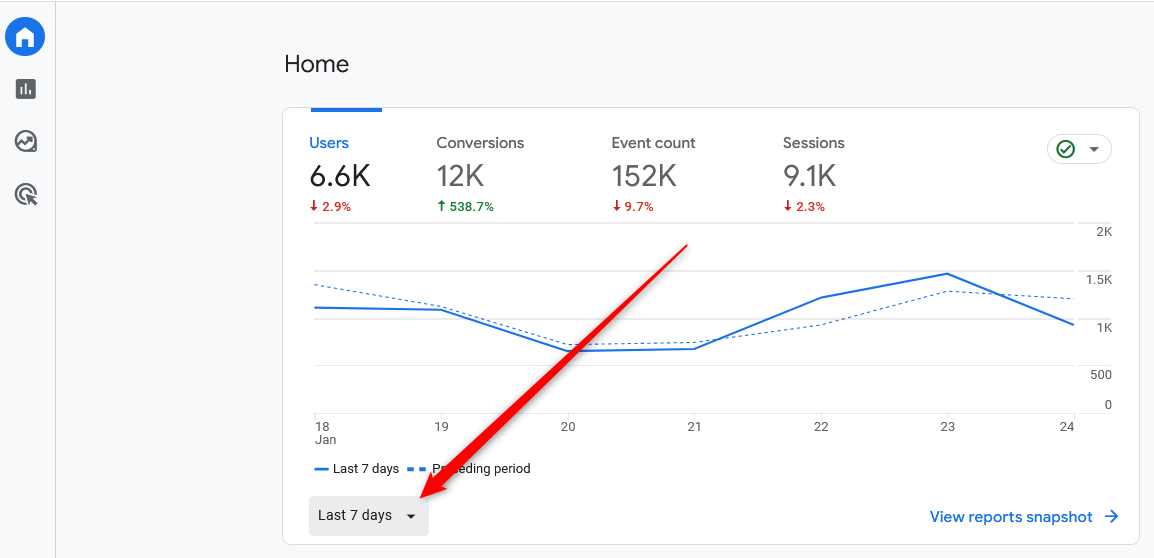
Once you click the button, a new menu with options will appear:
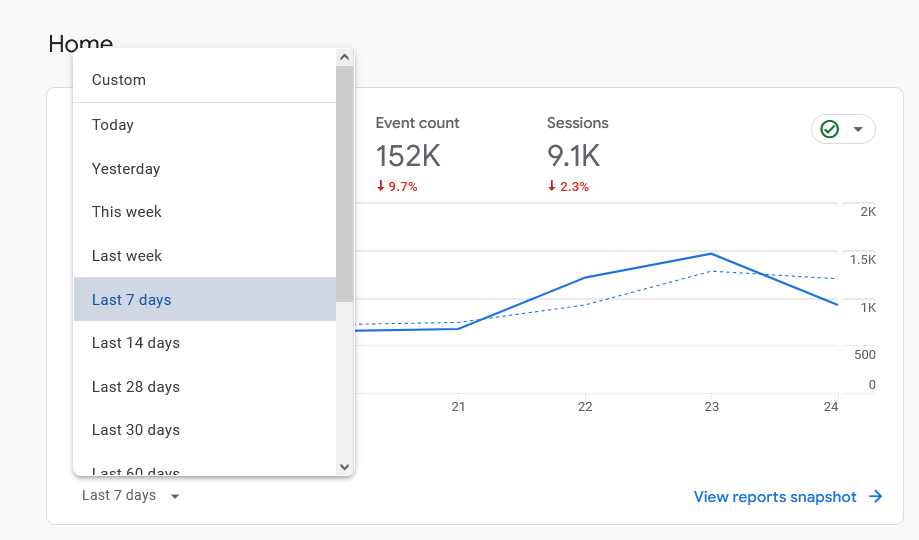
You can select a period for each of the showcased reports on the home page of GA4.
If you scroll down the home page, you will see some more details that GA4 presents you with. In our case, these are boxes with information about how the site visitors find the website, where they are from, and details about various events – in the case of Google Merch Store, the stats about various purchases for the last 7 days:
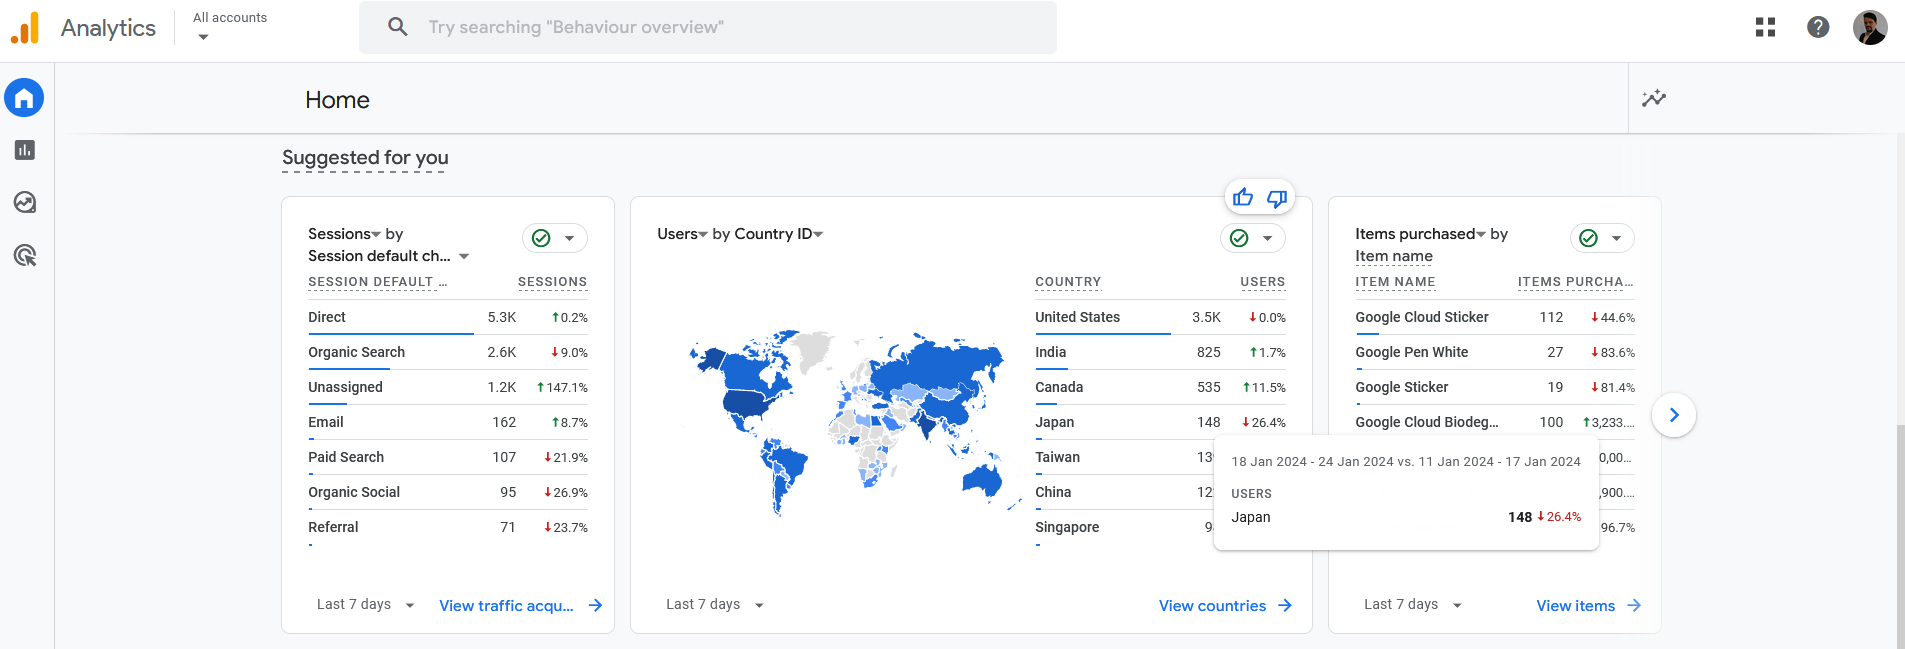
GA4 home is very handy if you wish to check some main metrics fast or jump to any other GA4 section. This is because the home screen is automatically personalized, so it shows reports you recently browsed and other relevant data.
Google Analytics 4 Reports Section
Reports are the next major section of Google Analytics 4. It resembles the information you see on the home page, however, in Reports you can browse much more detailed data.
To open the Reports section, simply click on the Reports icon within the navigation section:
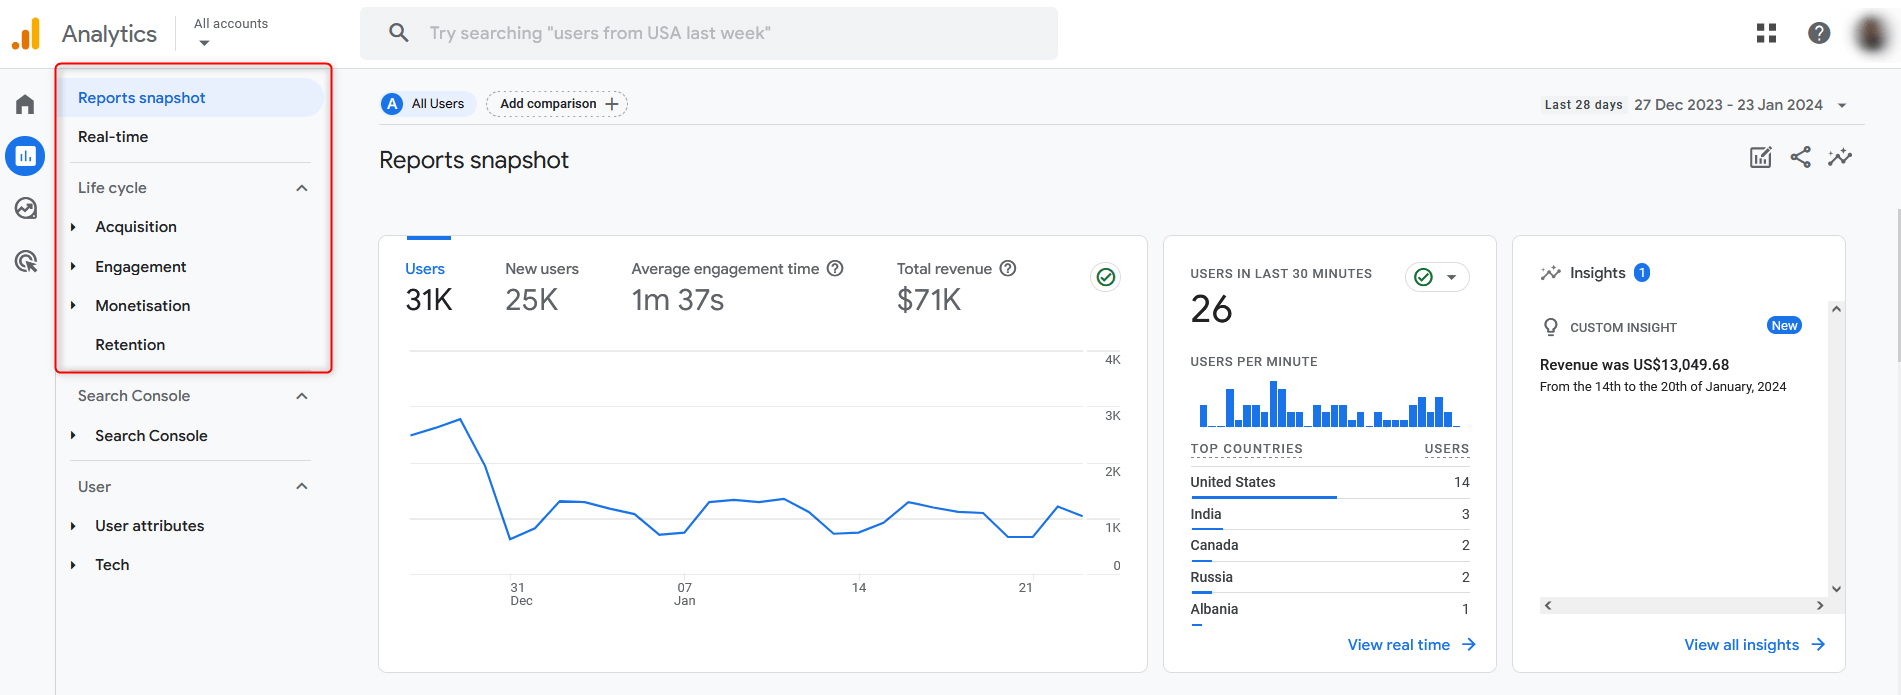
Once you click on Reports, GA4 will lead you to the Reports snapshot section:
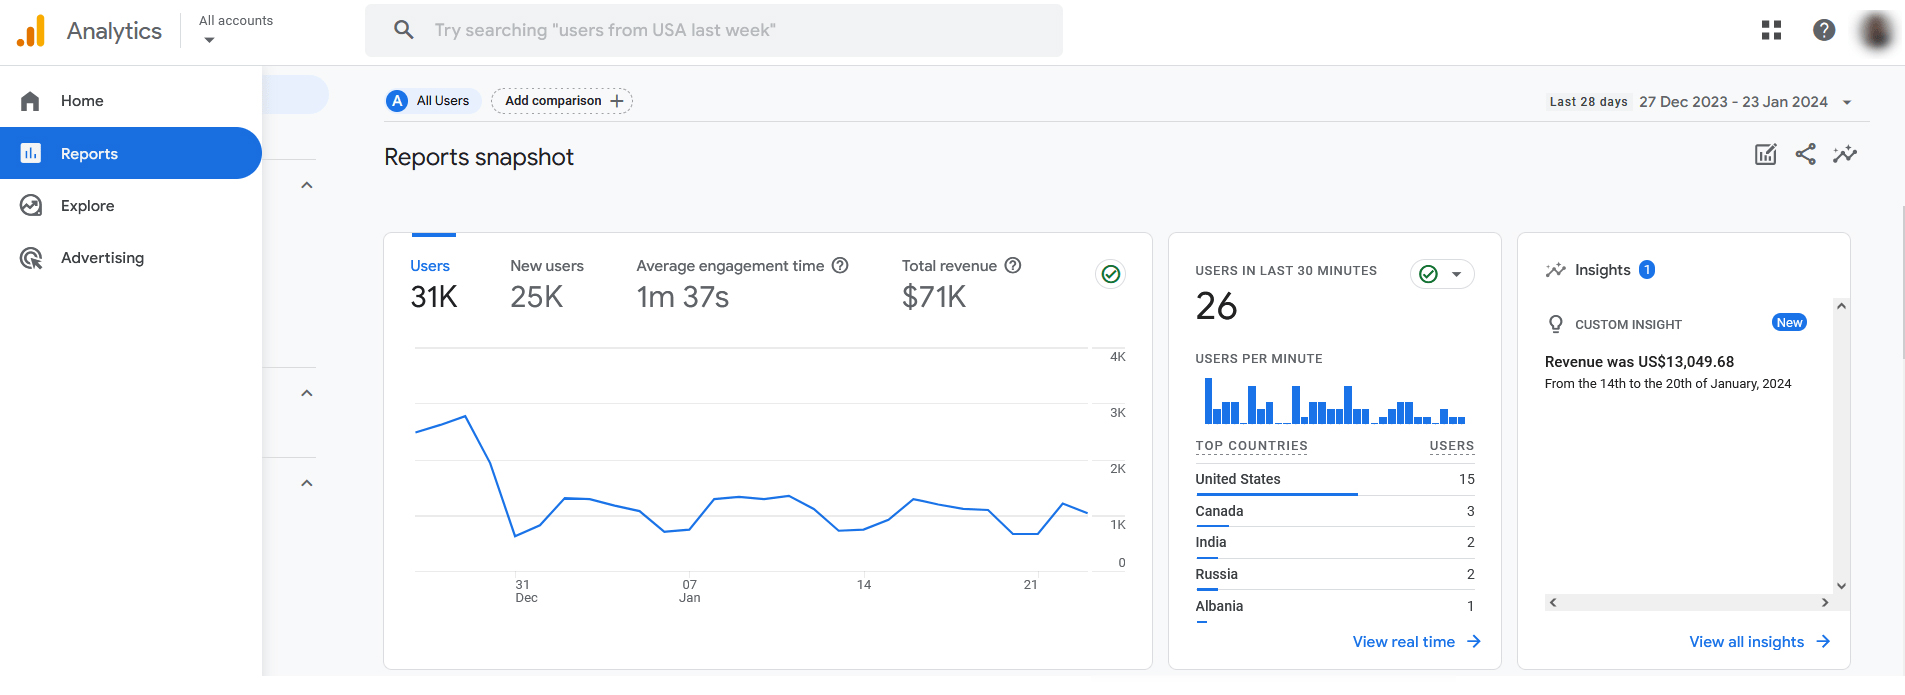
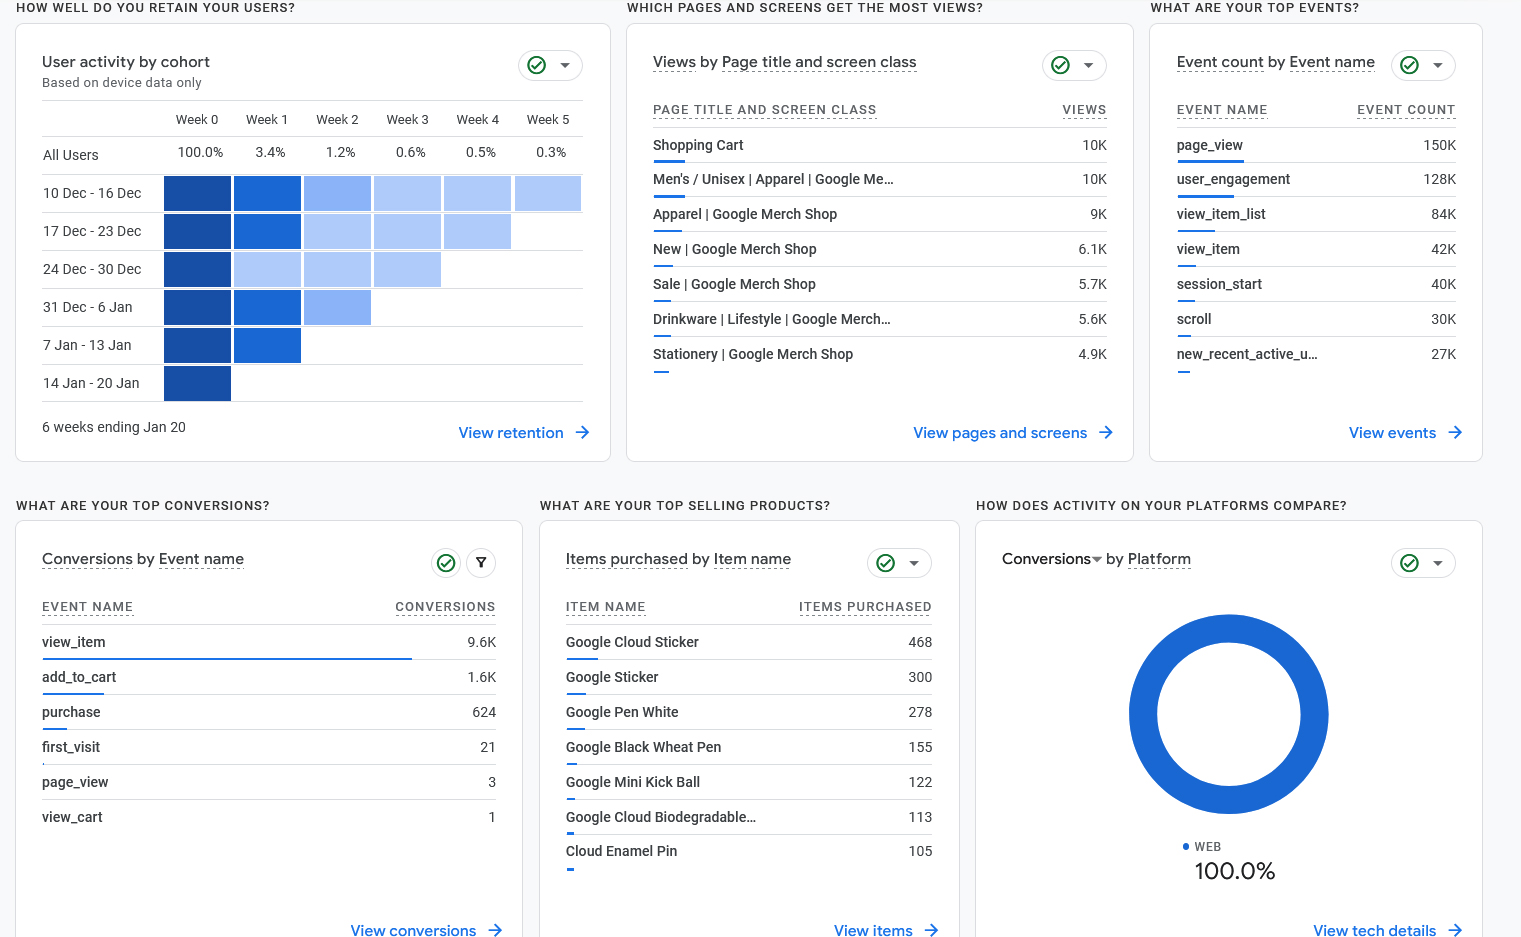
Although you can see the same information as shown in Home, the Reports section contains much more data. For example, if you scroll down the page, you can see a user retention chart, along with charts showcasing which pages have received the most views for a given period, event count, and items visitors are purchasing:
However, what makes the Reports page in GA4 very useful are the Acquisition, Engagement, Monetization, and Retention reports. You can access these via the navigation menu on the left of the screen:
In short, here’s what each report showcases:
- Acquisition: this report gives you detailed information on how visitors have found and opened your website.
- Engagement: this report grants you details about what site visitors do on your pages and how much time they spend there.
- Monetisation: this report gives you various details about purchases and other streams of income on your website.
The acquisition report is divided into 3 segments – Overview, User acquisition, and traffic acquisition. You can access each of these segments from the navigation section in the sidebar.
Acquisition Overview
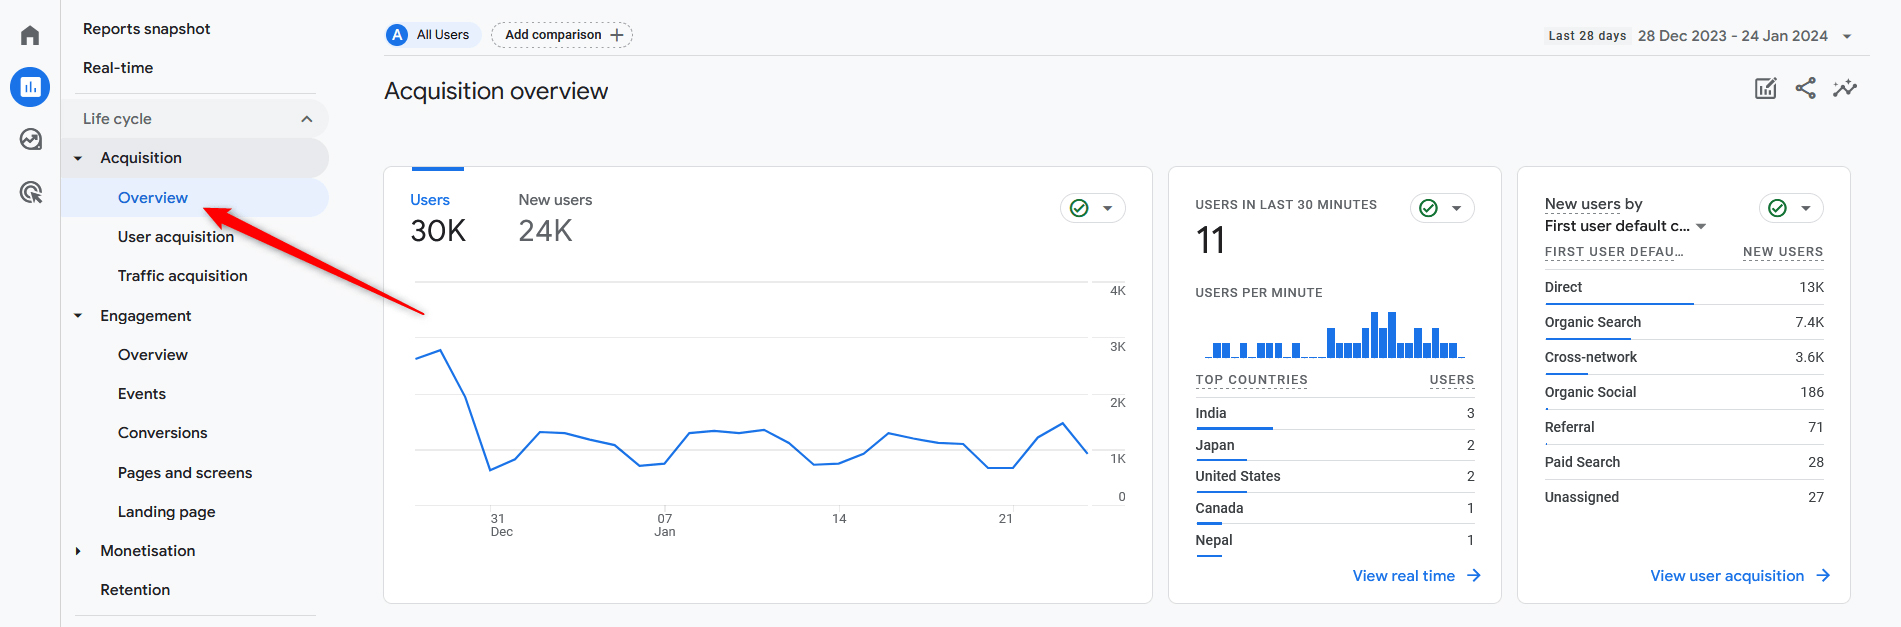
The overview report grants you information about your site users – how they found your site, which pages they open first once on your website, and various Google Ads performance stats, should you be using the ads platform:
User Acquisition Report
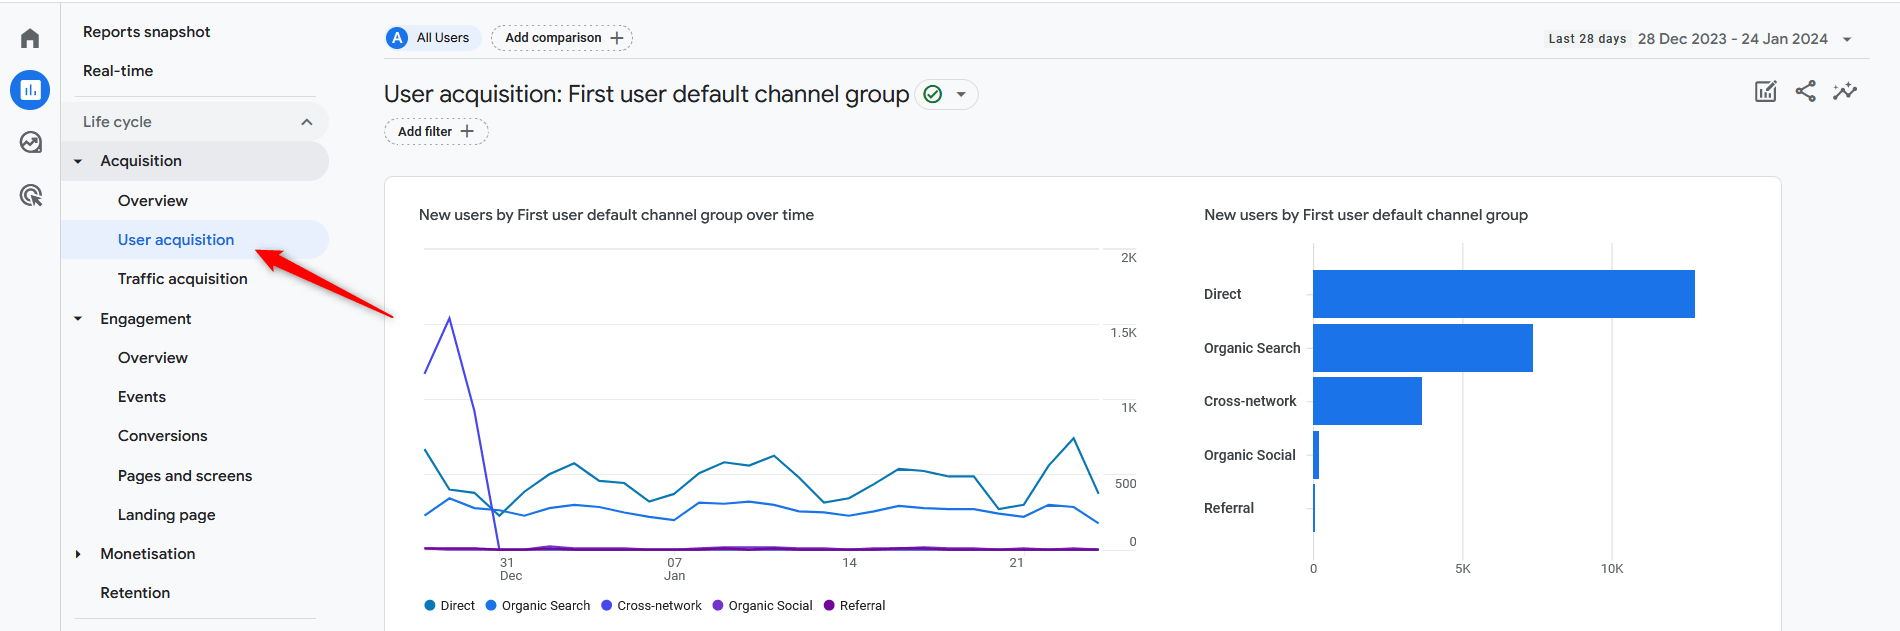
The User Acquisition report showcases various data about your users, how they access your website, and what is their behavior on your website – which pages they visit, how much time they spend on each one, and similar.
You can filter out various groups of visitors by analyzing various metrics in the provided table with stats. Also, you can change table channel groups and add new dimensions for even more detailed user analysis:

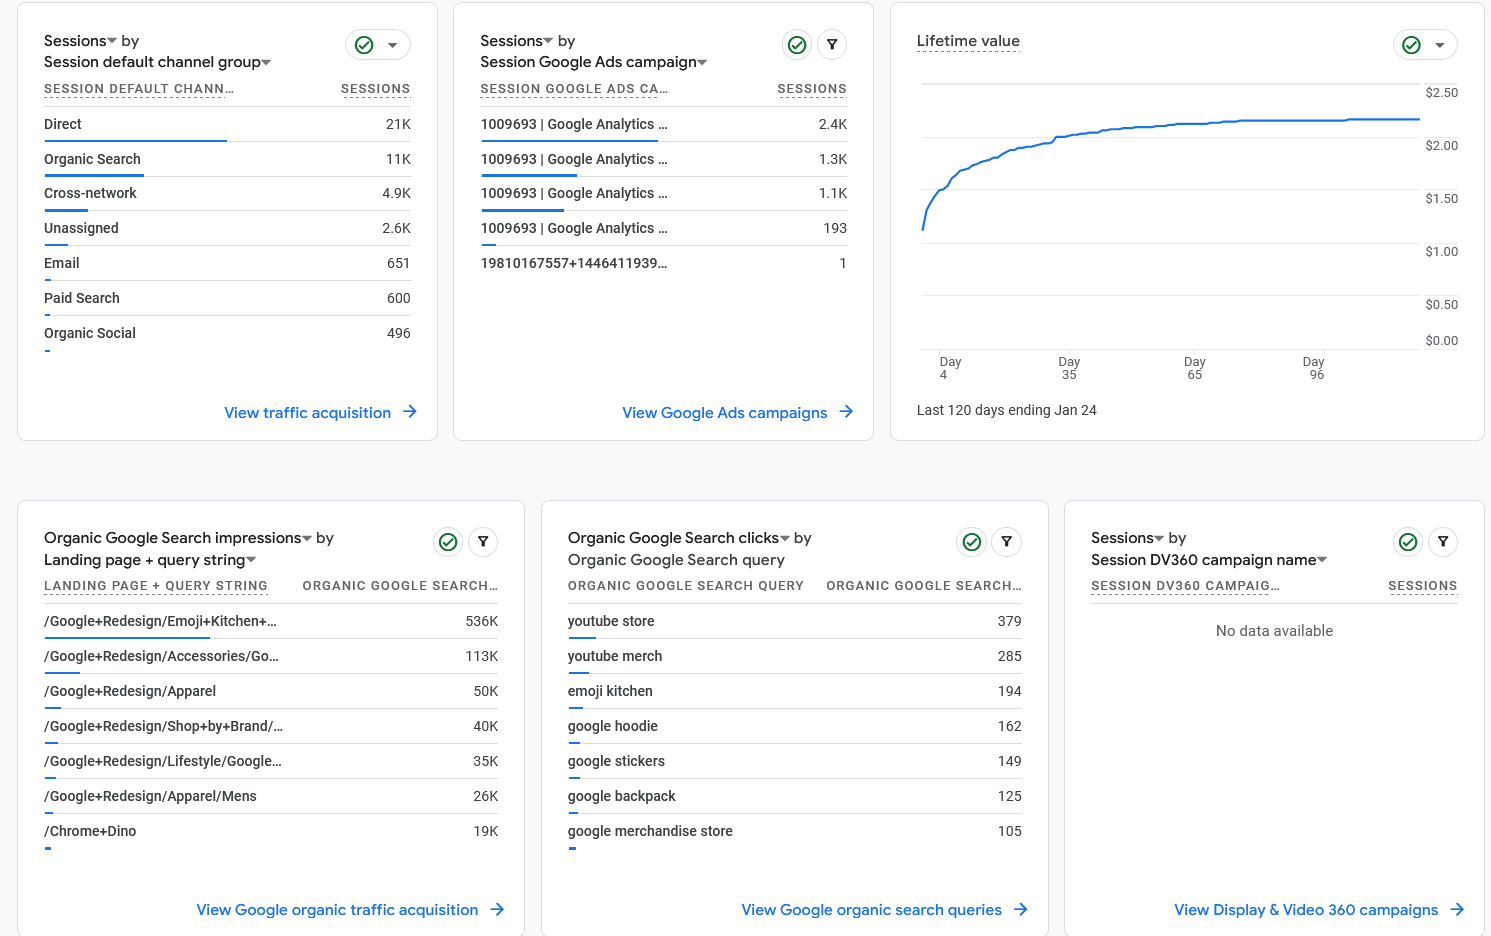
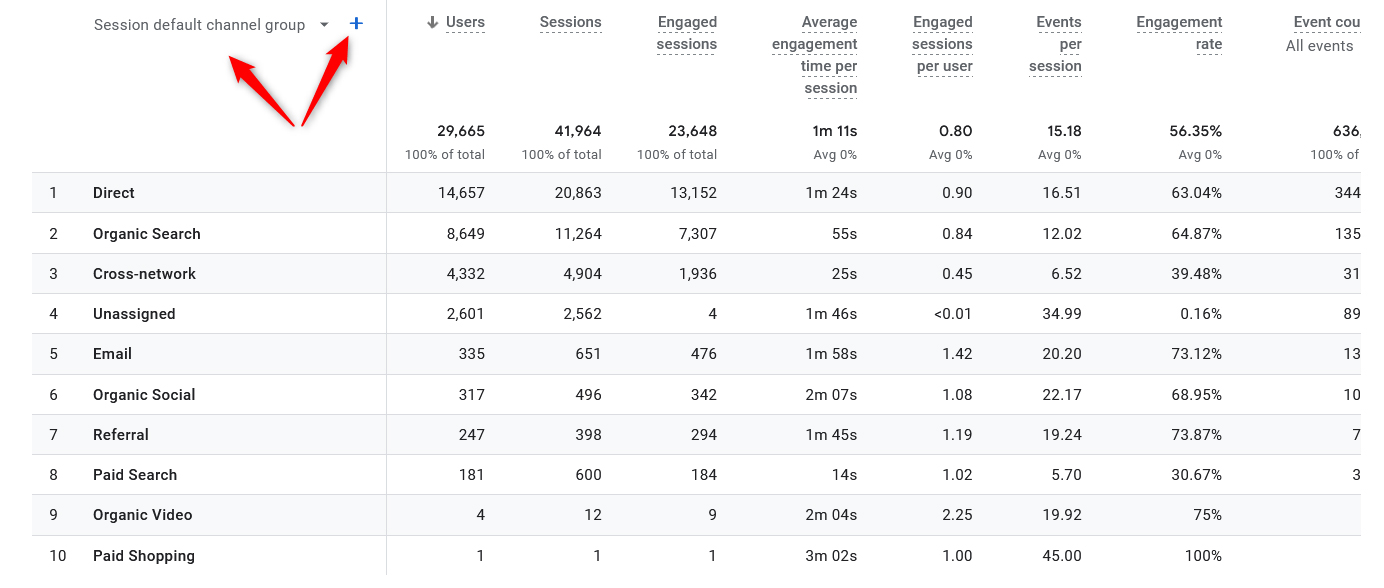
Traffic Acquisition
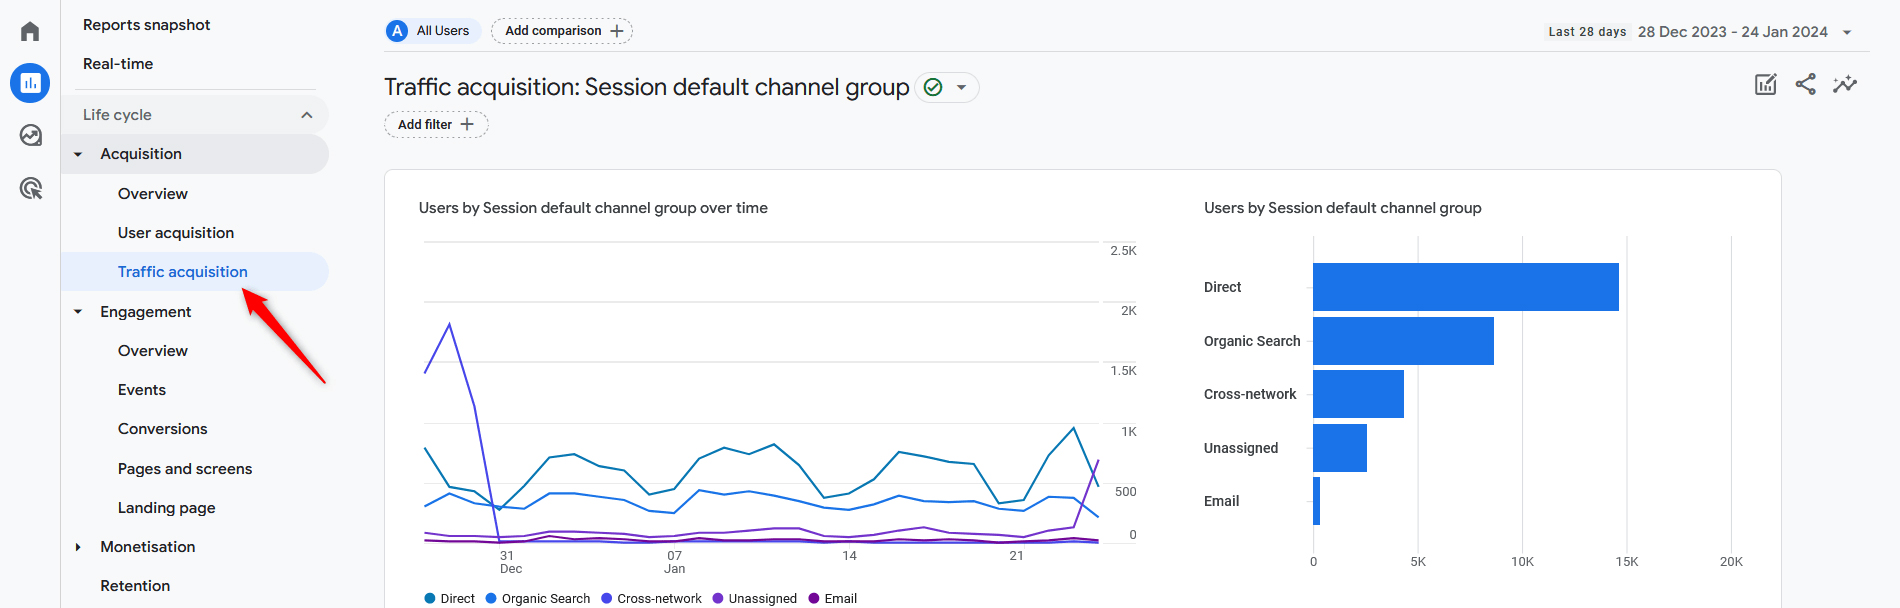
This report is similar to the User acquisition one. However, the main difference is that this report relies on sessions. Also similar to user acquisition, you can filter out various data and delve deeper into metrics by using the provided table and options to change channel groups and add new dimensions:
Google Analytics 4 Engagement Section
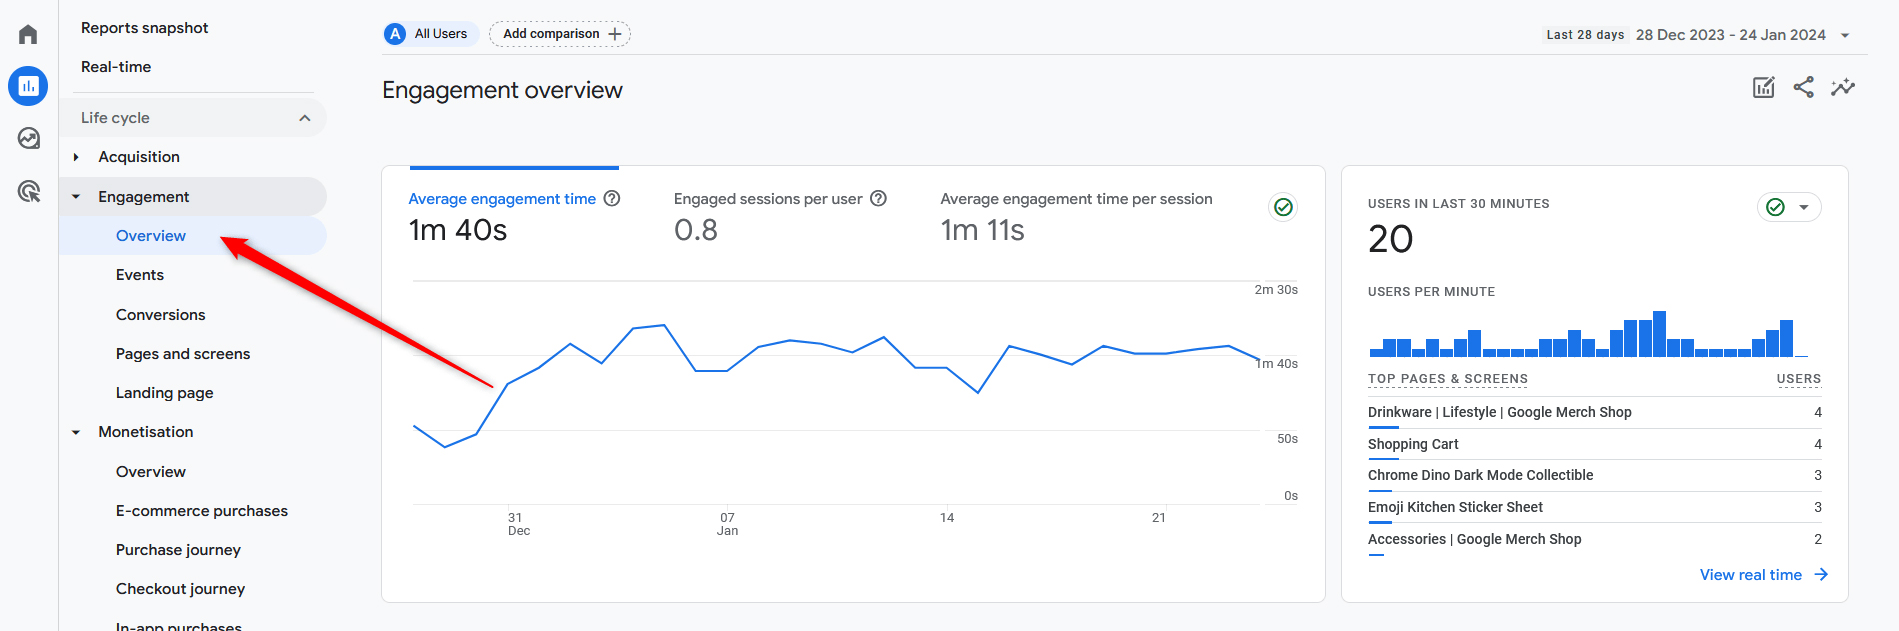
Engagement is the next large set of reports in Google Analytics. This section grants you details about how users interact with your website. Engagement metrics include average time on site, events completed, viewed pages, and others.
GA4 Events
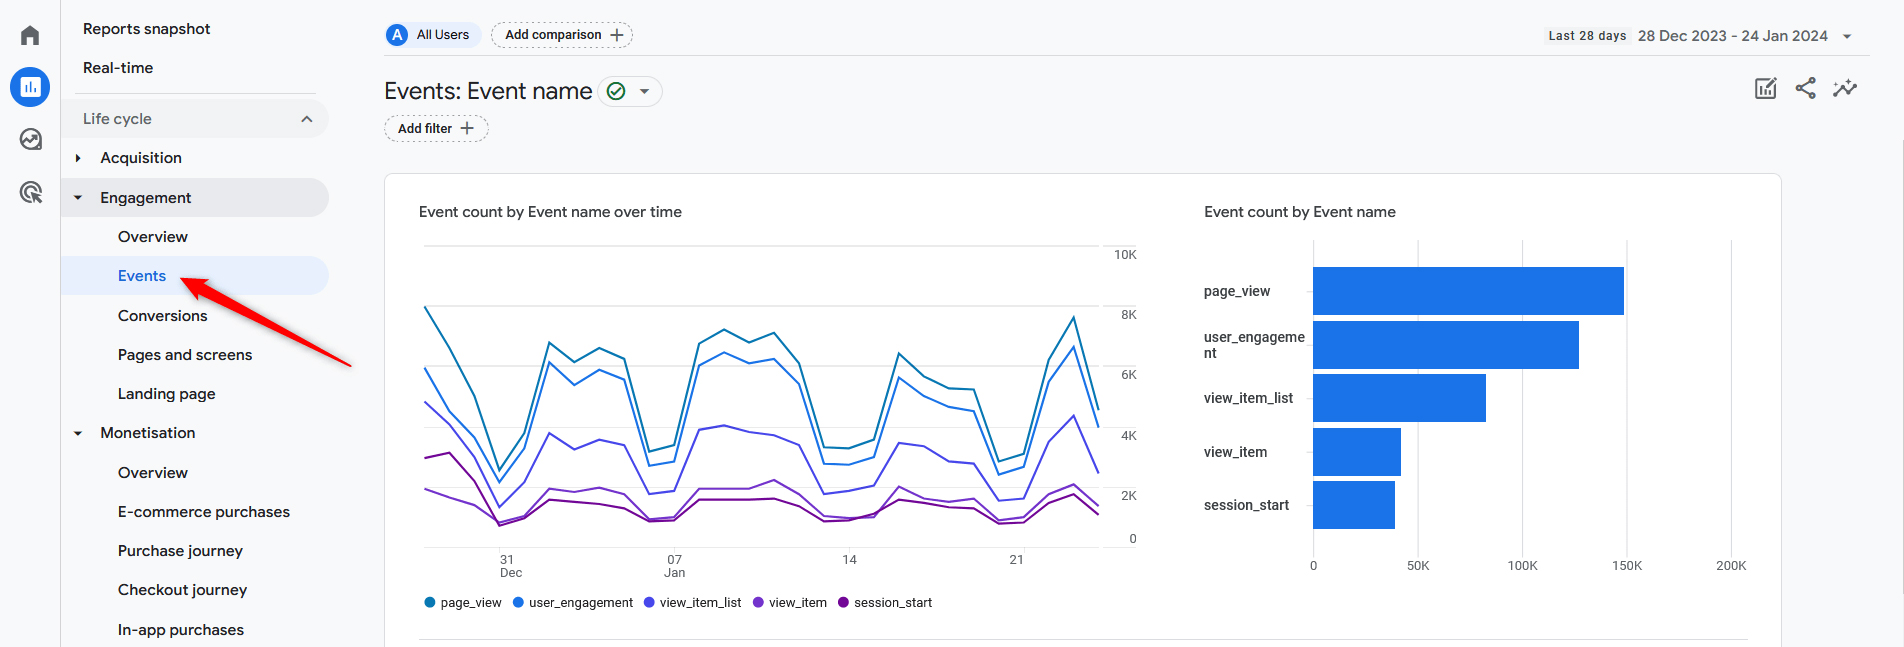
In the Events tab, you can track how many users have accomplished a goal you find important on your website – registration, add to cart, purchase, or something else.
Also, this is the place from where you can track custom events performance, should you have such.
GA4 Conversions
The Conversions report showcases a list of events that are considered more important than others. Such include filling out a contact form, making a phone call, making a purchase, or anything else that indicates a given site visitor is interested in your business, website, and your services and goods.
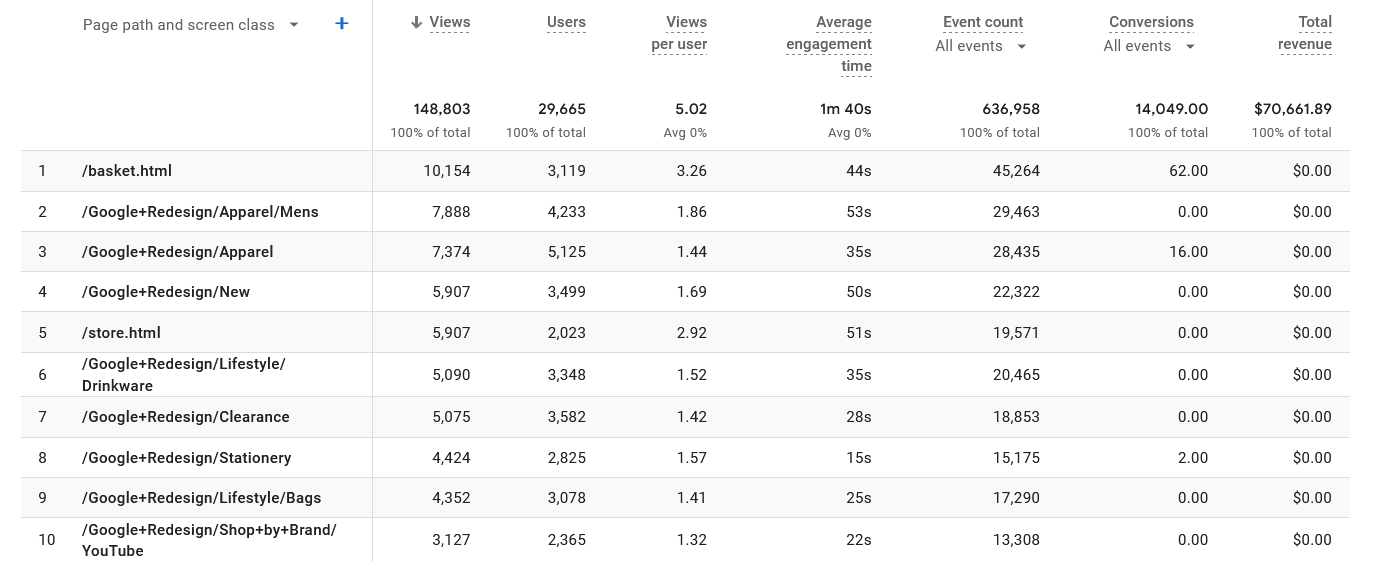
GA4 Pages and Screens
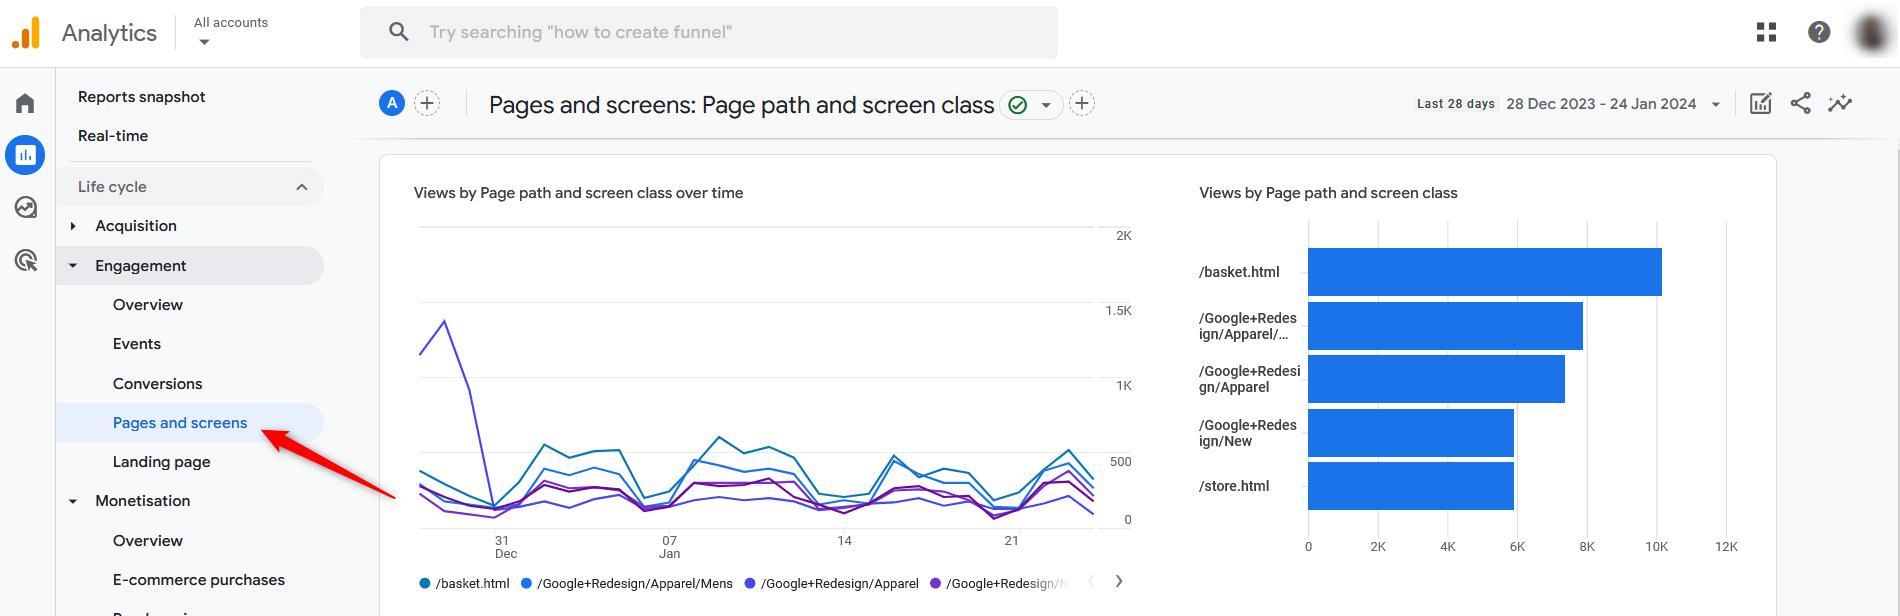
Page and screens report revolves around which pages are most visited for a given period. Additionally, via the stats table, this report offers, you can make quite a comprehensive breakdown of various data metrics and discover dependencies, ideas, and overall insights. The table is very versatile, thanks to the option to change screen classes and add various dimensions for further data breakdown:
Landing Page
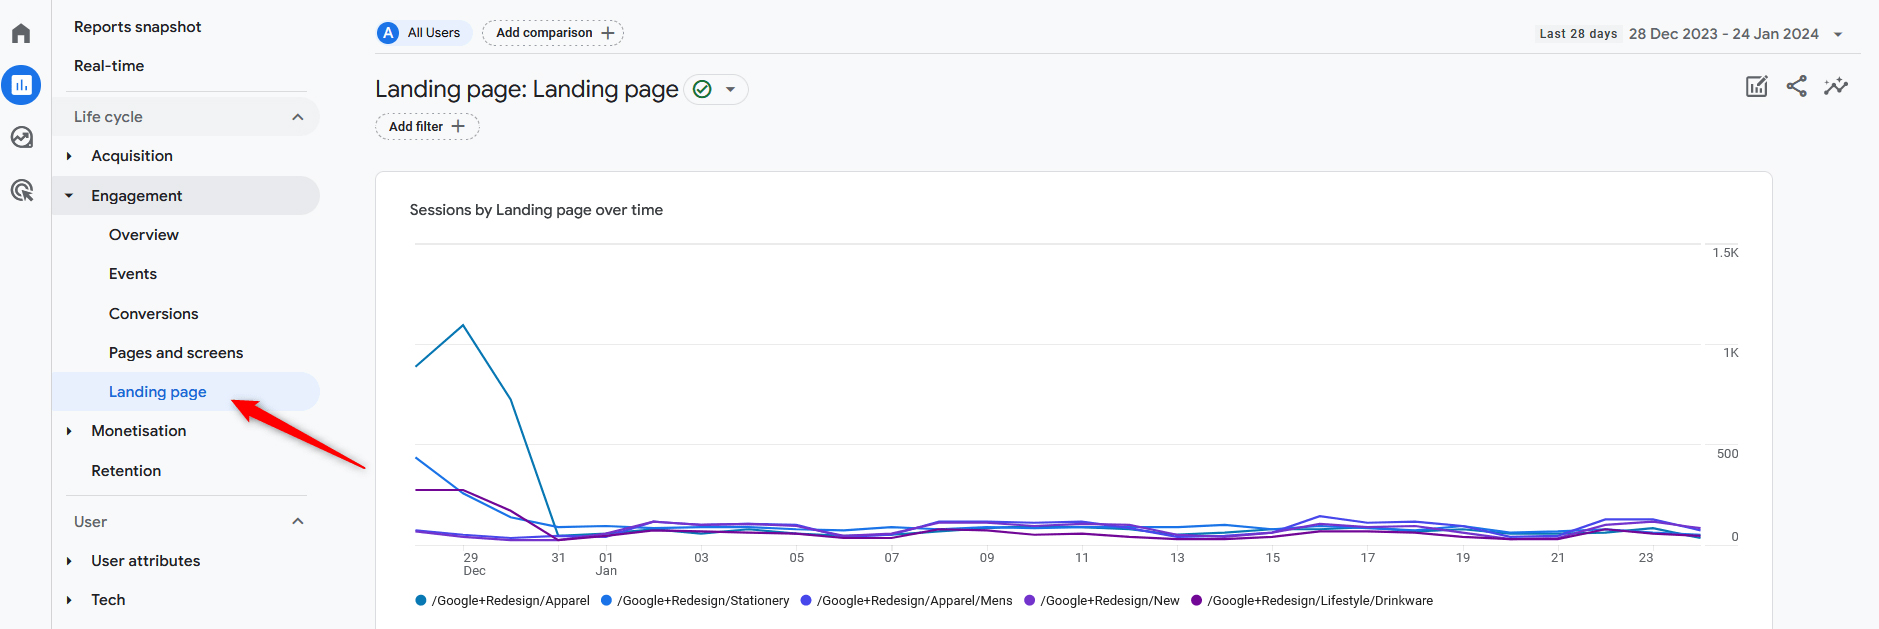
The Landing Page report page is pretty similar to the previous one, however, the main accent in this report is the pages that your site visitors first open when visiting your website.
You can use this report to narrow down the paths via which people come into your website and make a precise plan on how to improve further the pages that have the most visitors that come for the first time.
Google Analytics 4 Monetisation Section
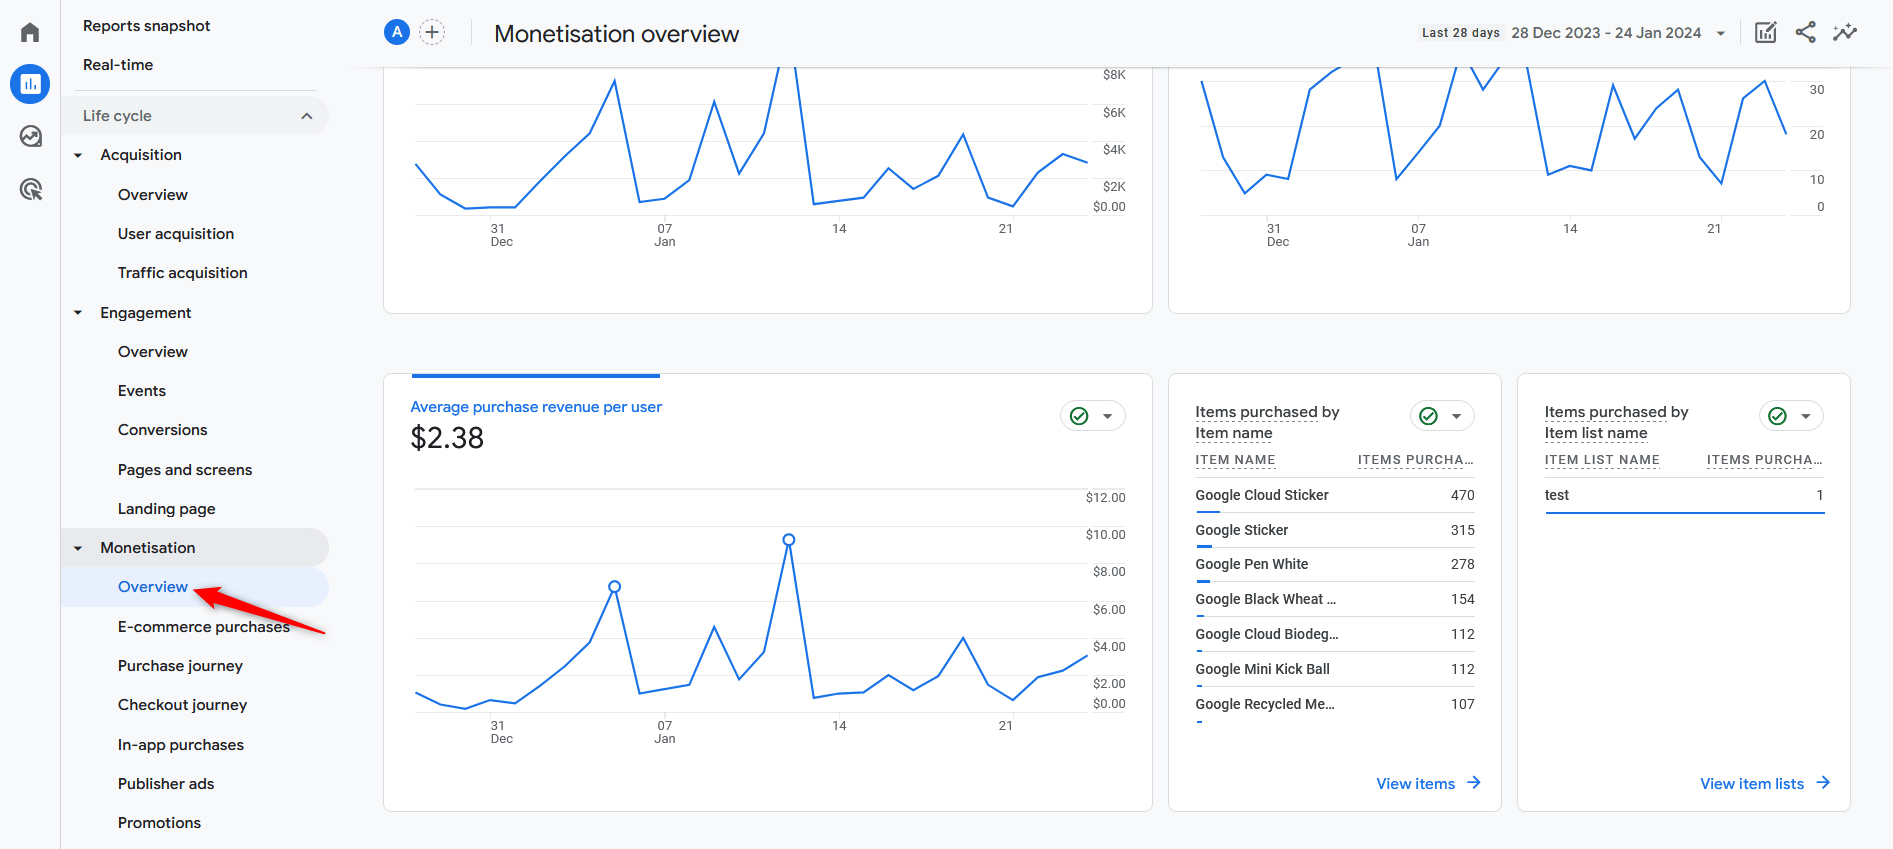
Monetization helps you make a comprehensive analysis of the various sources of income you have created on your website.
For example, you can analyze your overall revenue for a certain period, purchase revenue, ads revenue, and most sold items.
Depending on which report you use under the Monetisation tab, you can analyze your monetization endeavors from different perspectives.
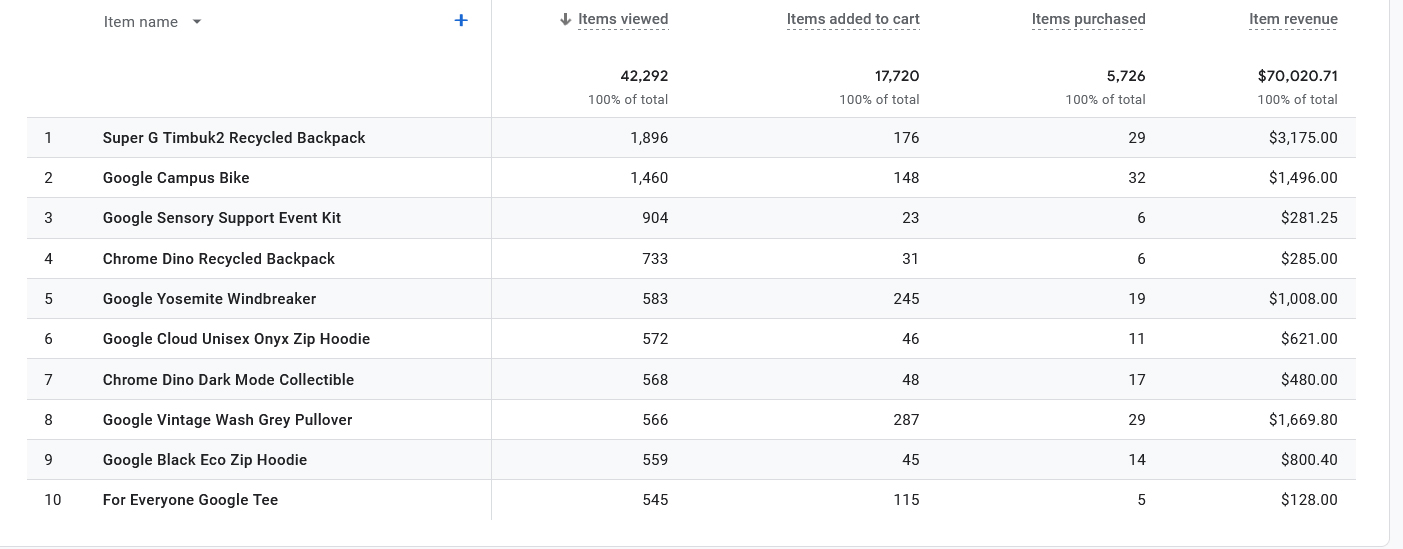
E-Commerce Purchases
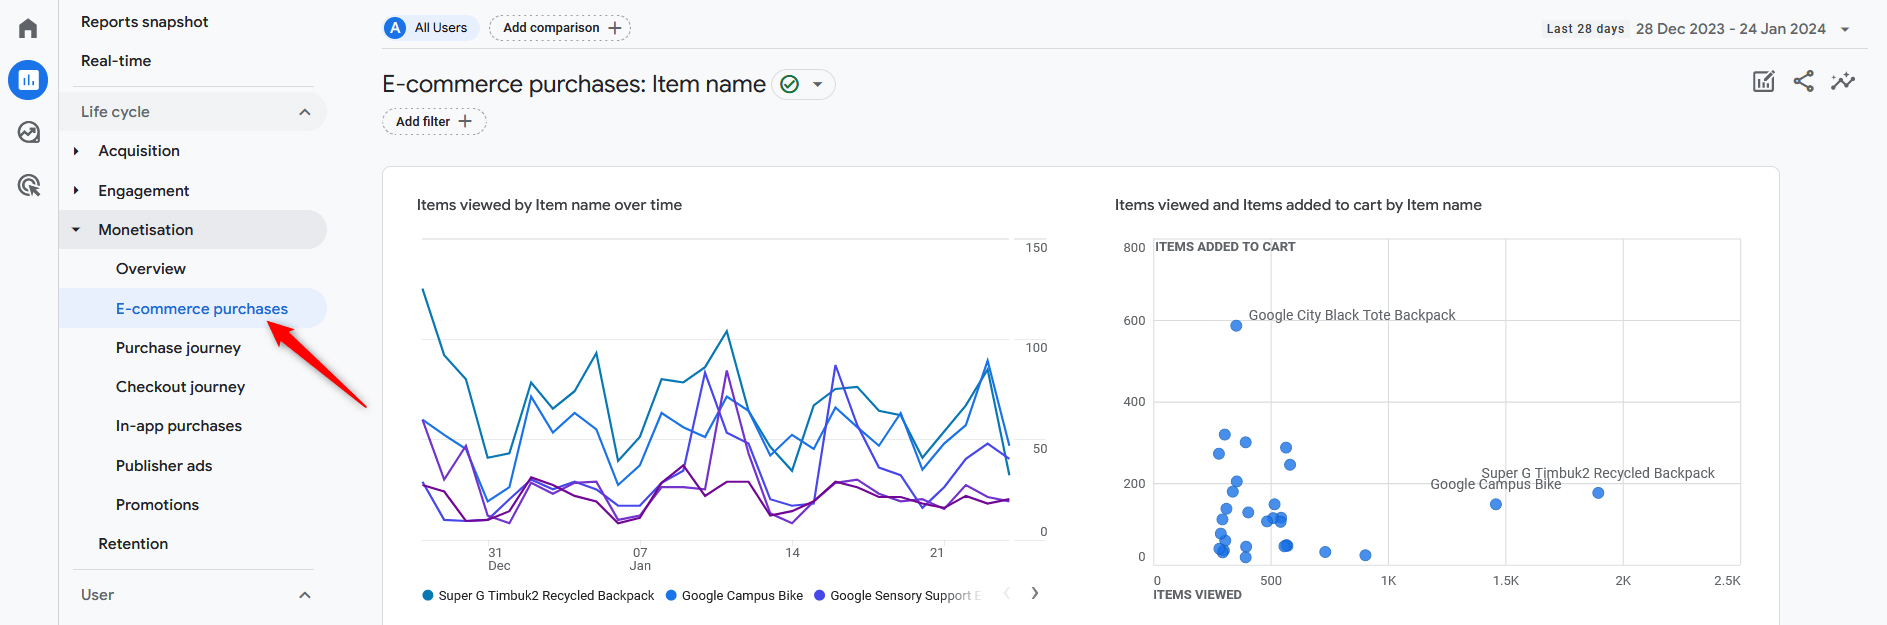
This tab is valuable for each e-commerce manager who seeks further details about how their online store is performing. E-commerce purchases revolve around the sold products and various ways of sorting them into different categories.
Similar to other tabs, this one also features a table of stats that can be altered in many useful ways, so you make precise segmentation and analysis for all the goods you sell via your e-commerce website:
Purchase Journey
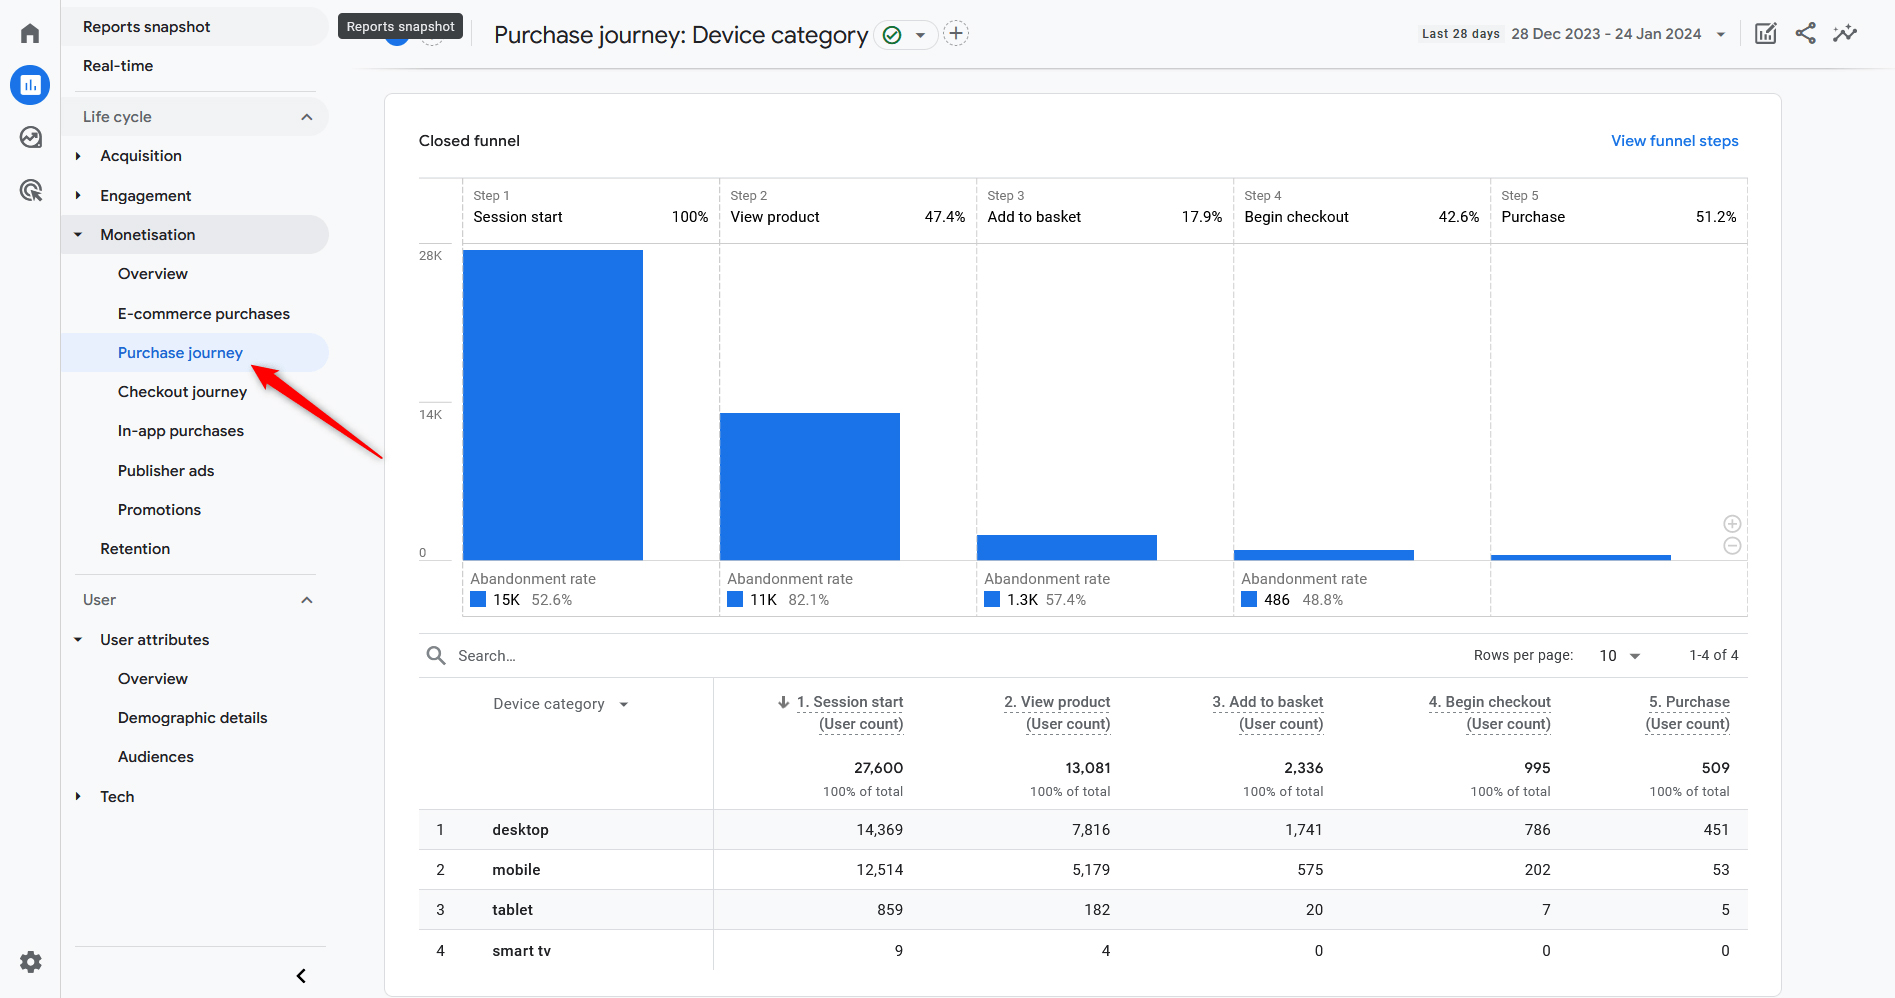
Unlike E-commerce purchases, the Purchase journey tab revolves around the various metrics regarding user purchase behavior. Via this tab, you can see how many sessions have resulted in purchases, what OS visitors use to purchase, and what purchase-related events have been completed.
Checkout Journey
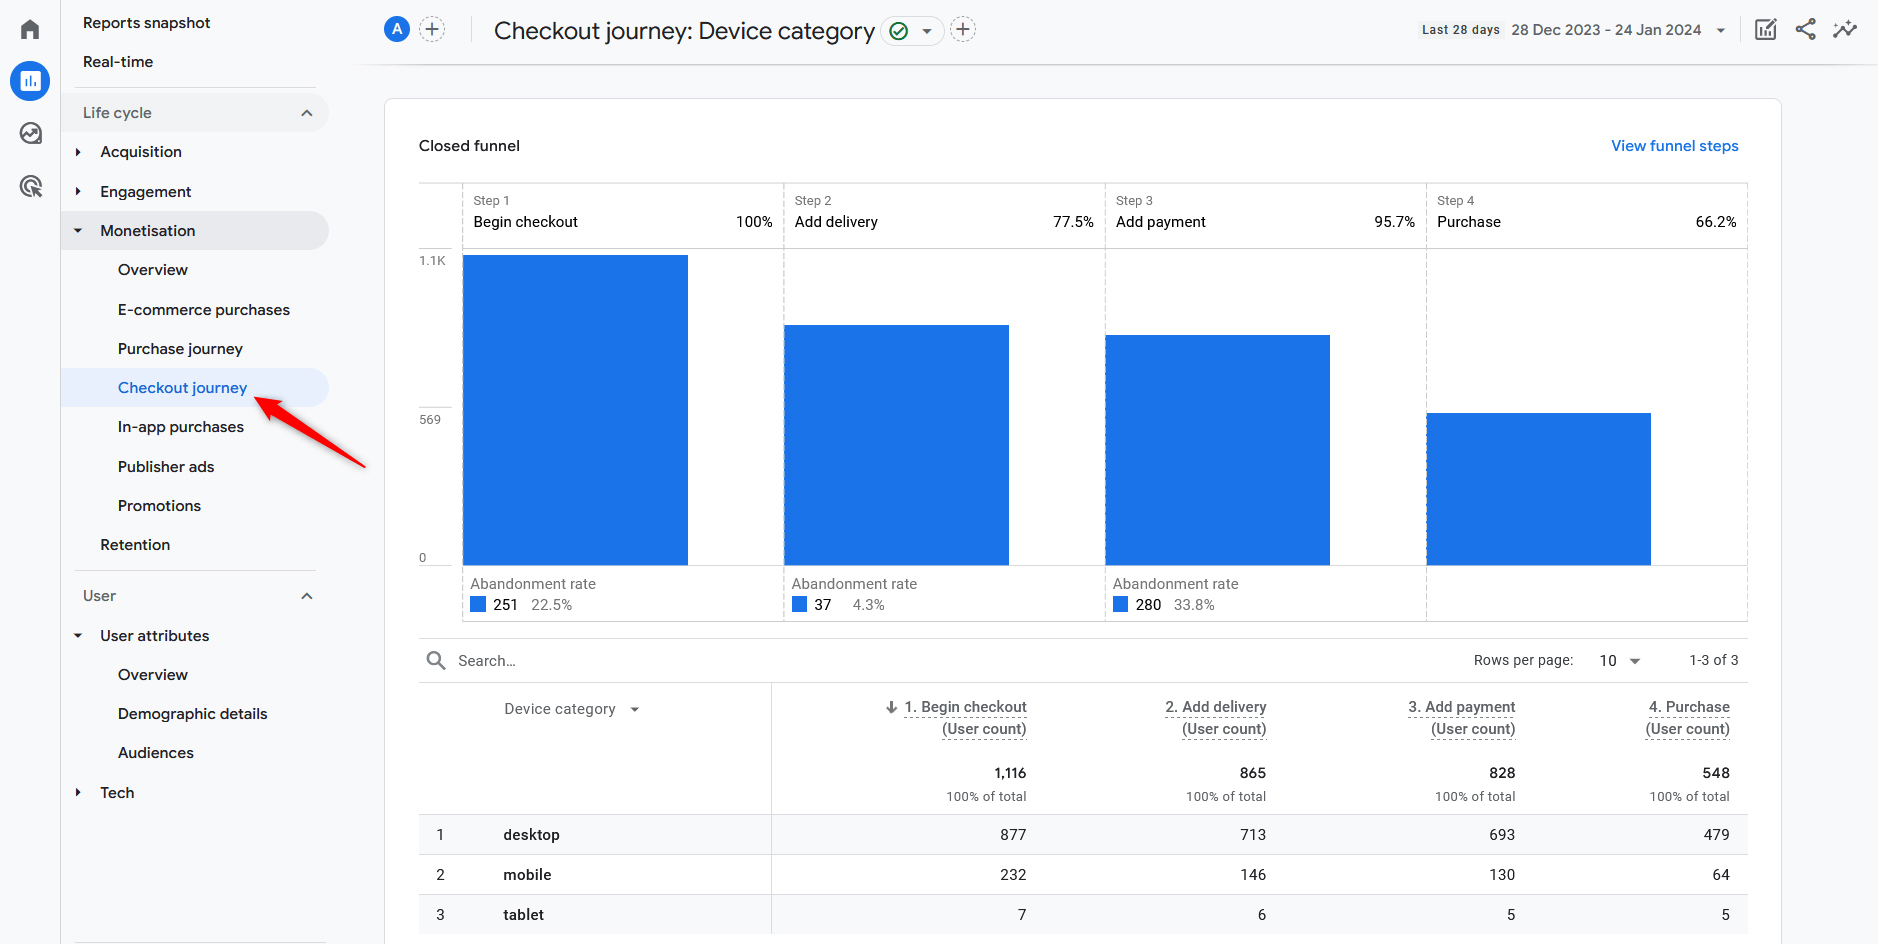
The checkout journey report focuses mainly on activities closely related to the purchase – begin checkout, add to cart, add payment, purchase, and abandonment for each related activity.
This tab can be effective to monitor which product pages are not performing well and need optimization, so to add a kick to revenue and overall better user engagement.
In-App Purchases
As the name suggests, this tab helps you analyze purchases done via a mobile app you have launched along with your website.
Publisher Ads
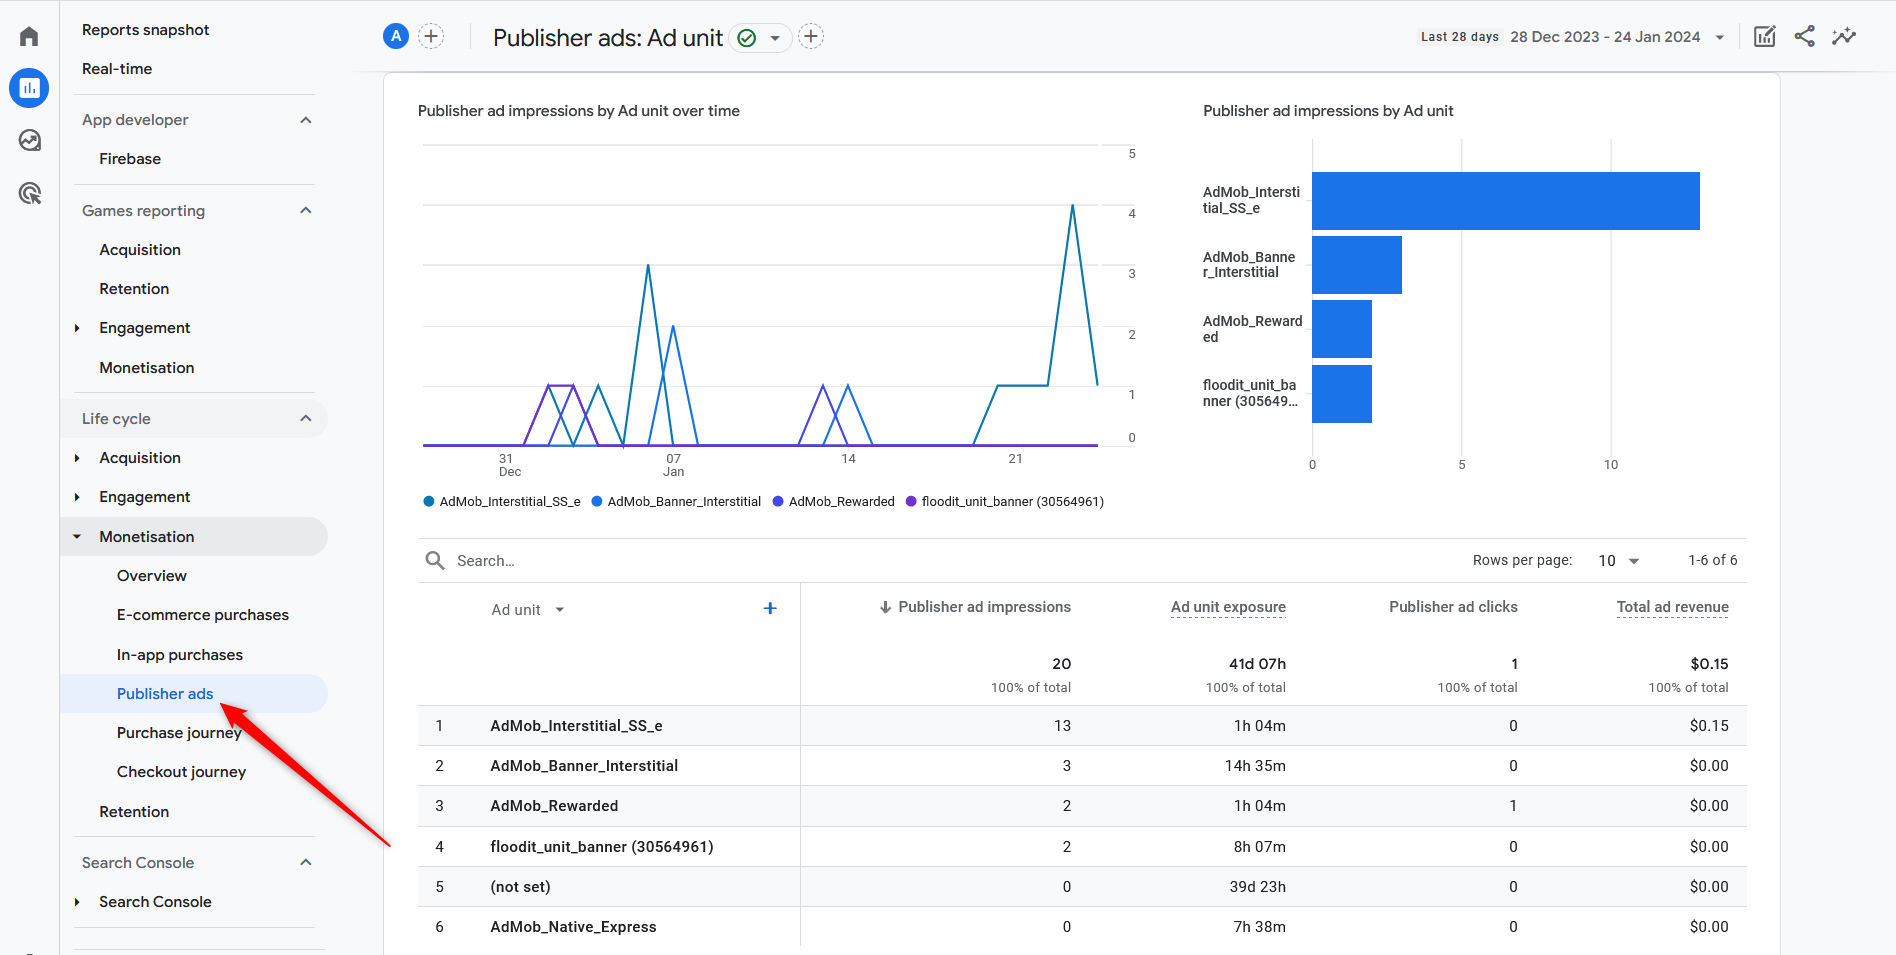
This report grants you all the details about ongoing ads on your website. Information includes how much revenue you have received, for how long any ad has been present on your website, and how different ads compare in performance.
Retention
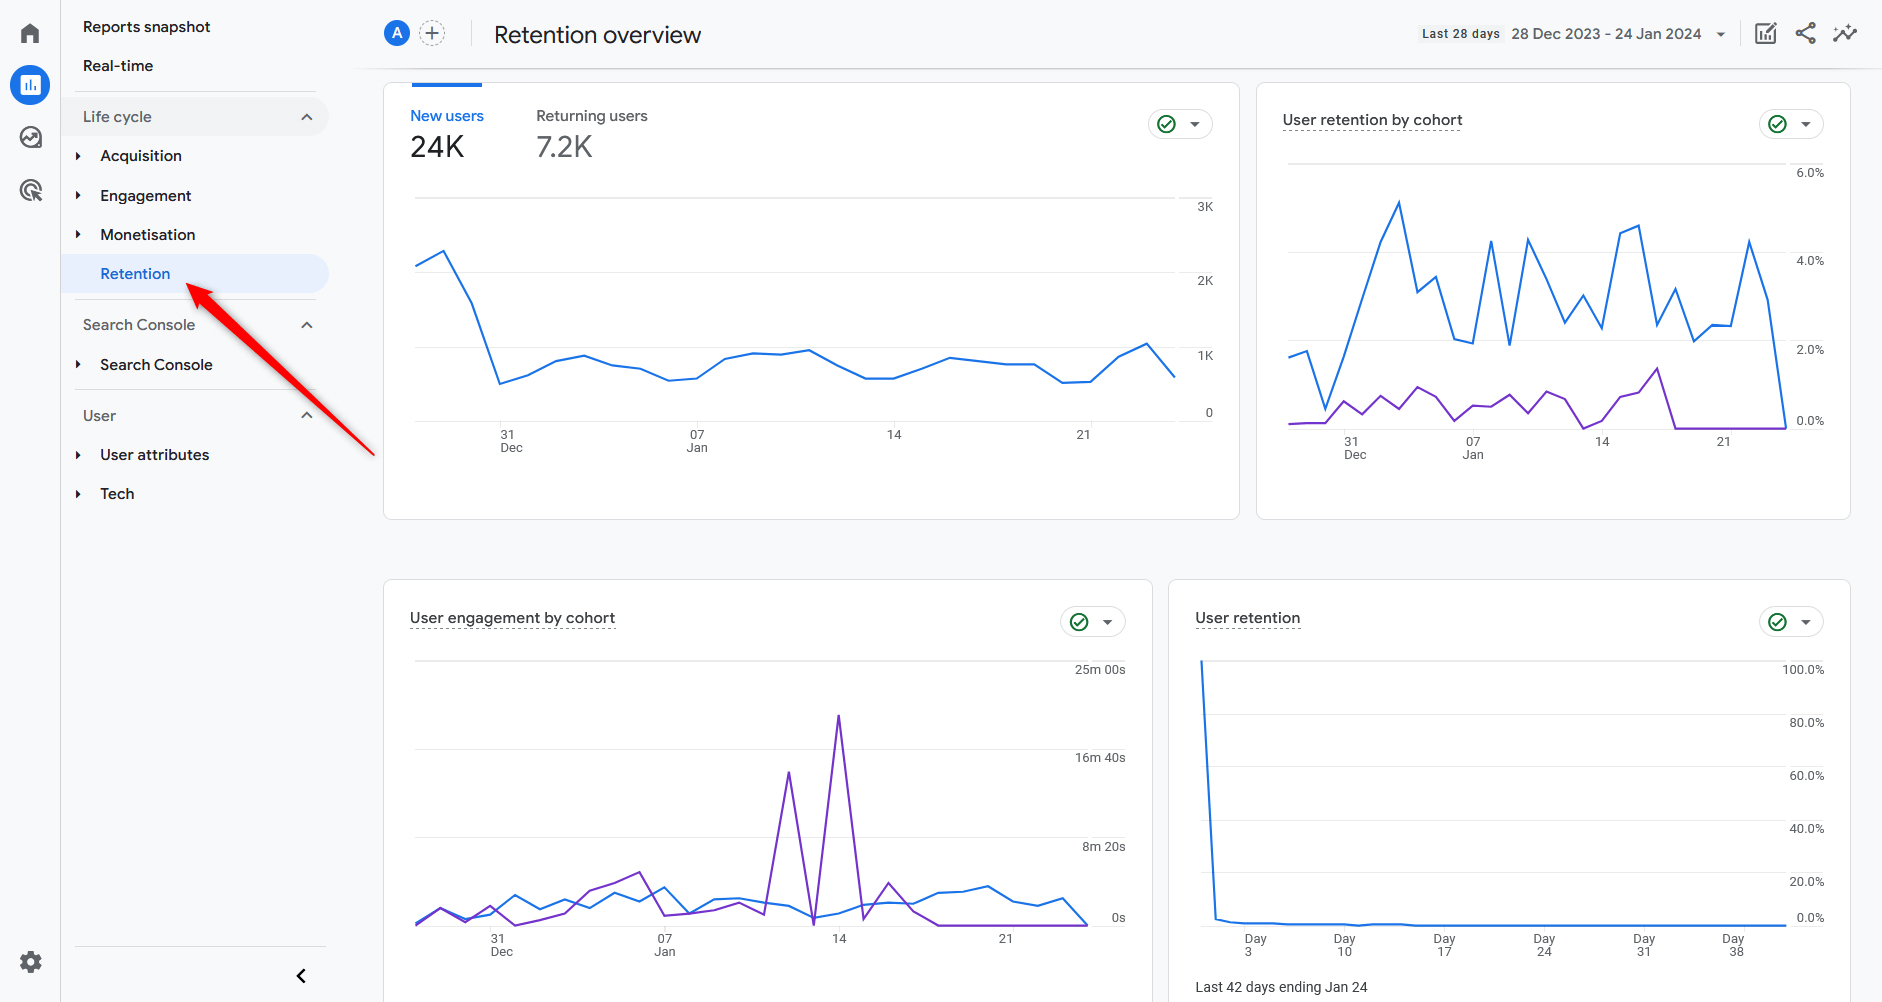
The GA4 retention tab helps you analyze how many are returning visitors and how your site manages to retain users for a long period. Each chart gives you an insight into how well you retain users.
User
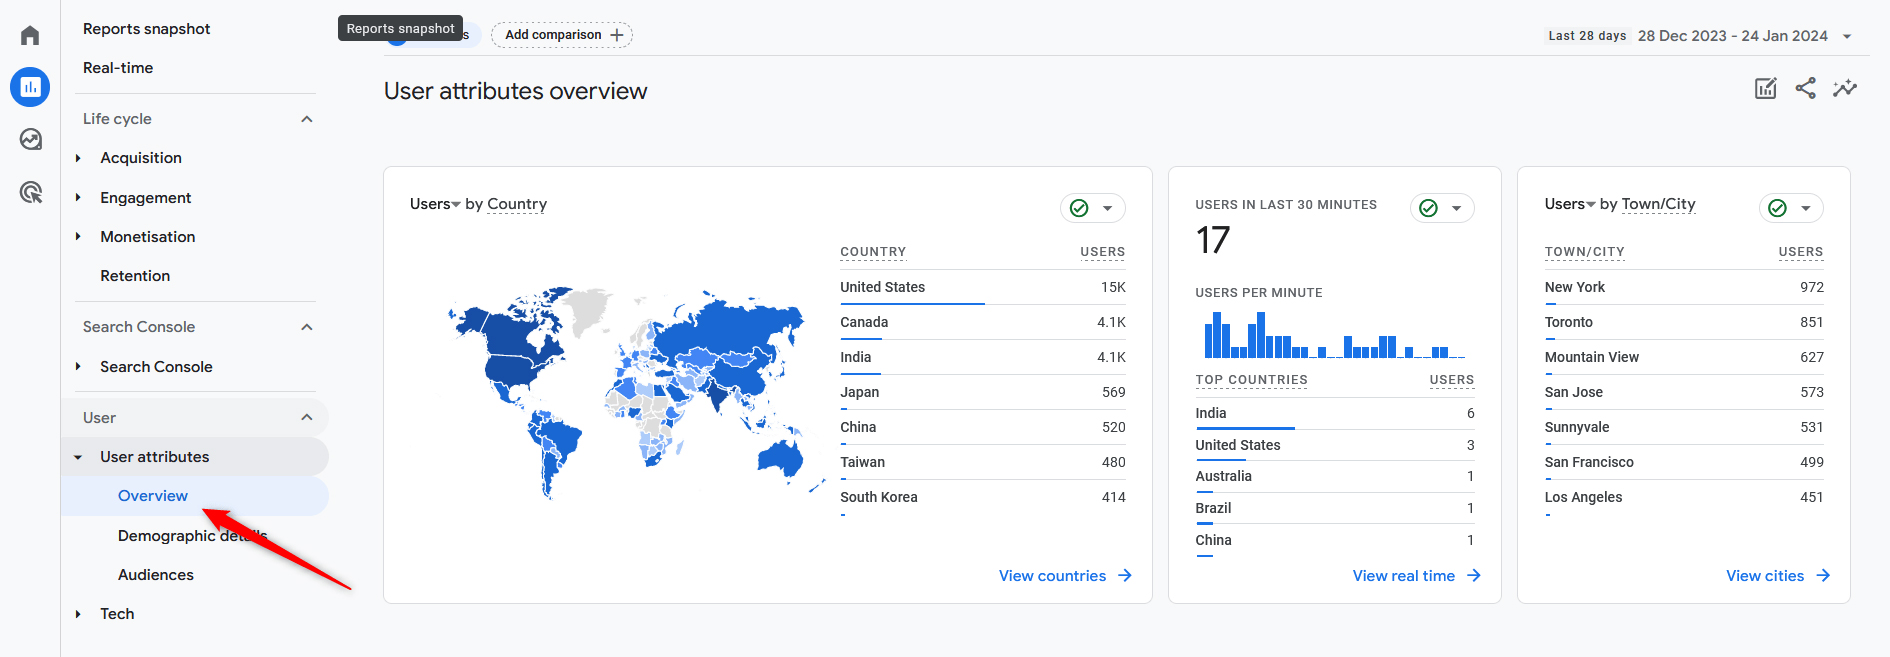
This tab revolves around your users – their demographic specifications and interests. Use the User tab to gain more information about who your site visitors are, so you know better what would work for them and what – not.
Demographic Details

This tab grants you comprehensive information about where your visitors come from and how they behave on your website. This tab is very useful for making various user segments and customized marketing campaigns for each segment.
Audiences
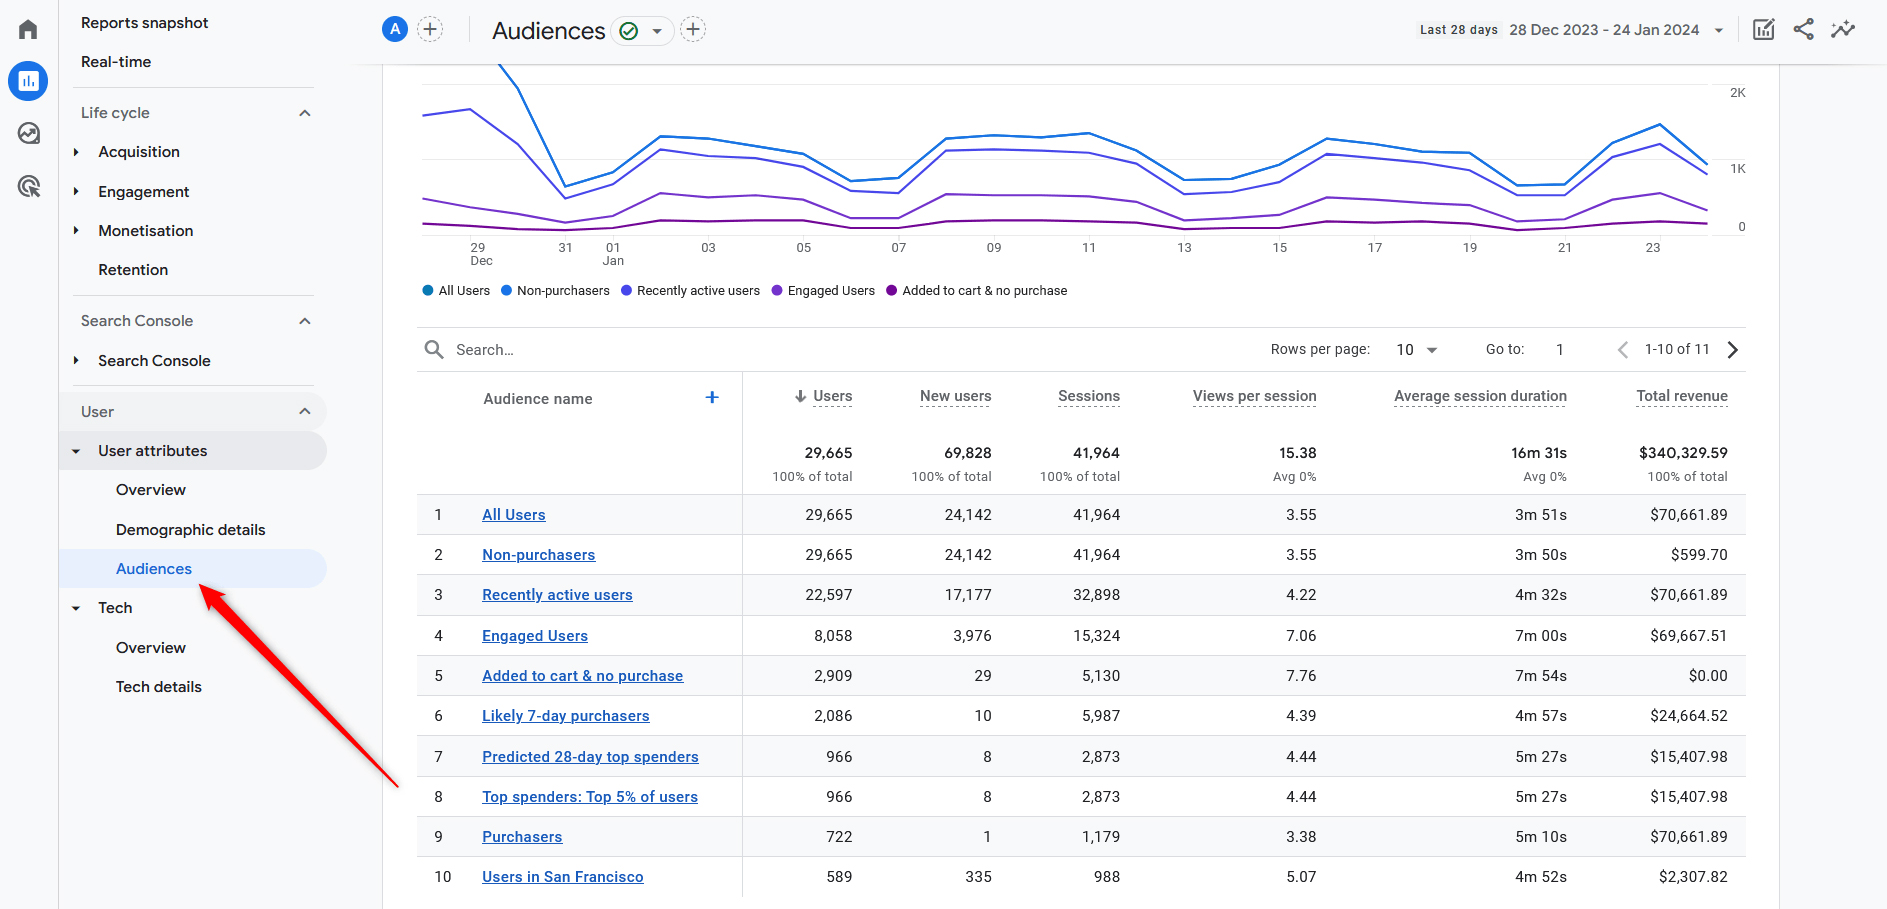
This tab helps you segmentate your site visitors into various groups, based on different characteristics. For example, you can sort out all the people who have bought a product, those who have added a product to the cart but didn’t make a purchase, people who registered to your newsletter, and many more.
Use it to sort out which group of people is worth approaching and which needs more development.
Tech

The tech report gives you information regarding the hardware devices and software platforms your site visitors use – types of internet devices, OS platforms, web browsers, and similar.
Google Analytics Explore
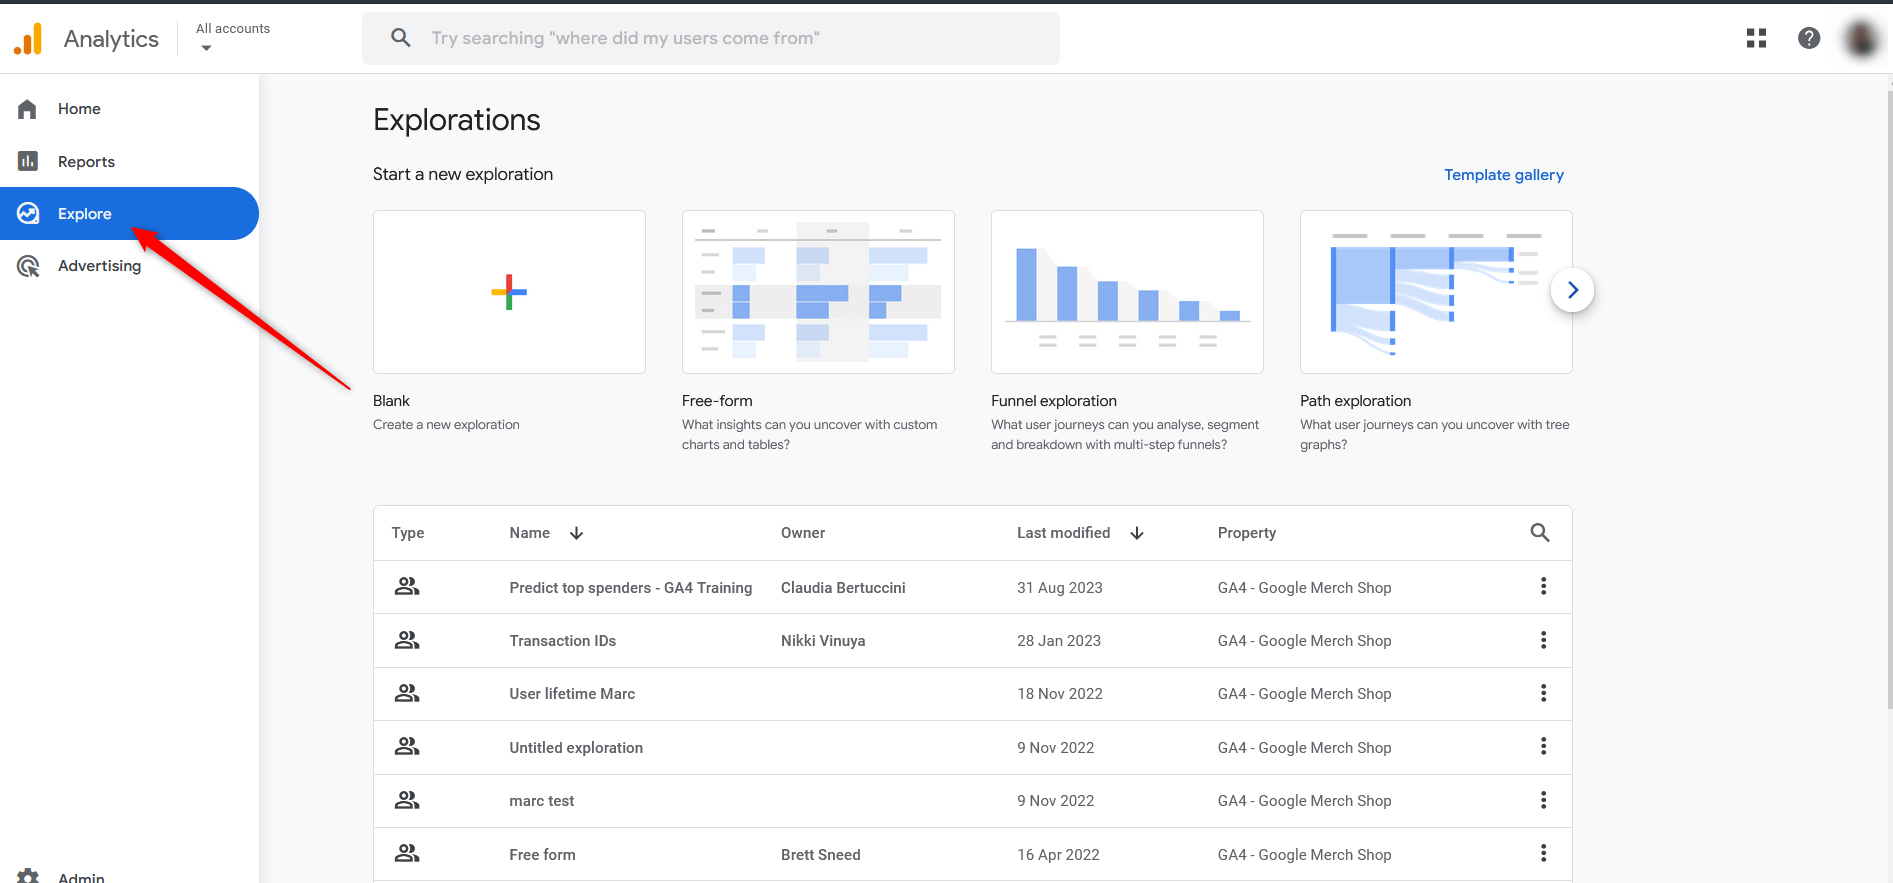
This section is all about custom reports. It grants you the opportunity to delve deep into metrics and analyze any bit of data the way you want. Although this section of Google Analytics 4 requires more advanced knowledge about the platform, it can greatly repay by giving you just the information you need to improve your website.
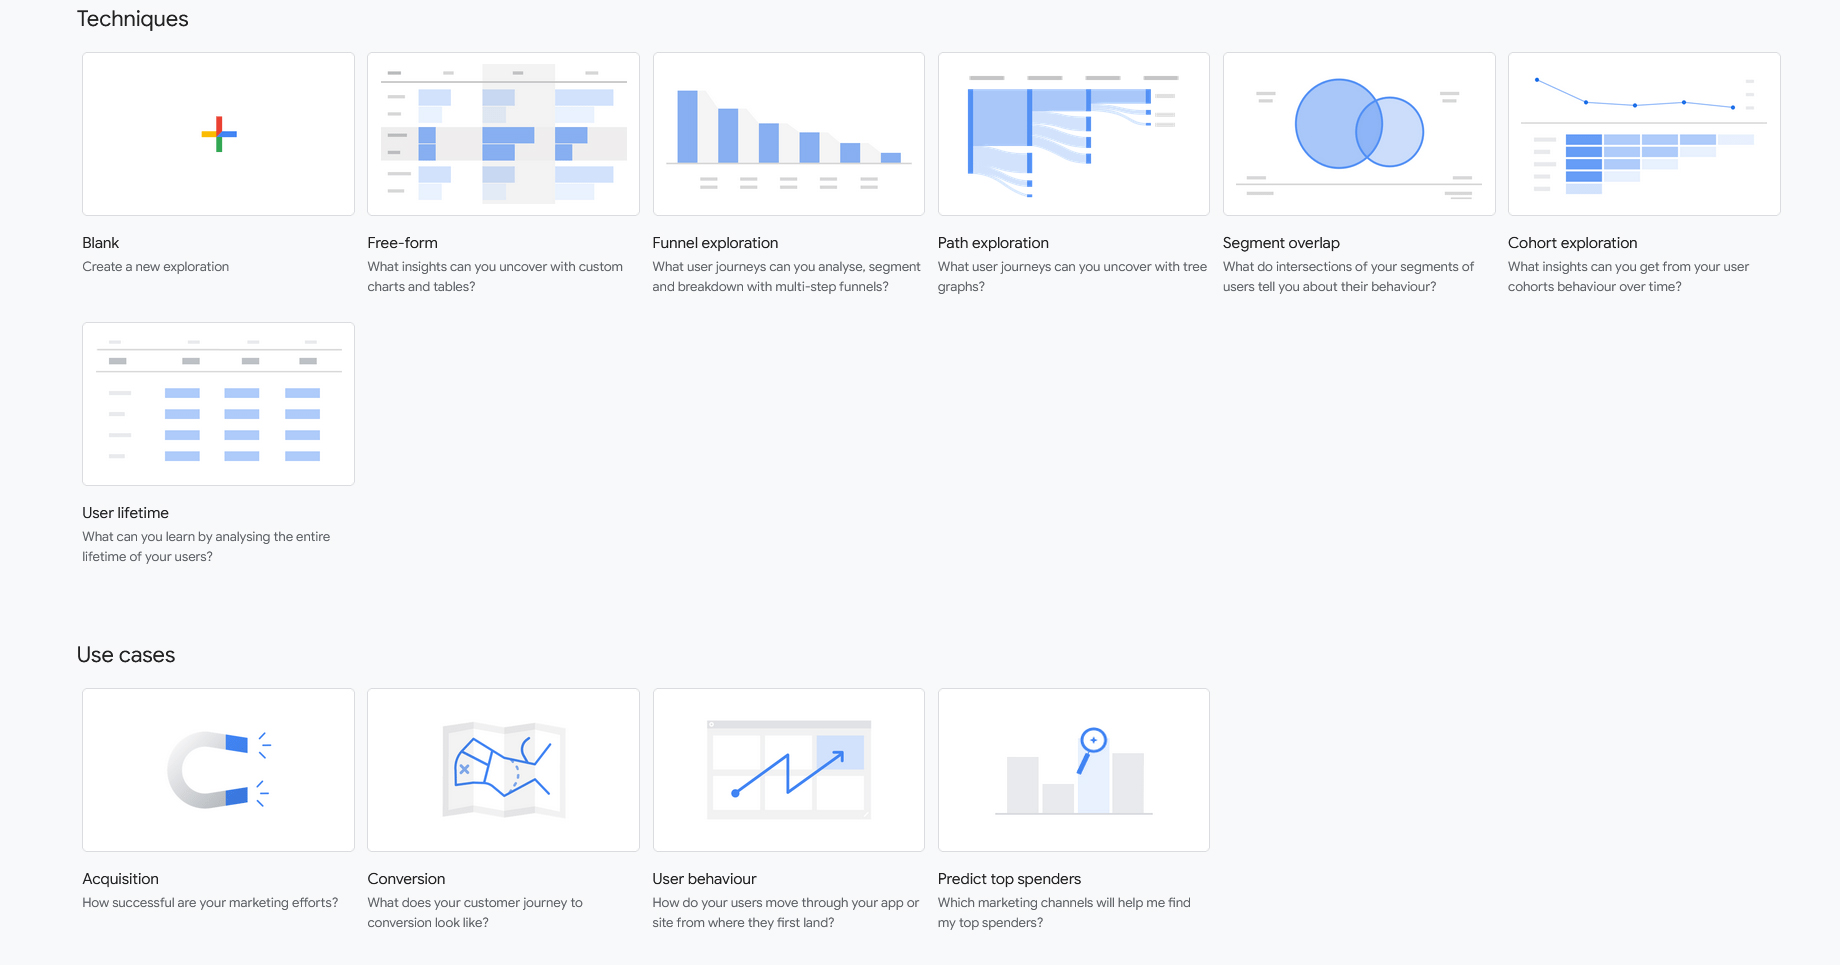
- The explore tab grants you access to several customer reports that can be very helpful in numerous scenarios. In short, you can access reports such as:
- Free Form. This one allows you to export and explore data via various graphs and charts
- Funnel Exploration. This template can be very helpful in monitoring your funnel performance and what works for your purchase journey and what doesn’t.
- Path Exploration. A handy template that helps you monitor which pages your site visitors open once they land on your website.
- Segment overlap. Helps you delve deeper into user segmentation and understand better your audience.
- Cohort Exploration. Groups users in various cohorts and allows you to monitor their engagement and return to your website.
- User Lifetime. Grants you information about a user that visits your website each time.
Google Analytics 4 Advertising Report
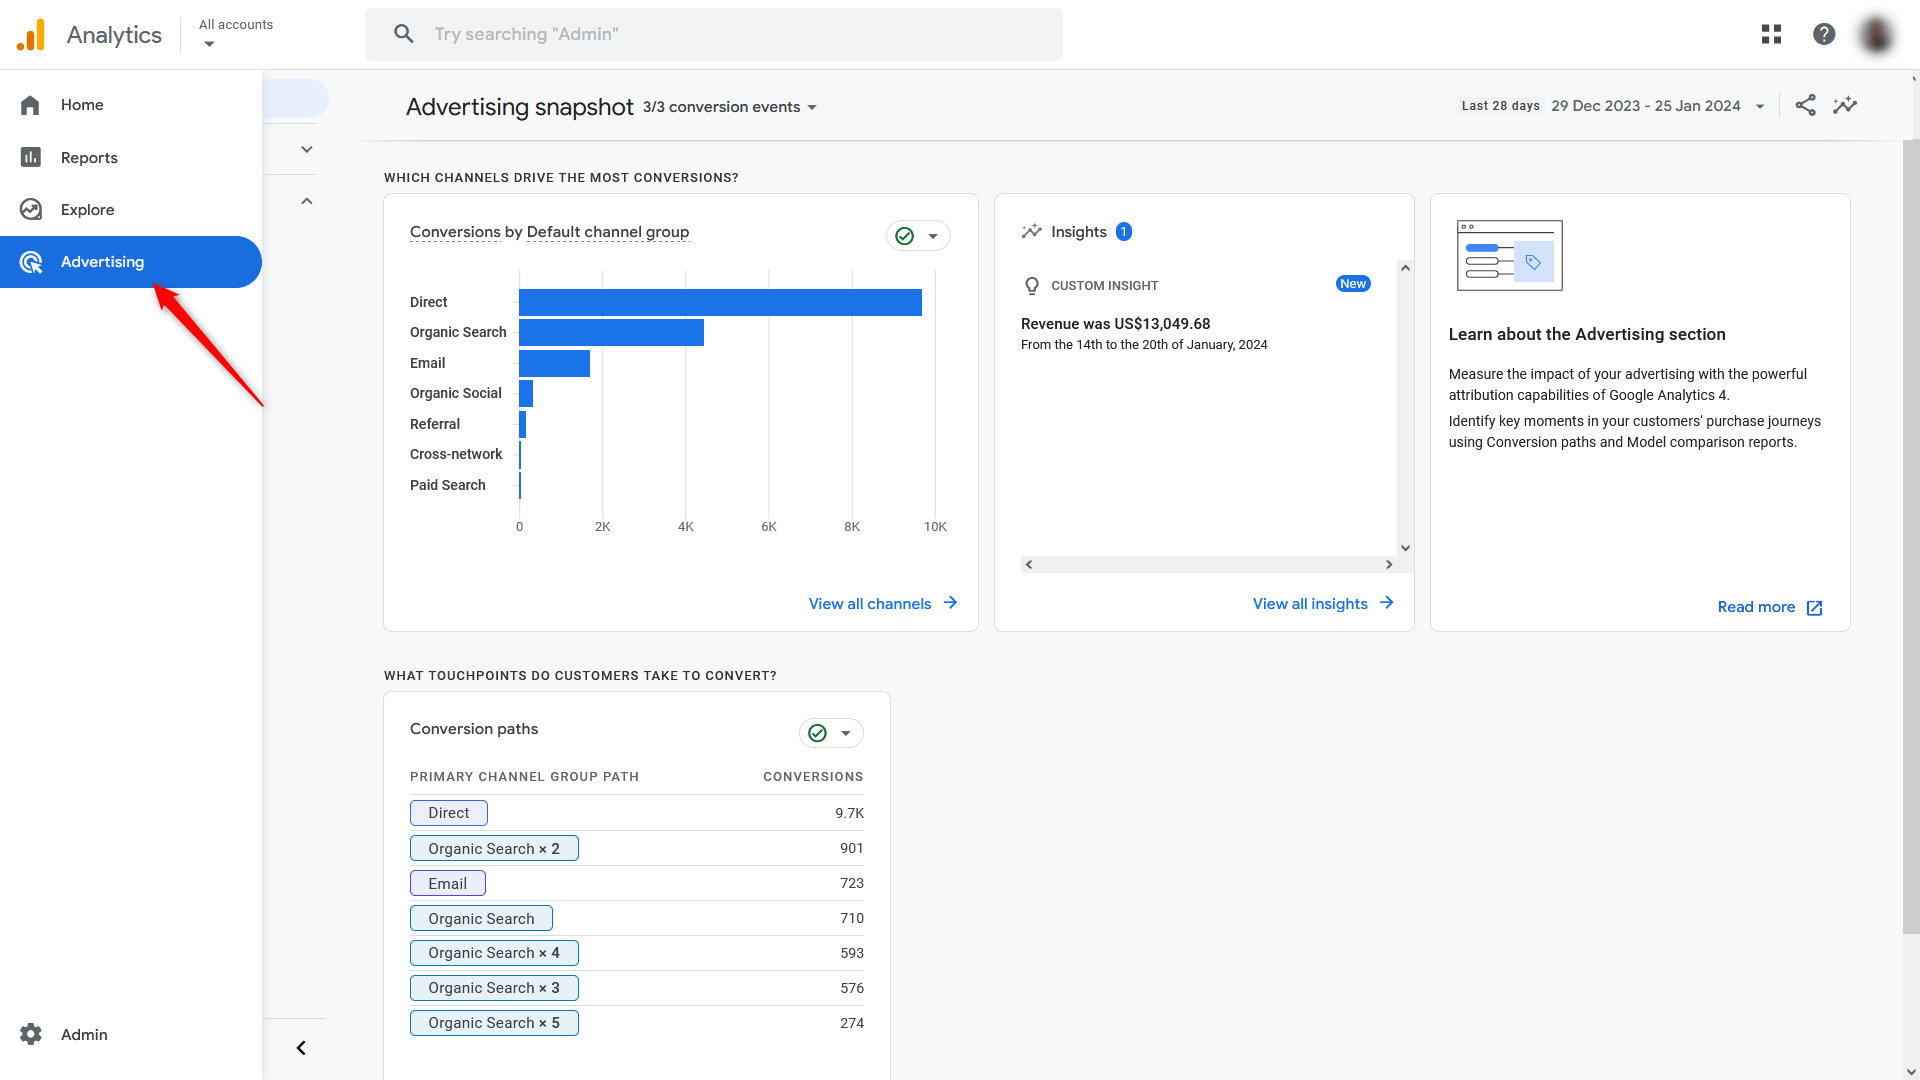
The advertising report in Google Analytics 4 grants you various types of data regarding how well your digital ads are performing and how each ad compares to other ads and other channels. The report also gives you a handy comparison of how your ads perform, compared to organic traffic and non-sponsored conversions.
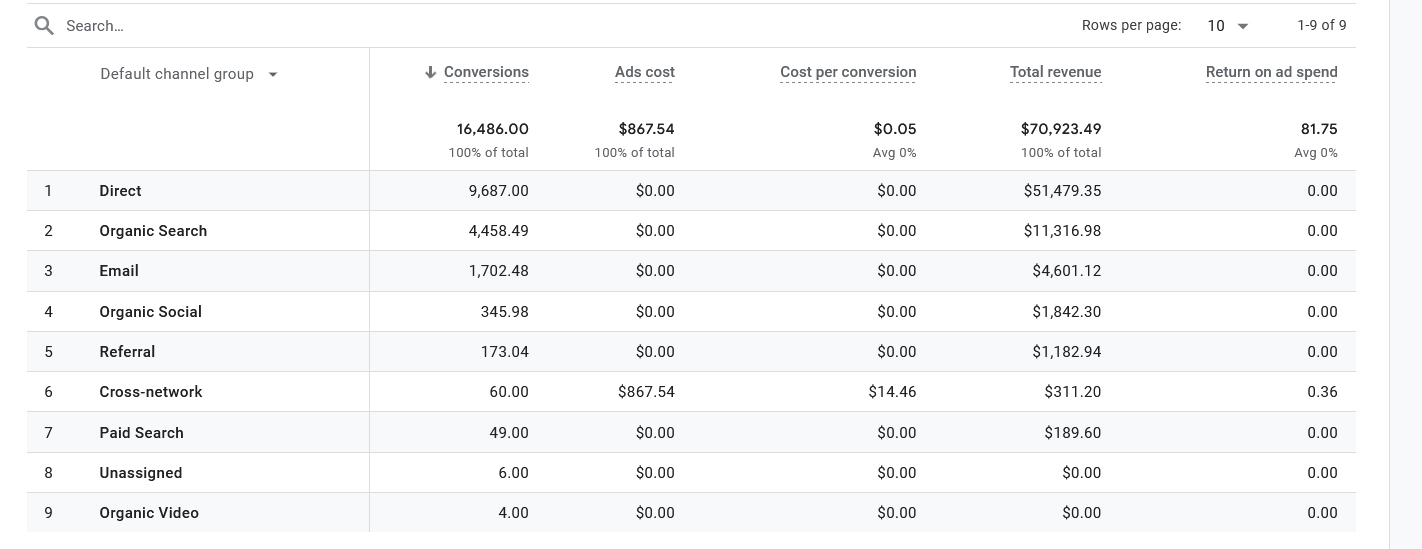
Performance – All Channels
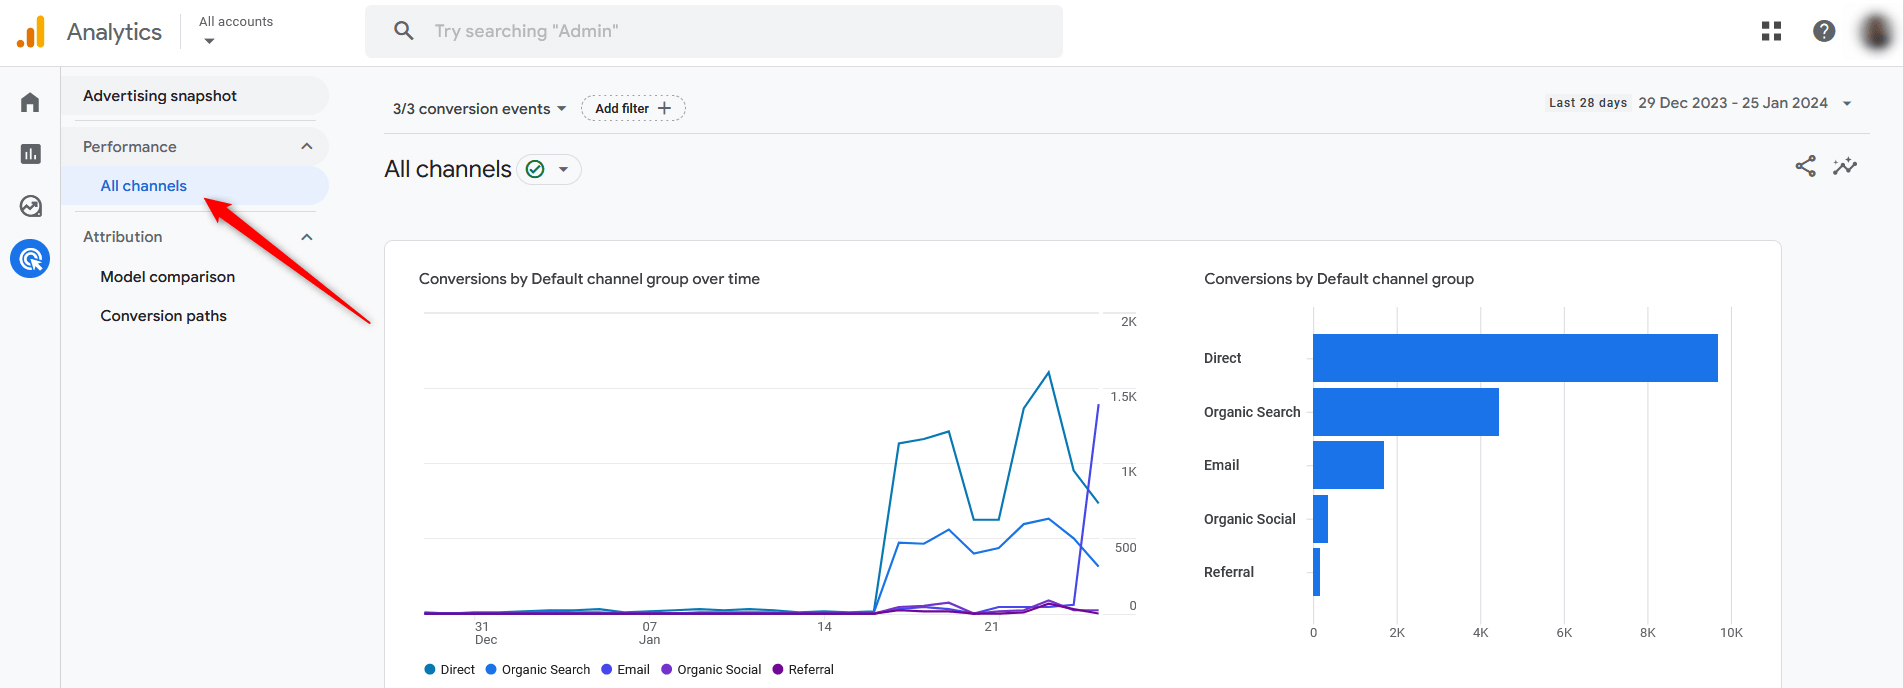
The All Channels report showcases all the conversions that have taken place on your pages. A very useful table displays tons of relevant data, which can be further broken down into various segments and help you analyze how each ad performs on each marketing channel.
Attribution – Model Comparison
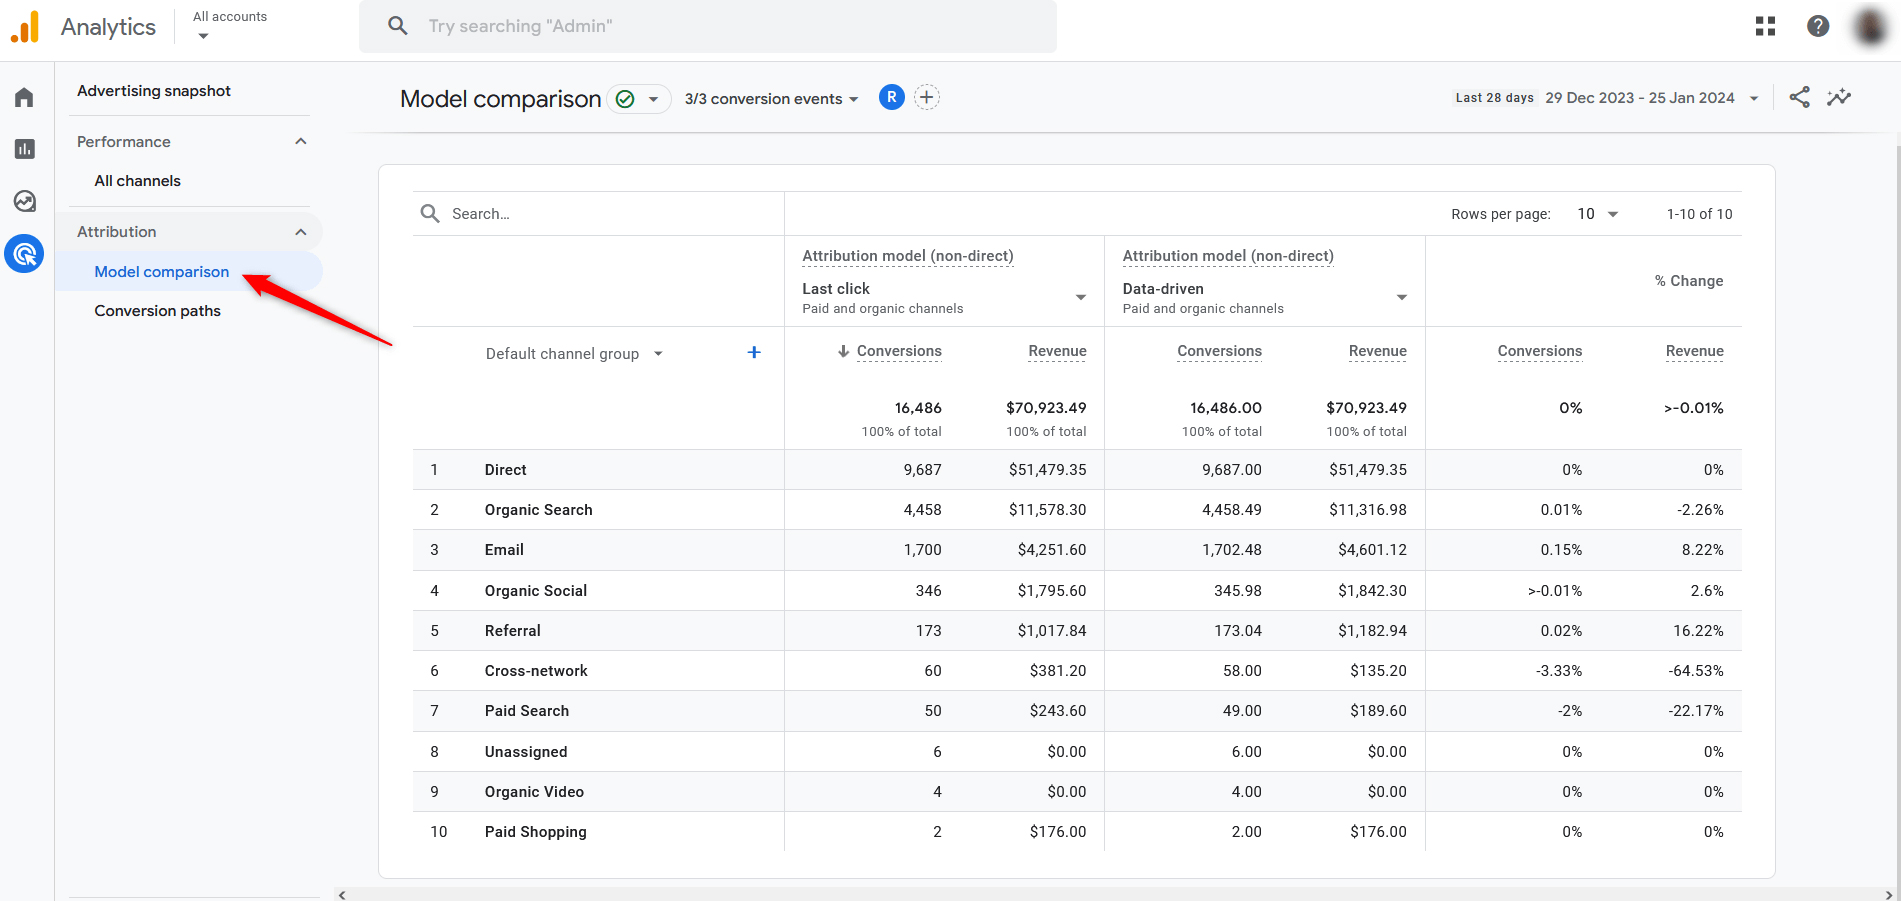
The model comparison provides various types of conversion data via different attribution models. You can also adjust the dimensions in the provided table for more detailed reports.
Attribution – Conversion Paths
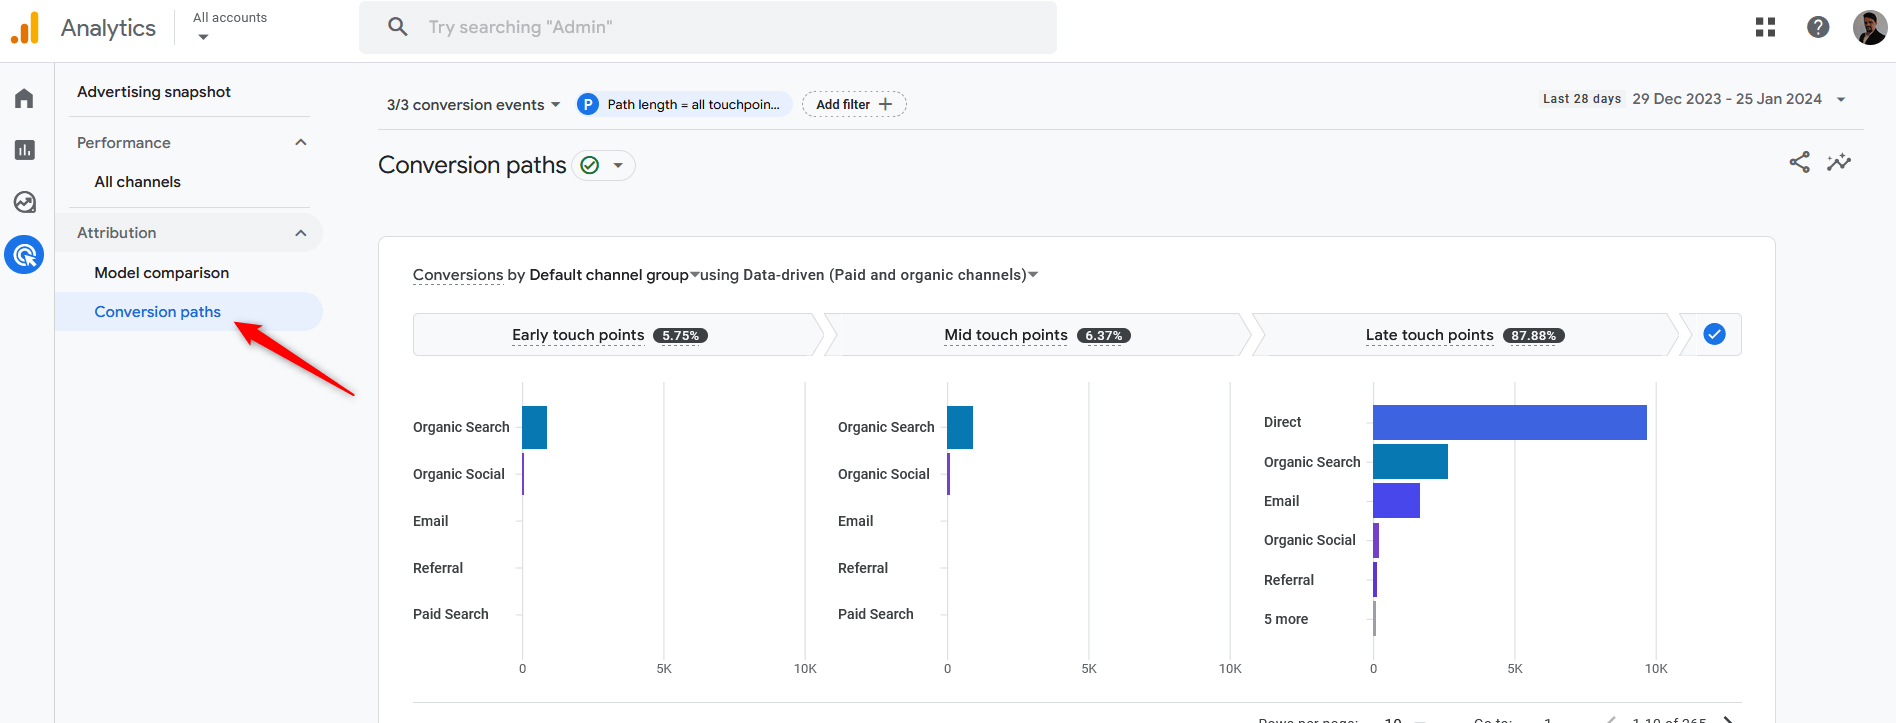
Conversion Paths is a very useful report, as it gives you information about how many times a visitor has visited your website before they made a conversion and via which channel they did so. This report is useful, as it grants you an idea of how many times a given customer visits your pages before they make a purchase or any other notable conversion.
Google Analytics Admin Settings
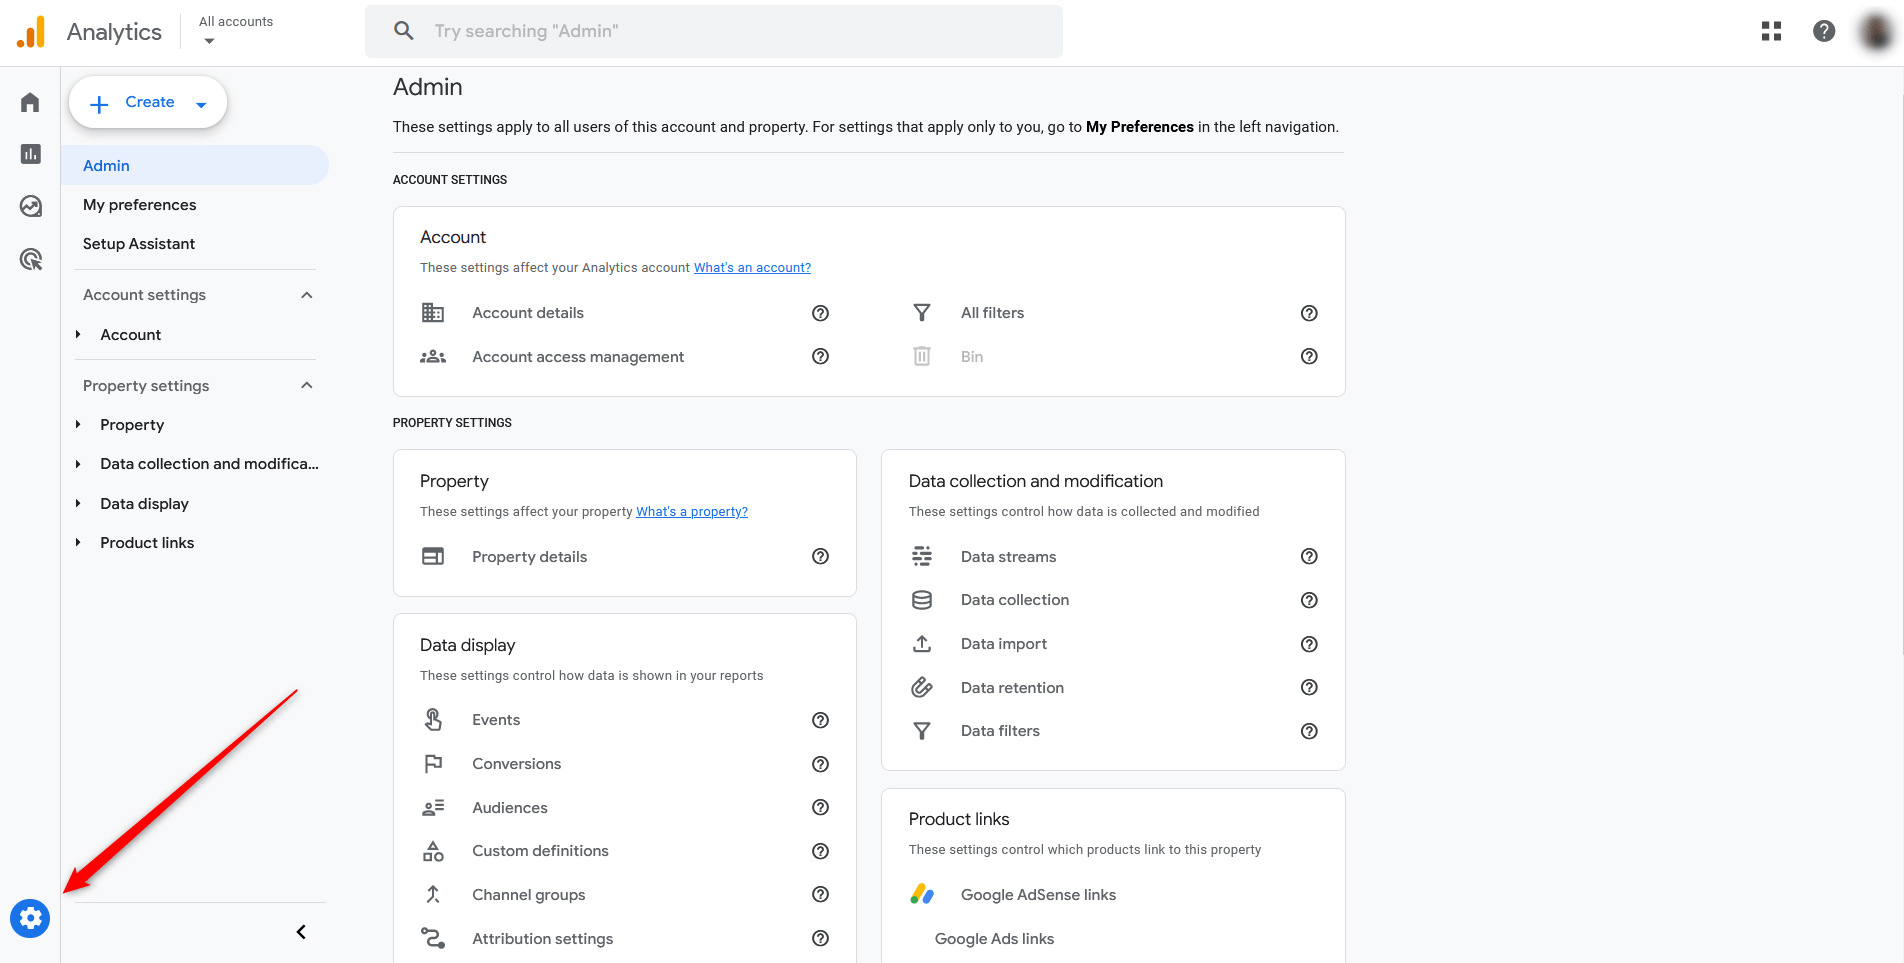
This is the section via which you can make various changes to your GA4 account and reports. For example, you can grant access to various reports, see how GA4 is connected to your website, add events, conversions, and audiences.
