How to Create a Page in MediaWiki

Home » Knowledge Base » Design Tools » MediaWiki » How to Create a Page in MediaWiki

Creating pages in MediaWiki is а core feature that allows you to add content to your MediaWiki website. Whether you are adding details for a project, contributing to a knowledge base, or anything else, learning how to create a page in MediaWiki is crucial for your wiki project.

In this tutorial, we show how to go through the process of creating a new page in MediaWiki.


How to Create a Page in MediaWiki

In most cases, a page in MediaWiki represents a unique topic on a given subject. Pages can contain text, images, other media, tables, and links, and can be interlinked with other pages to create an organized system with a well-crafted structure. Additionally, each page contains a corresponding history, which allows you to track changes and revisions by site visitors and team members.

After you install MediaWiki, Log in, you can use  three methods to create a page in MediaWiki:

  • Use the Search Box
  • Create a Red Link
  • Direct URL

In the following paragraphs, we show how each of the methods is applied.


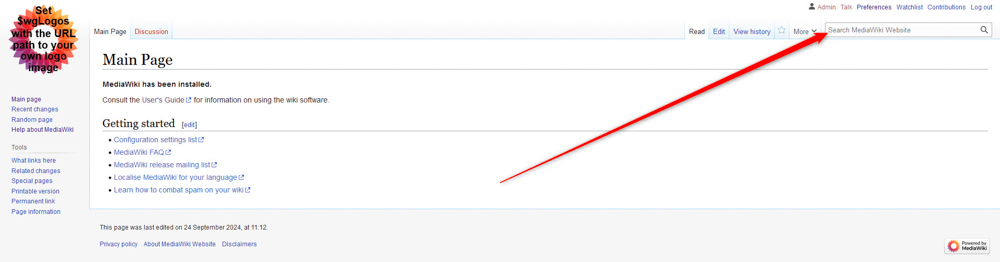
Create a MediaWiki Page with the Search Box

This is by far the easiest way to create a new page. To create one with this method, simply type in the title of the page you wish to create in the search box:

How to Create a Page in MediaWiki by using the search function


Once you type in the request, MediaWiki will return a list of pages that match your query. However, should the page you search for doesn’t exist, the system will prompt you to create a new page on the topic:

Create a new page in MediaWiki by clicking the red link


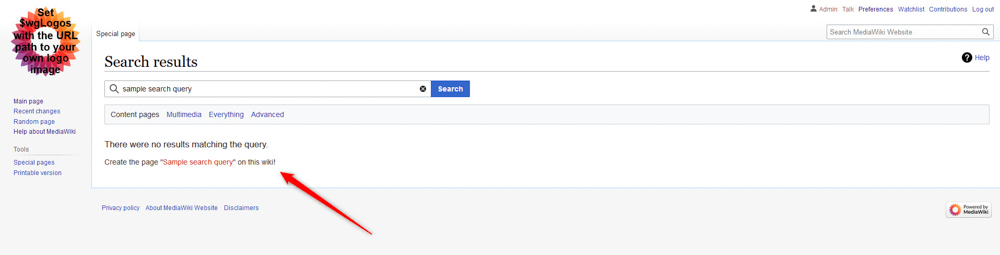
Once you see this message, click on the red link that says “Create the page [your search query] on this wiki!”, so you can start working on your new page.

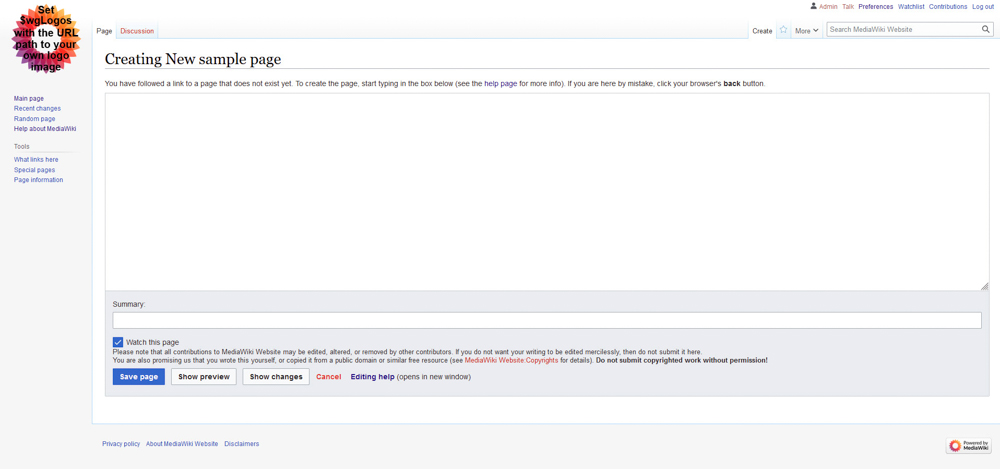
After you click the red link, you will be directed to the MediaWiki editor where you can start working on your new page:

MediaWiki Page Editor


Create a New Page with a Red Link

Another way of creating a page in MediaWiki is by using a red link. In MediaWiki, red links are links that lead to a page that is not yet created.

To create a MediaWiki page with this method, first go to an already existing page that should link to a non-existent one.

Then, within the existing page, add the title of your new page in square brackets like this:

[[new MediaWiki page]]

After that, save the changes. Once you do so, the title of the new page will appear on the already existing page in red (as a red link). Once you see this red link on your already existing page, you can click it, so MediaWiki can redirect you to the editor with which you can start working on your new page.


Create a Page via the Direct URL Method

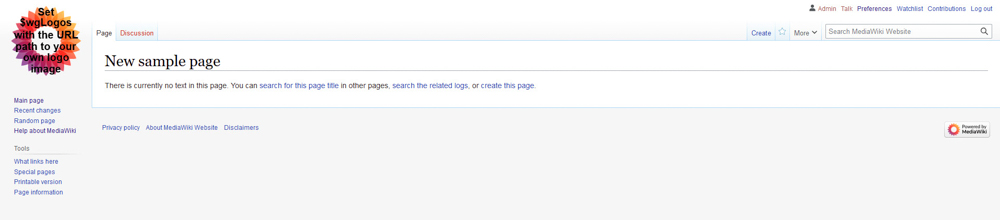
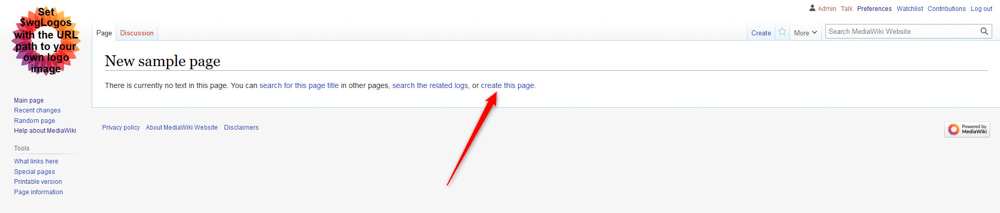
In case you know the exact URL of a page you want to create, then type it in your web browser. Once you do so, MediaWiki will search for such a page and won’t find any results, so instead of the given page, the platform will inform you that there’s currently no text on this page and you can search for it in other places, search the related logs or create the page:

MediaWiki Search Results for a New Page

Once you see this page, click on the Create this page button:

Create a New Page in MediaWiki by cliking the link


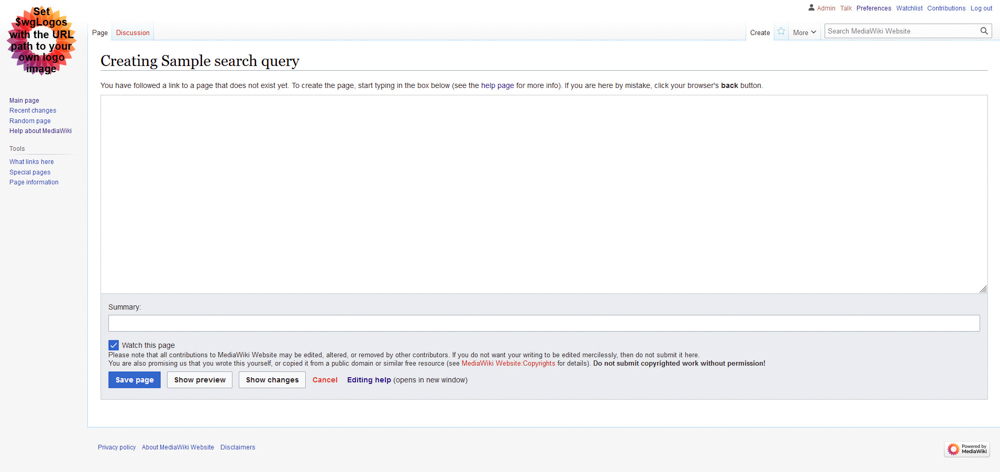
Once you do, MediaWiki will redirect you to the page editor where you can start working on your new page:

Open the MediaWiki Page Editor


Conclusion

Creating pages in MediaWiki is simple and you can use any of the three methods to add new pages with content for your MediaWiki project.

Related:

Was this post helpful?

i

Relevant tags:

Connect

Latest posts:

How to Log in to TYPO3

TYPO3 is a powerful CMS platform that allows you to build a fully functional and aesthetically pleasing website. The platform is known for its versatility and long list of features. In another article, we shared how you can install TYPO3 on any of the AwardSpace...

How to Install TYPO3

You can install TYPO3 on all the AwardSpace hosting services—free web hosting, shared hosting, and premium plans such as Semi-Dedicated Hosting and VPS hosting. All AwardSpace hosting services are tailored to run TYPO3 smoothly, regardless of your website’s size or...

How to Add Products to Zen Cart: A Step-By-Step Guide

After you install Zen Cart and log in to the admin panel, you can start adding products to your online store. This guide walks you through the process step by step.   How to Add Products to Zen Cart To add a product to Zen Cart, you need to follow a few simple...

How to Log in to Zen Cart

Once you install Zen Cart, you can log in to the CMS and start working on your project. The login process is simple and is comprised of only a few steps.   How to Log in to Zen Cart There are two ways to log in to Zen Cart: Method 1: Login by following the...

How to Install Zen Cart

You can install Zen Cart with any of the AwardSpace hosting plans—free web hosting, shared hosting, and advanced plans such as Semi-Dedicated Hosting and VPS hosting. Each AwardSpace hosting service is tailored to run Zen Cart flawlessly and smoothly, regardless of...


Create a website for free!


Free forever

Our Support Team is Here to Help


If you need any questions answered, don't hesitate and contact us. Click the button below and follow the instructions. You can expect an answer within an hour.


Contact AwardSpace


iNewest knowledge base articles

How to Log in to TYPO3

TYPO3 is a powerful CMS platform that allows you to build a fully functional and aesthetically pleasing website. The platform is known for its versatility and long list of features. In another article, we shared how you can install TYPO3 on any of the AwardSpace...

How to Install TYPO3

You can install TYPO3 on all the AwardSpace hosting services—free web hosting, shared hosting, and premium plans such as Semi-Dedicated Hosting and VPS hosting. All AwardSpace hosting services are tailored to run TYPO3 smoothly, regardless of your website’s size or...

How to Add Products to Zen Cart: A Step-By-Step Guide

After you install Zen Cart and log in to the admin panel, you can start adding products to your online store. This guide walks you through the process step by step.   How to Add Products to Zen Cart To add a product to Zen Cart, you need to follow a few simple...

How to Log in to Zen Cart

Once you install Zen Cart, you can log in to the CMS and start working on your project. The login process is simple and is comprised of only a few steps.   How to Log in to Zen Cart There are two ways to log in to Zen Cart: Method 1: Login by following the...

How to Install Zen Cart

You can install Zen Cart with any of the AwardSpace hosting plans—free web hosting, shared hosting, and advanced plans such as Semi-Dedicated Hosting and VPS hosting. Each AwardSpace hosting service is tailored to run Zen Cart flawlessly and smoothly, regardless of...

How to Log in to phpBB

Now that you have installed phpBB, it is time to learn how to log in to the system and start working with it. The process is simple and is comprised of only a few steps.   How to Log in to phpBB There are several ways you can use to log in phpBB. The process...

Even more web tutorials

Check out our web hosting knowledge base and the WordPress tutorials to learn more, and be better prepared for your website creation and maintenance journey.