How to Enable Ioncube Loader

Home » Knowledge Base » Control Panel » PHP Settings » How to Enable Ioncube Loader

Enabling Ioncube Loader on your server is crucial for running encrypted PHP files. At AwardSpace, we understand the importance of a quick and easy setup process for your web hosting needs. Whether you are a developer looking to secure your code or a business running complex PHP applications, enabling Ioncube Loader can significantly enhance your server’s functionality and security. In this guide, we will walk you through the simple steps to enable Ioncube Loader via our intuitive control panel.

Step-by-Step Instructions

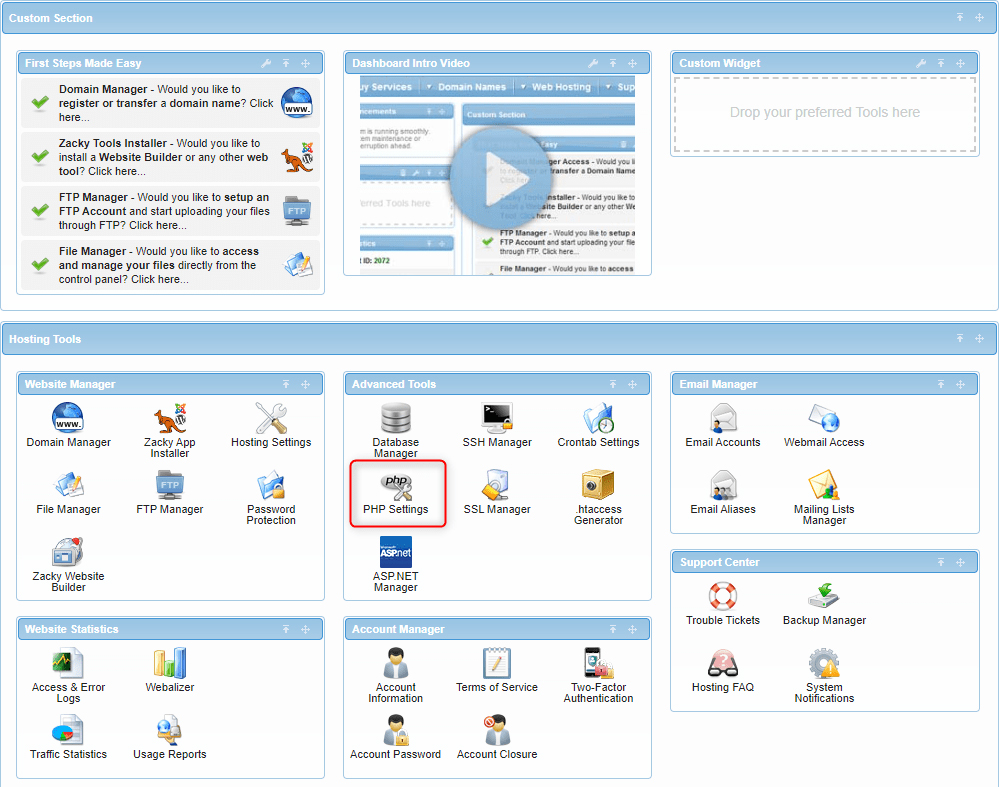
  1. Log in to your AwardSpace account and navigate to the PHP Settings menu.The PHP Settings menu in the hosting control panel.
  2. Enter the php.ini configuration options that are available in the PHP settings section.The menu in which you configure the PHP settings.
  3. Within the php.ini configuration, locate the line containing:
    ;zend_extension = /usr/local/ioncube/ioncube_loader_lin_8.1.so
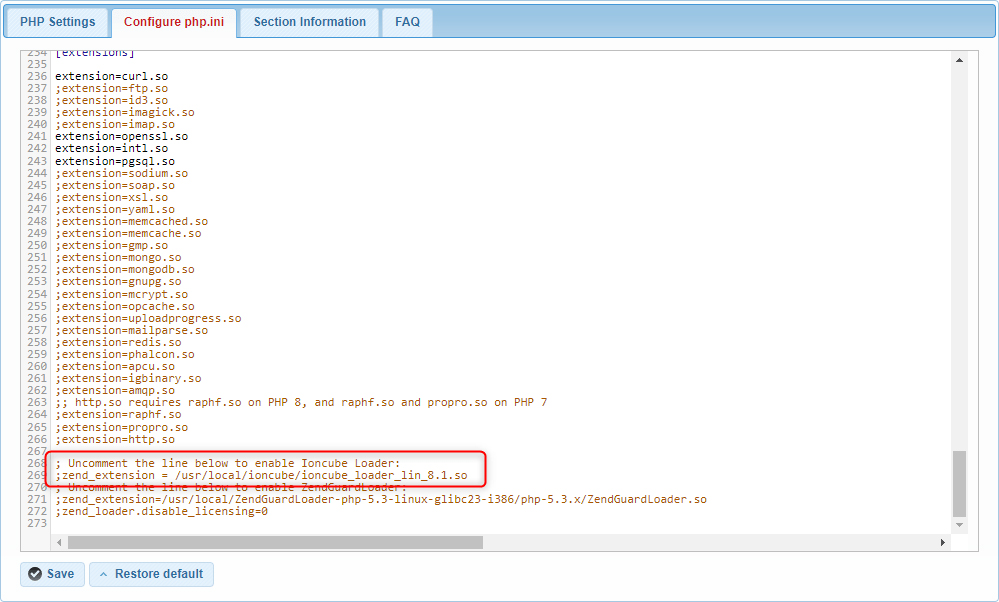
    The disabled Ioncube loader extension within the PHP ini file.
  4. Remove the semicolon (;) at the beginning of the line to uncomment it. The line should now look like this:
    zend_extension = /usr/local/ioncube/ioncube_loader_lin_8.1.so
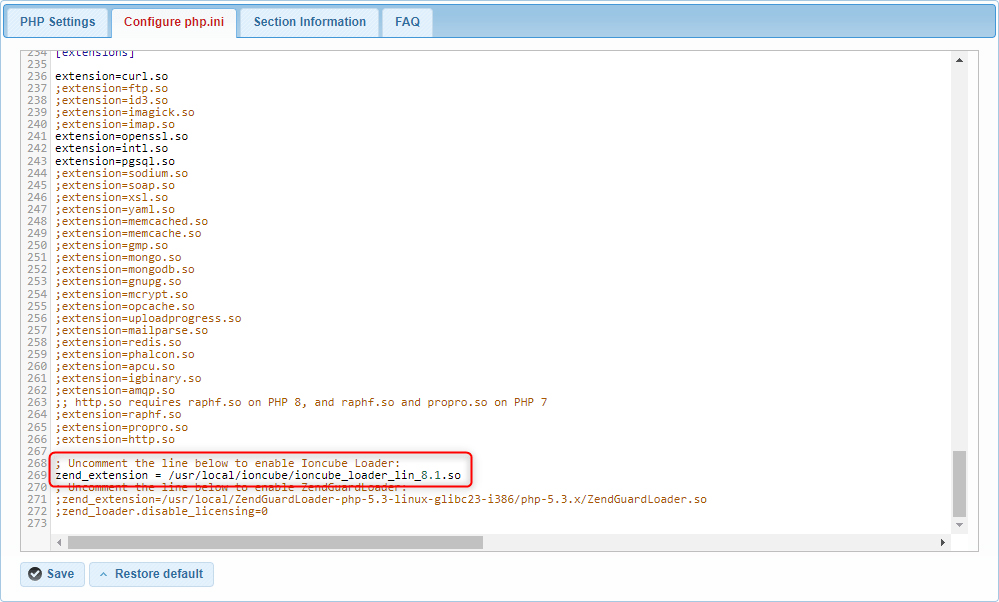
    The enabled Ioncube loader extension within the PHP ini file.
  5. After editing the php.ini file, ensure you save the changes.

Conclusion

Enabling Ioncube Loader ensures your PHP applications that require encrypted files run smoothly. By following these steps, you can easily enable Ioncube Loader through AwardSpace‘s user-friendly control panel. If you encounter any issues or need further assistance, our support team is here to help.

At AwardSpace, we strive to provide reliable and efficient web hosting solutions tailored to your needs. With features like Ioncube Loader, we ensure that your website performs optimally and securely. Thank you for choosing AwardSpace as your trusted hosting provider. We look forward to supporting your web projects and helping you achieve success online. For further assistance or more advanced configurations, feel free to explore our AwardSpace Hosting Plans and additional resources or contact our support team.

Was this post helpful?

i

Relevant tags:

Connect

Latest posts:

How to Find Modules in MediaWiki

After you install MediaWiki, log in to the CMS, and presumably install extensions, it is time to learn how to find modules in MediaWiki.   What are MediaWiki Modules Modules in MediaWiki are Lua-based scripts that allow you to add various functionalities to your...

How to Fix MediaWiki Internal Error: A Step-By-Step Guide

MediaWiki Internal Error message can be very frustrating and can significantly harm your MediaWiki project. Luckily, the issue can be fixed in a few easy-to-follow steps to get your website up and running in no time. There are various causes for the issue: Incorrect...

How to Add Infobox Module in MediaWiki

The Infobox in MediaWiki is a handy tool for presenting content and key information in a structured and visually pleasing way. Infoboxes are useful for any kind of MediaWiki project and can provide your readers with a quick snapshot of important data and details. In...

How to Install a MediaWiki Skin

In MediaWiki, skins determine the visual appearance of your wiki website. Skins define how content is presented to users and include such settings for the overall website layout, typography, color scheme, and more. By default, when you install MediaWiki, the platform...

How to Create a Page in MediaWiki

Creating pages in MediaWiki is а core feature that allows you to add content to your MediaWiki website. Whether you are adding details for a project, contributing to a knowledge base, or anything else, learning how to create a page in MediaWiki is crucial for your...


Create a website for free!


Free forever

Our Support Team is Here to Help


If you need any questions answered, don't hesitate and contact us. Click the button below and follow the instructions. You can expect an answer within an hour.


Contact AwardSpace


iNewest knowledge base articles

How to Find Modules in MediaWiki

After you install MediaWiki, log in to the CMS, and presumably install extensions, it is time to learn how to find modules in MediaWiki.   What are MediaWiki Modules Modules in MediaWiki are Lua-based scripts that allow you to add various functionalities to your...

How to Fix MediaWiki Internal Error: A Step-By-Step Guide

MediaWiki Internal Error message can be very frustrating and can significantly harm your MediaWiki project. Luckily, the issue can be fixed in a few easy-to-follow steps to get your website up and running in no time. There are various causes for the issue: Incorrect...

How to Add Infobox Module in MediaWiki

The Infobox in MediaWiki is a handy tool for presenting content and key information in a structured and visually pleasing way. Infoboxes are useful for any kind of MediaWiki project and can provide your readers with a quick snapshot of important data and details. In...

How to Install a MediaWiki Skin

In MediaWiki, skins determine the visual appearance of your wiki website. Skins define how content is presented to users and include such settings for the overall website layout, typography, color scheme, and more. By default, when you install MediaWiki, the platform...

How to Create a Page in MediaWiki

Creating pages in MediaWiki is а core feature that allows you to add content to your MediaWiki website. Whether you are adding details for a project, contributing to a knowledge base, or anything else, learning how to create a page in MediaWiki is crucial for your...

How to Install MediaWiki Extensions

Now that you have installed MediaWiki and learned how to log in to the CMS, it is time to extend MediaWiki's functionality via extensions. MediaWiki extensions are sets of files that add various types of functionality to your MediaWiki website. You can use extensions...

Even more web tutorials

Check out our web hosting knowledge base and the WordPress tutorials to learn more, and be better prepared for your website creation and maintenance journey.