
The navigation menu is a crucial part of every website. Those, created with WordPress make no exception. In order to create a navigational structure for your website, and improve the user experience you need to find out how to work with the WordPress menu.
WordPress Menu
WordPress features a comprehensive and effective system for creating menus, enabling you to craft not only the primary navigation menu typically found at the top of your page but also versatile sidebar and footer menus.
Many WordPress themes offer multiple types of menus and may include unique in-theme menu construction capabilities. However, the standard menu creation interface provided by WordPress is sufficient for most themes available.
It’s common to encounter websites that utilize more than one navigational menu. Often, there’s a primary menu that dominates in size and importance, accompanied by a secondary menu. This secondary menu is usually positioned at the top of the page, characterized by a smaller font and reduced overall size. If your chosen theme supports dual menus, they are often clearly labeled to avoid confusion, typically referred to as Primary and Secondary, though other naming conventions may be used.
Should you wish to implement a menu in your website’s sidebar that differs from these primary or secondary options, you’ll need to create and then not assign it a specific role (neither Primary nor Secondary). Instead, you will integrate it using the sidebar widget feature.
This overview introduces the basics, but let’s dive deeper into how you can maximize the use of WordPress menus to enhance your site’s navigational structure.
Accessing the Menu Interface
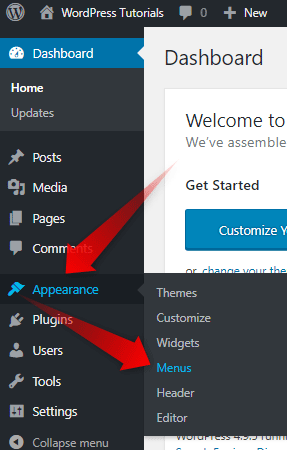
To start working on the menu of your website, first, you need to log in to your WordPress website. After that, go to Appearance -> Menus. This is where you create and manage the menus of your website.
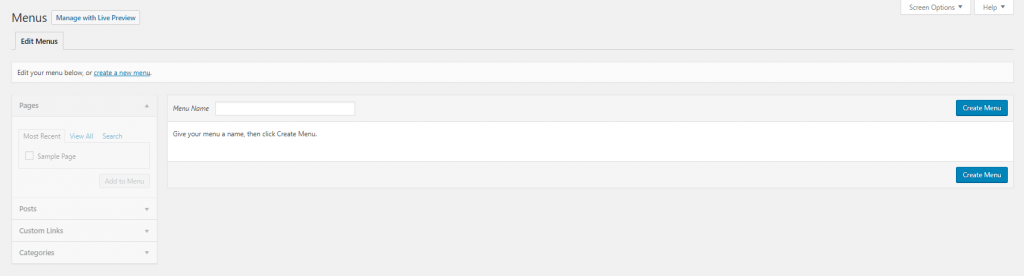
If you haven’t already, create a new menu.
Adding Items to Your Menu
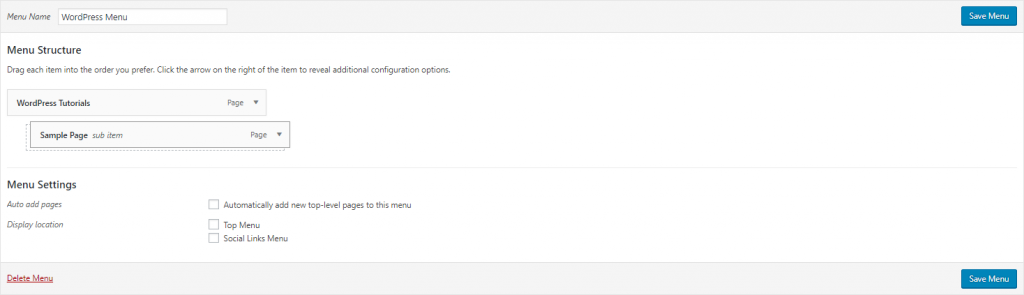
To add items, first, you need to choose the menu that you want to enrich (or create). After that, focus your attention on the left side of the menu editor. There you’ll see options to add different types of links to your menu, including Pages, Posts, Custom Links (for external links), and Categories. Select the items you want to add and click Add to Menu.

Custom Links: To add a custom link, such as a link to another website or a specific section of your site, use the Custom Links option. Enter the URL and the link text, then click Add to Menu.
Arrange your WordPress Menu Elements
In the WordPress menu creation interface, the components you add to your menu are listed from top to bottom. However, it’s important to note that these items will be displayed from left to right on the front end of your website. This arrangement is crucial for ensuring a logical and user-friendly navigation structure.
Even though careful planning can help you sequence the menu items correctly as you add them, WordPress provides a flexible way to rearrange these items with minimal effort.
The process is straightforward: simply use the drag-and-drop feature.
When you hover over an item that’s already been added to the menu, your cursor will change to a drag-and-drop icon. This visual cue indicates that you can click and hold the menu item to move it. You’re then free to drag the item to a new position within the menu or adjust its hierarchy by dragging it slightly to the right under another item to create a dropdown menu.
This drag-and-drop functionality allows for easy adjustments and fine-tuning of your site’s navigation menu, ensuring it perfectly aligns with your site’s structure and user experience goals.
How to Create a Dropdown Menu in WordPress
Creating a sub-menu that appears when you hover over a menu item is a simple yet effective way to enhance navigation on your WordPress website. This feature is commonly seen across various websites, offering a neat way to organize content under broader categories.
To achieve this hover effect and create a sub-menu in WordPress, you’ll need to organize the menu items you want to include in the sub-menu directly beneath their parent item in the menu structure.
Find the menu items you wish to appear in the sub-menu. Click and hold one of these items, then drag it slightly to the right, positioning it just below the parent menu item. This slight indentation indicates that the item is now a sub-item of the parent.
Setting Menu Locations
Different themes offer different menu locations (such as the main menu, footer menu, etc.). At the bottom of the menu editor, you’ll find Display location options where you can assign your menu to any of the available locations.
Make sure that you click the Save Menu button, once you are happy with the menu you’ve created. (You can click the Save Menu button, before you are completely ready, just to make sure, you won’t loose your progress).
Tips for Effective Menu Design
- Кeep It Simple: Aim for a menu that’s easy to navigate. Too many items can overwhelm visitors.
- Use Descriptive Labels: Menu labels should be clear and concise, giving visitors a good idea of what content they can expect to find.
- Consistent Structure: Keep your menu structure logical and consistent across your website to enhance usability.
If you need more in-depth directions, check our previously published article on How Does WordPress Menu Work
If you feel like you are ready to go further in the CMS, feel free to browse our WordPress Tutorials section.
