How to Enable Outgoing Connections

Home » Knowledge Base » Control Panel » Website Manager » How to Enable Outgoing Connections

Outgoing connections are a necessary feature for modern websites. They are used to establish a connection to external servers. In this article, we will review how to enable the outgoing connection for your hosting account.


Enabling outgoing connections

The outgoing connections are a premium feature and thus are available only for our Premium Hosting Plans. If you are using the Free Hosting Plan and you would like to enable them you will first have to upgrade your plan.

To enable the outgoing connections for your account simply follow the steps below:

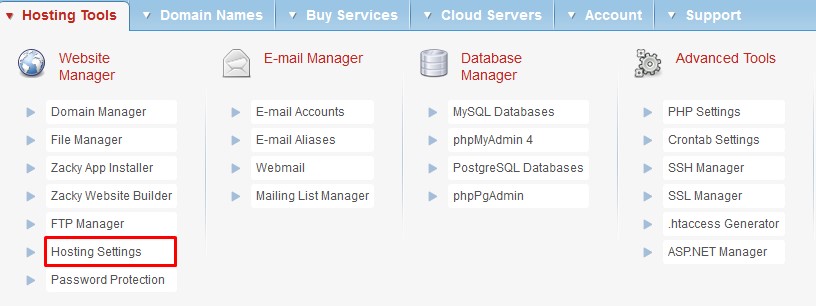
  1. Login to your Hosting Control Panel
  2. From the Hosting Tools menu open the Hosting Settings page
  3. Scroll down to Firewall Options and enable the HTTP Outgoing connections
outgoing-connections

Currently, you can only enable HTTP(s) Outgoing connections from the Hosting control panel. If you would like to establish an SMTP connection please refer to our article here.


Outgoing connections are enabled but my website still cannot connect to the external server. Why?

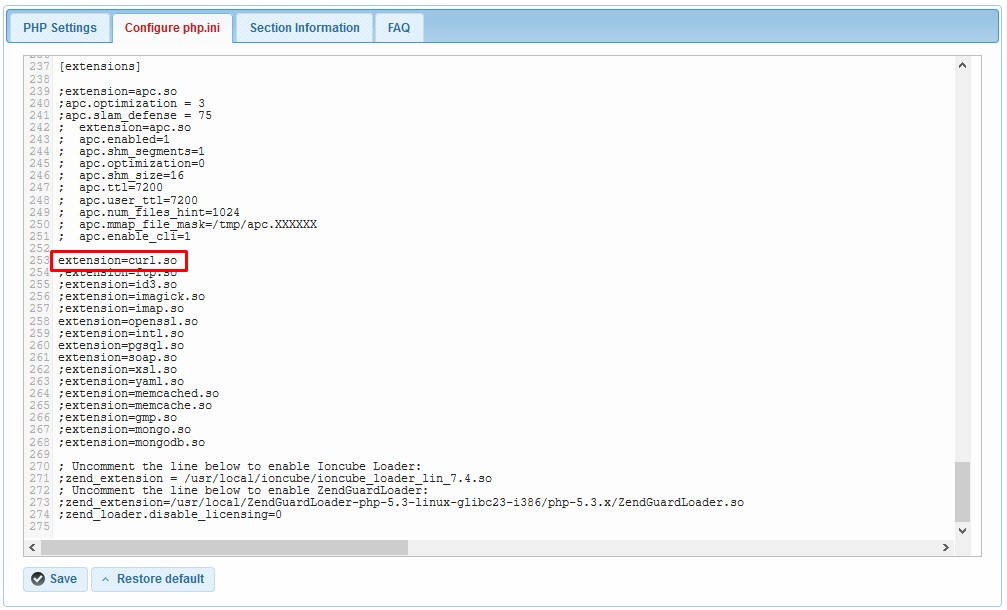
The most common reason for your website to not establish a connection to an external server, after you have enabled the outgoing connections would be if the PHP extension curl is disabled.

To save you the extra step we have the curl extension enabled by default on all paid hosting plans. This can be seen inside the php.ini file from the PHP Settings page. The settings inside php.ini are global for your hosting account. Because of this, having a php.ini file inside your website directory would overwrite the settings inside the global php.ini file.

php-ini-file

To make sure that all changes inside your global php.ini are in effect is to make sure that you do not have any php.ini files inside your website directory. A similar example would be the default Opencart installations which have php.ini files in their directory that would prevent your website from connecting to external servers.

To solve this all you need to do is access the website directory and remove the php.ini file(s).


Still not able to connect to external servers?

Although all of this should be enough for your site to establish a connection to an external server, there are still some cases where you might experience issues. For example a blocked network or corrupted file. Our technical support team would be happy to assist you with troubleshooting the issue.

If you have followed our articles for activating the outgoing connections and your website still does not connect, we would recommend you to contact our technical support via Trouble Ticket or email support@supportindeed.com.

Was this post helpful?

i

Relevant tags:

Connect

Latest posts:

How to Log in to Zenphoto

Zenphoto is a handy CMS that helps you build a beautiful and fully functional gallery website. The app is widely used, thanks to its ease of use and great versatility. In another article, we shared how you can install Zenphoto on any of the AwardSpace hosting plans,...

How to Insall Zenphoto

Zenphoto is a handy CMS that allows you to build a gallery-based website. The platform is easy to use and has many features that allow you to manage your online gallery in numerous ways. Zenphoto comes as a free feature with each AwardSpace hosting plan, and you can...

How to Log in to TYPO3

TYPO3 is a powerful CMS platform that allows you to build a fully functional and aesthetically pleasing website. The platform is known for its versatility and long list of features. In another article, we shared how you can install TYPO3 on any of the AwardSpace...

How to Install TYPO3

You can install TYPO3 on all the AwardSpace hosting services—free web hosting, shared hosting, and premium plans such as Semi-Dedicated Hosting and VPS hosting. All AwardSpace hosting services are tailored to run TYPO3 smoothly, regardless of your website’s size or...

How to Add Products to Zen Cart: A Step-By-Step Guide

After you install Zen Cart and log in to the admin panel, you can start adding products to your online store. This guide walks you through the process step by step.   How to Add Products to Zen Cart To add a product to Zen Cart, you need to follow a few simple...


Create a website for free!


Free forever

Our Support Team is Here to Help


If you need any questions answered, don't hesitate and contact us. Click the button below and follow the instructions. You can expect an answer within an hour.


Contact AwardSpace


iNewest knowledge base articles

How to Log in to Zenphoto

Zenphoto is a handy CMS that helps you build a beautiful and fully functional gallery website. The app is widely used, thanks to its ease of use and great versatility. In another article, we shared how you can install Zenphoto on any of the AwardSpace hosting plans,...

How to Insall Zenphoto

Zenphoto is a handy CMS that allows you to build a gallery-based website. The platform is easy to use and has many features that allow you to manage your online gallery in numerous ways. Zenphoto comes as a free feature with each AwardSpace hosting plan, and you can...

How to Log in to TYPO3

TYPO3 is a powerful CMS platform that allows you to build a fully functional and aesthetically pleasing website. The platform is known for its versatility and long list of features. In another article, we shared how you can install TYPO3 on any of the AwardSpace...

How to Install TYPO3

You can install TYPO3 on all the AwardSpace hosting services—free web hosting, shared hosting, and premium plans such as Semi-Dedicated Hosting and VPS hosting. All AwardSpace hosting services are tailored to run TYPO3 smoothly, regardless of your website’s size or...

How to Add Products to Zen Cart: A Step-By-Step Guide

After you install Zen Cart and log in to the admin panel, you can start adding products to your online store. This guide walks you through the process step by step.   How to Add Products to Zen Cart To add a product to Zen Cart, you need to follow a few simple...

How to Log in to Zen Cart

Once you install Zen Cart, you can log in to the CMS and start working on your project. The login process is simple and is comprised of only a few steps.   How to Log in to Zen Cart There are two ways to log in to Zen Cart: Method 1: Login by following the...

Even more web tutorials

Check out our web hosting knowledge base and the WordPress tutorials to learn more, and be better prepared for your website creation and maintenance journey.