Last week we talked about WordPress Multisite. What is it good for, when you will need it and when you won’t.
Today we’ll find out how to manually establish your first WordPress Multisite.
To do so, we’ll go through a number of steps. If you are not an experienced webmaster, the steps will seem a bit intimidating at first but I promise you, there is nothing to worry about.
There is a bit of code copying and pasting. A bit of adjusting. But you’ll cope with it.
By following this tutorial on how to establish WordPress Multisite you’ll find yourself an owner of a website network, long before you expected to.
We have a lot to cover, so let’s dive in.
Enabling WordPress Multisite Network Feature
When you Install WordPress the Multisite Network feature is built-in. But you’ll have to enable it. Once you’ve installed WordPress, you can go to the File Manager and start the Multisite enabling process.
NB! Before proceeding, I want to urge you to create a backup of the following files:
/home/www/domainname.com/wp-config.php
/home/www/domainname.com/.htacces
Now that you have the needed backups, you can continue without any worries about the potential mistakes.
The first thing you have to do is to add two lines of code in the wp-config.php file.
Once you open the file, scroll to the bottom of the code. Look for the line which says:
/* That’s all, stop editing! Happy blogging. */
Here is what you can expect to see:
After you found this particular line of code, you have to paste the following just above it:
/* Multisite */
define( ‘WP_ALLOW_MULTISITE’, true );
Save the changes.
You’ve enabled the feature.
Now you have to adjust your WordPress Multisite Network and make it work.
Setting up WordPress Multisite Network
After you’ve enabled the Multisite Network Feature, in the menu in your admin panel, a new option will occur.
But before interacting with it, you have to deactivate all of your plugins.
Go to Plugins -> Installed Plugins. Select all of them, and choose the bulk deactivation option. Click Apply.
After doing this, you have to configure your Network. While setting the network is a fairly straightforward process, there are a few things that you have to know if this is your first time setting a WordPress Multisite Network.
Head to Tools -> Network Setup.
Here is what you should expect to see, once on the page:
Now you have to choose the domain structure of your Multisite Network. It could be either
Sub-domains or Sub-directories. Choose the network title. And make sure the inserted email address is correct.
Click the blue Install button at the bottom of the page.
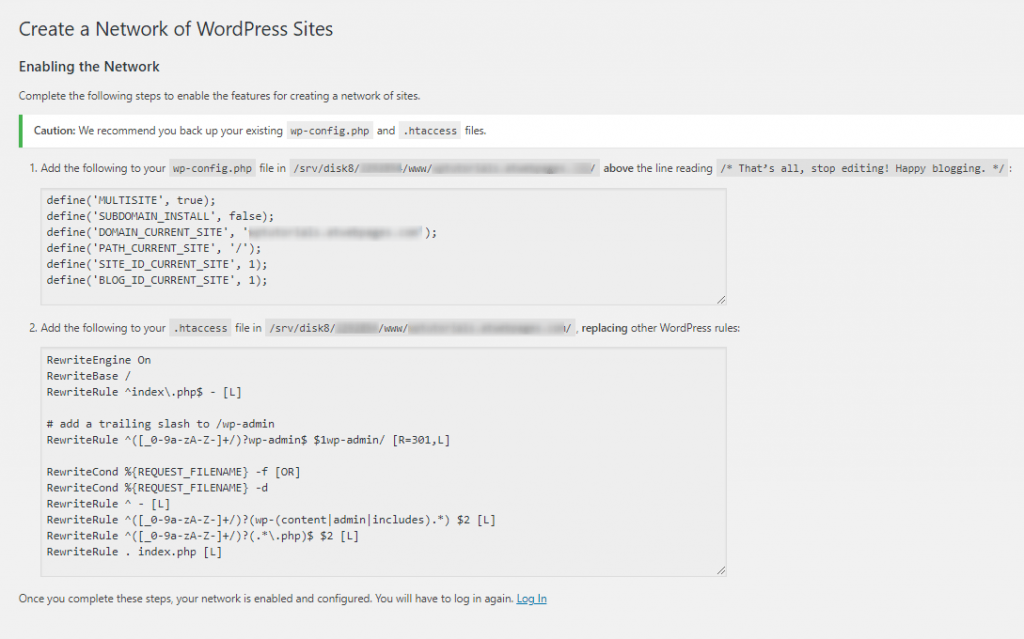
A new page will load. Here is what you’ll see:
The code on the upper part of the page, you’ll have to add to your in the wp-config.php file, right
above the line reading /* That’s all, stop editing! Happy blogging. */
The other piece of code, you’ll have to add to your .htaccess file, replacing the already existing text
in there.
Now just go back to your WordPress Website and log in again.
Configuring Network Settings
Your WordPress Multisite is already set up. What follows is the configuring of the network.
Once, you are back to the WordPress Admin Panel, you’ll figure that something is different.
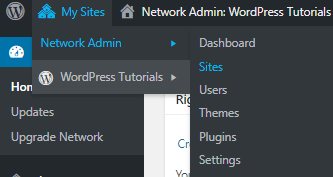
On the strip at the top of the Admin Panel, you’ll see a new option. It says “My Sites” and there you can find the Network Dashboard.
You have to go there in order to create (add) a new website to the network.
Once you’ve opened the Network Dashboard, the main menu of the WordPress Admin Panel (the one on the left) will change. There will be fewer options, but they are general options for the Network as a whole.
To configure network settings, click on the ‘Settings’ link in the admin sidebar.
You’ll see a vast number of options when scrolling down. Make sure all the tunable settings are defined by your taste and click the Save Changes button at the bottom of the page.
Adding New Sites to Your WordPress Multisite Network
Adding a site to the network is a simple process. You have to go to My Sites->Network Admin-> Sites or just click on My Sites which will lead you to the Network Dashboard page.
By clicking on the Sites link, you’ll be directed to the add site page.
You’ll see a list of all the added sites (as for now, just your main website).
Click the Add New button, right next to the page title.
As you can see, for this WordPress Multisite tutorial I’ve chosen to make the network of sites in sub-directories, rather than subdomains. If you choose to set your network in subdomains, you’ll see a slightly different view. Nevertheless, the process is the same.
After you’ve chosen the name of the site you wish to create, you can add an admin email address other than the one you are currently using to manage your multisite.
If the email address is not currently in use by another user, WordPress will create a new user and send the password and username to the email address you’ve entered.
When you are ready, click on the Add Site button.
A new site will be added to your multisite network. As the network admin, you will receive a new site registration email.
If you created a new user, then that user will receive an email with instructions to set a password and log in.
Adding Themes and Plugins to Your Multisite Network
By default, individual site administrators in a multisite network cannot install themes and plugins on their own. As the network admin, also known as Super Admin, you can install plugins and themes and make those themes/plugins available to the sub-sites.
You already know how to add themes and install plugins.
Yet, once you have a Multisite Network, you can install themes on the main site (when in its Dashboard) and on the Network and enable them down the network.
The sites down the network(all except the main site) don’t have the rights to install themes and plugins. Yet, they can choose which of the enabled themes to use. And if you enabled Plugin Menu, the subsite’s admins will be able to activate or deactivate the installed plugins by their choice.


