In this article, we’re going to review the FTP Manager section and each of its features.
How to Create an FTP Account?
When you sign up for a website hosting plan, we automatically create a default FTP account on your behalf. Your default FTP account login details are the same as your Control Panel’s username (client ID number) and password.
In addition to being able to use your default FTP username, you can also set up an additional account on your FTP server. To add a new FTP account, please follow the below-mentioned steps:
- Log into your AwardSpace Control Panel.
- Visit the FTP Manager section.
- Fill in the appropriate fields.
- Finally, click on the Create FTP Account button.
Congratulations! You have successfully created a new FTP account.
Note: Our policy requires that you set up a unique password for every FTP username that you create in your Control Panel. It is also mandatory that you use complex passwords – your password must be at least 8 characters long and must contain both letters and numbers.
Note: If no FTP Path is assigned, the system will assign the default path to the FTP user account – /home/www/.
How Would I Go About Changing my Password?
To change the password for an FTP account, click on the Options icon right next to the corresponding FTP username and open the Password tab.
You will be prompted to type in and confirm your new password. To finalize the password change process, click Change Password.
What is a Hosting Path and How to Change It?
The Hosting (Directory) Path represents the access level of your FTP username for your hosting directories. A username with a Hosting Path /home/www/ has access and management rights over all files and folders on your FTP server.
If you want to give someone else (a friend of yours or your web developer) access to a specific directory on your server, you can use the FTP Manager’s Hosting Path feature to achieve that.
To assign a different directory path for a secondary FTP account, click on the Hosting Path tab and specify your destination folder in the Path field (as illustrated below).
How to download an FTP Configuration File?
Currently, there are three FTP configuration Files you can choose from:
- FileZilla
- CoffeeCup
- Cyberduck
To download the FTP configuration file for a specific FTP account, click on the FTP Account you wish to configure.
Open the FTP Configuration Files tab and click on the Download Config File button for your FTP client software.
A new dialog box will appear prompting you to specify your domain/sub-domain name.
In order to download the configuration file, simply click on the Yes button.
How to Import an FTP Configuration File?
You can follow the steps below to import a FileZilla configuration file:
-
- Obtain the FTP configuration .xml file from your FTP Manager area under Options > FTP Configuration Files.
- Launch FileZilla.
- Open the File menu and choose Import… from the drop-down menu.
-
- Locate the .xml file you’ve just downloaded and click Open.
- A new window will appear asking you to confirm your Import settings. Mark the Site Manager entries checkbox and press OK.
-
- Open the File menu and select Site Manager… or press Ctrl+S.
-
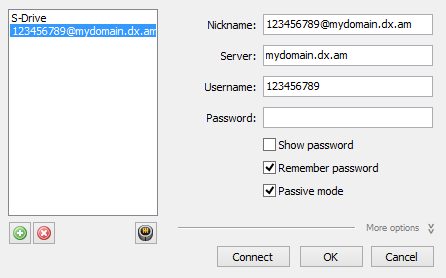
- In the left pane, under My Sites, click on the site you would like to connect to.
- Click Connect.
To import an FTP Configuration File in CoffeeCup Free FTP, perform the following actions:
-
- Obtain the FTP configuration .xml file from your FTP Manager area under Options > FTP Configuration Files.
- Start CoffeeCup.
- Open the File menu, select Server Profiles from the list and click Import….
-
- Locate the .xml file you’ve just downloaded and click OK.
-
- Open the File menu and click Manage Servers.
-
- In the left pane select the site you wish to connect to.
- Click Connect.
To install an FTP Configuration File in Cyberduck, please take these steps:
- Obtain the FTP configuration .xml file from your FTP Manager area under Options > FTP Configuration Files.
- Locate the .xml file you’ve just downloaded and double-click it.
Can I Create an FTP Username without my Client ID Number?
Our Shared hosting platform is configured in such a way, that your additional FTP usernames always start with your client ID followed by an underscore symbol. The only way to configure your own FTP usernames would be on a VPS plan.
Is It Possible to Delete my Default FTP Account?
Currently, our system does not support the deletion of default (primary) FTP accounts from a server. The only FTP accounts (usernames) that can be removed from a server are the ones that were manually created by the account owner.
To delete a secondary FTP username, open the Delete tab and press Delete.
You will see a confirmation dialog asking: This will delete the FTP Account. Are you sure?
Click Yes in order to finish the deletion process.


